First release.
There are still some minor graphical details to attend to (only in the user interface), but for a first version I think it's good enough.
Don't forget to click on the Update button once in a while.
Posts about the specifics of DNGDeblur:
- Introduction
- User Interface I
- User Interface II
- About the deblurring circles
Download
You can download DNGDeblur here.

Thursday, December 18, 2014
Sunday, December 14, 2014
DNGDeblur - The Circles
In this post I'll show you how the deblurring circles work.
Placing a circle
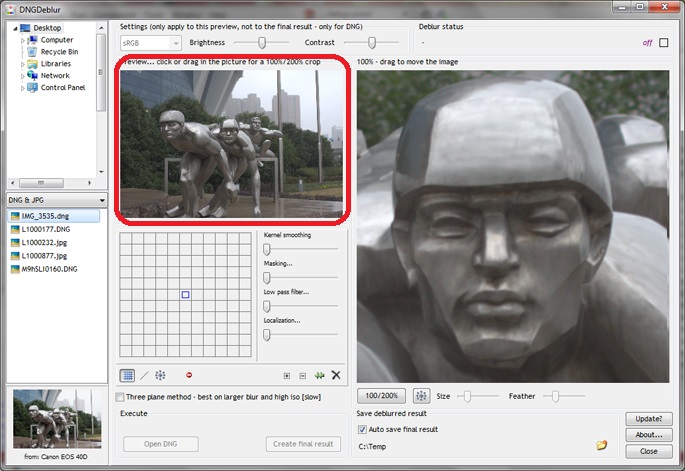
To place a circle on the photo, you first have to switch on the deblurring circles, by clicking the button outlined in red in the next screenshot.
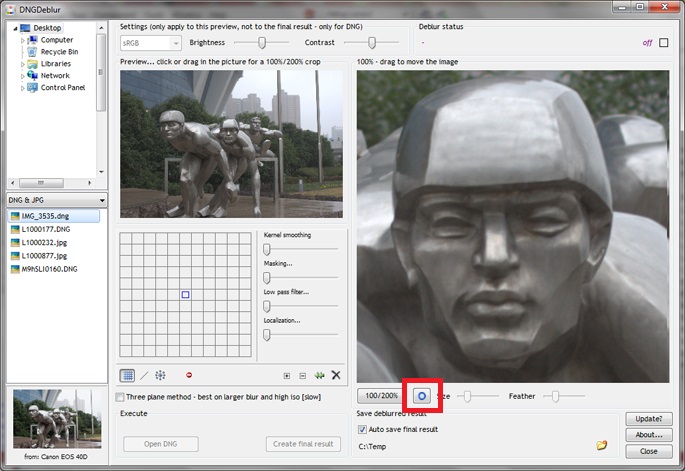 Button to turn on the deblur circle mode...
This circle button is an on / off button, and as long as it stays down, you are in 'deblur circle mode'. In that mode, the cursor is changed into a circle, as soon as you move your mouse over the bigger preview image. You then cannot drag the image with your mouse anymore (no more hand symbol).
To place a circle anywhere (after switching to deblur circle mode with the button), move the circle over the bigger preview and click with the left mouse button once, when you have the right position. At that point a circle will appear on the photo. You can place more than one circle: simply click again with the left mouse button.
The placed circle (and the cursor) will always be a fixed size. You can only change the size of the circle after it's placed on the photo.
Any deblurring you have done to the photo will at this point only be visible within the placed circle(s). See the next two screenshots, where I deliberately made the deblurring somewhat horrible, so you can see what happens after placing a circle.
 No circles placed, the whole photo is deblurred (ugly deblurring shown deliberately)...
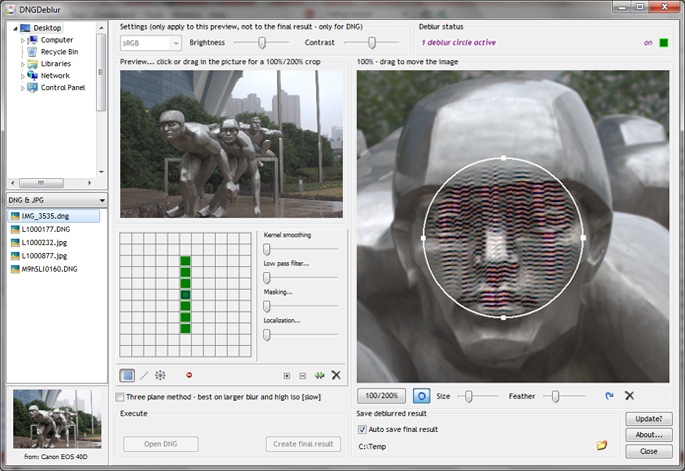 One circle placed, the deblurring is confined (ugly deblurring shown deliberately)...
Since you cannot drag the bigger preview image in deblur circle mode, if you need a circle on a part of the photo that's not visible, the easiest way is to navigate that part into view with the smaller preview image.
Selecting a circle
Before you can change the size of a circle or change its feathering, you have to select it. You can select the circle you want to change by clicking in it with the left mouse button. A selected circle has a thicker edge and shows four handles.
Moving a circle
You can move a circle by clicking in it with the left mouse button and holding the button. Then you can drag the circle to another position.
Resizing and feathering a circle
Next to the circle button (see first screenshot) you'll find two sliders. One is to increase or decrease the size of the selected circle, the other is to feather the selected circle. Note that the feathering works inwards and that every circle can have its own amount of feathering.
You can change the overall size of the circle with the slider, but you can also change the shape (and / or size) of the circle with the four handles on the edge of a selected circle.
If you do want to see the outline of the circles, but you don't want any of them selected, click the button next to the feather slider.
If you don't want to see the outline of the circles, click the 'deblur circle mode' button again so it switches off. You'll get back to the mouse hand (so you can drag the image) and you won't see the outline of the circle(s) anymore. However, the deblurring is still confined within the now invisible circles.
Deleting a circle
To delete a circle, make sure it's selected by clicking in it. Then click the delete button under the big preview picture. If you only had one circle, the deblurring will now be back to the total image.
Some remarks
The size and feathering are specific to each individual circle (meaning you can resize and feather every circle individually), however, all circles will use the same deblurring, set through the deblurring filter. Currently it's not possible to have a different type of deblurring per circle.
In the deblur status, on top of the bigger preview, you can see how many circles are placed on the photo.
The deselect and delete buttons, under the bigger preview, are only visible if there's a selected circle. The size and feather sliders are only enabled if there's a selected circle.
Download
You can download DNGDeblur here.
Previous posts about the specifics of DNGDeblur:
- User Interface II
- User Interface I
- Introduction
Placing a circle
To place a circle on the photo, you first have to switch on the deblurring circles, by clicking the button outlined in red in the next screenshot.
Button to turn on the deblur circle mode...This circle button is an on / off button, and as long as it stays down, you are in 'deblur circle mode'. In that mode, the cursor is changed into a circle, as soon as you move your mouse over the bigger preview image. You then cannot drag the image with your mouse anymore (no more hand symbol).
To place a circle anywhere (after switching to deblur circle mode with the button), move the circle over the bigger preview and click with the left mouse button once, when you have the right position. At that point a circle will appear on the photo. You can place more than one circle: simply click again with the left mouse button.
The placed circle (and the cursor) will always be a fixed size. You can only change the size of the circle after it's placed on the photo.
Any deblurring you have done to the photo will at this point only be visible within the placed circle(s). See the next two screenshots, where I deliberately made the deblurring somewhat horrible, so you can see what happens after placing a circle.
No circles placed, the whole photo is deblurred (ugly deblurring shown deliberately)...One circle placed, the deblurring is confined (ugly deblurring shown deliberately)...Since you cannot drag the bigger preview image in deblur circle mode, if you need a circle on a part of the photo that's not visible, the easiest way is to navigate that part into view with the smaller preview image.
Selecting a circle
Before you can change the size of a circle or change its feathering, you have to select it. You can select the circle you want to change by clicking in it with the left mouse button. A selected circle has a thicker edge and shows four handles.
Moving a circle
You can move a circle by clicking in it with the left mouse button and holding the button. Then you can drag the circle to another position.
Resizing and feathering a circle
Next to the circle button (see first screenshot) you'll find two sliders. One is to increase or decrease the size of the selected circle, the other is to feather the selected circle. Note that the feathering works inwards and that every circle can have its own amount of feathering.
You can change the overall size of the circle with the slider, but you can also change the shape (and / or size) of the circle with the four handles on the edge of a selected circle.
If you do want to see the outline of the circles, but you don't want any of them selected, click the button next to the feather slider.
If you don't want to see the outline of the circles, click the 'deblur circle mode' button again so it switches off. You'll get back to the mouse hand (so you can drag the image) and you won't see the outline of the circle(s) anymore. However, the deblurring is still confined within the now invisible circles.
Deleting a circle
To delete a circle, make sure it's selected by clicking in it. Then click the delete button under the big preview picture. If you only had one circle, the deblurring will now be back to the total image.
Some remarks
The size and feathering are specific to each individual circle (meaning you can resize and feather every circle individually), however, all circles will use the same deblurring, set through the deblurring filter. Currently it's not possible to have a different type of deblurring per circle.
In the deblur status, on top of the bigger preview, you can see how many circles are placed on the photo.
The deselect and delete buttons, under the bigger preview, are only visible if there's a selected circle. The size and feather sliders are only enabled if there's a selected circle.
Download
You can download DNGDeblur here.
Previous posts about the specifics of DNGDeblur:
- User Interface II
- User Interface I
- Introduction
Sunday, November 30, 2014
DNGDeblur - User Interface - II
In this post I'll write a bit more about the deblur filter - mainly the free grid - and about the sliders and what they do.
But first let me show you an option in DNGDeblur that might easily be overseen. It's only applicable to DNGs.
The one or three plane method for DNGs
You can see the option if you have opened a DNG. See the next screenshot, where it is surrounded by the red square.
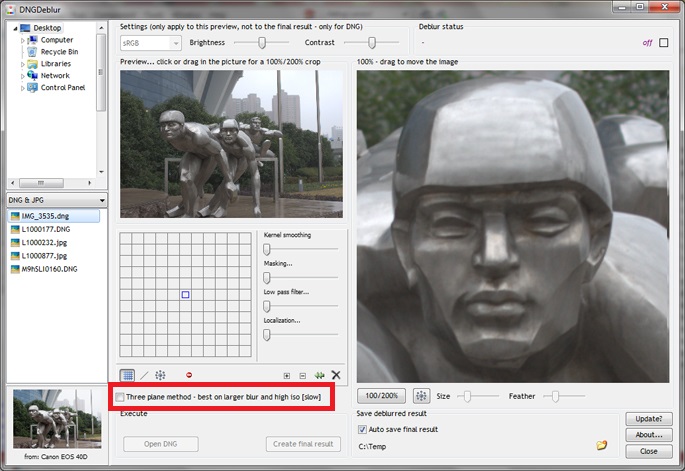 Option to select the slower three plane method for DNGs...
Default it's turned off, since it's slower than the one plane method.
The one plane method only deblurs the green plane of the DNG (after interpolating it in the background into a full monochrome photo). Then, through some comparing with the original DNG, the red and the blue pixels are interpolated back into the overall deblurred DNG. This method works very well for small blur (say within 2 or 3 pixels), but when the blur gets more extensive, it can lead to color loss, mainly in the reds, or to shifted colors overall. This is because the original DNG is used to base the new red and blue pixels on (in the deblurred DNG). But since the original is blurry, it will eventually lead to errors if the blur is too extensive. If that happens it's best to switch to the three plane method. In that method the green, red and blue are interpolated separately, into three monochrome photos. Then they're all deblurred, and the pixel values for the original green, red and blue are written back and thus form the deblurred DNG.
Both methods produce a non-interpolated DNG.
The single plane method is quite fast for the total DNG (although that will depend on your hardware and from which camera the DNG came), so the biggest downside of the three plane method is that it's three times as slow.
For monochrome DNGs the three plane option isn't available, because a monochrome DNG only contains one plane.
Also with JPEG, the option to select the three plane method is lacking, since JPEG already contains three interpolated planes if it's a color JPEG and 24-bits (not really, because it's a compressed format, but once it's decoded and shown on your screen). So with a JPEG, interpolating values back doesn't make sense. It's much easier to deblur the three complete planes and write them back in full. No interpolation necessary.
The one issue with deblurring DNGs and keeping them RAW
The biggest problem is out of my control, and that's the interpolation methods used. Every RAW converter will use a different interpolation algorithm. So the preview you see in DNGDeblur after deblurring, might not be accurate, compared to how your favorite RAW converter will show the deblurred DNG. To get a feel for the differences and how to get the best results out of DNGDeblur, you'll have to experiment a bit.
For the color preview I'm using a fairly simple interpolation, provided by Adobe. The interpolation in the background, to produce the monochrome planes for the actual deblurring - is done through the more sophisticated interpolation also used in DNGMonochrome.
More on the filter
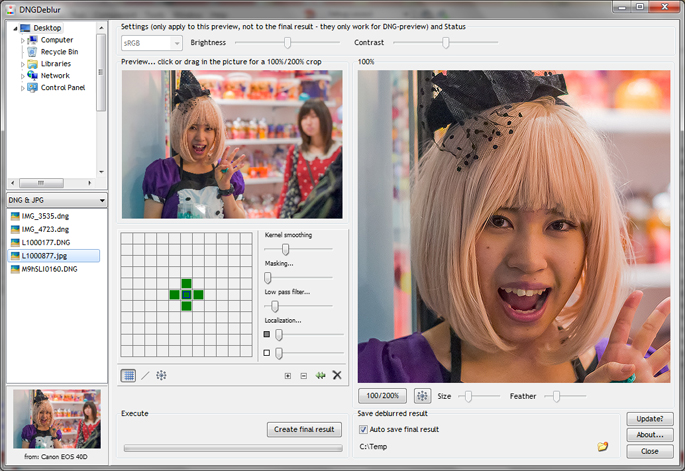
In the free grid you can click with the left mouse button, to turn on a single square, which will then turn green. Click again to turn the square off. You can also 'draw' in the grid by dragging with your mouse. If you drag with the right mouse button held down, you can turn off squares.
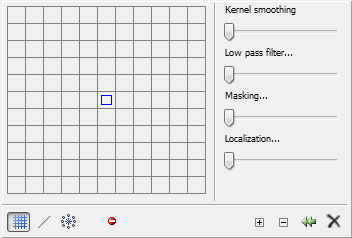
Deblur filter, showing the free grid...
Note that after each action (either clicking in the grid or changing any of the sliders), the preview on the right is recalculated, and that causes a noticeable lag. If you have selected the three plane method for DNG (see above in this post) that lag will last longer. Advice is to turn off the three plane method when you're trying to deblur and only turn it on (if necessary) right before creating the final output.
Tip: most deblurring through the free grid works quite well if you start in the center with a small cross and try to improve from there. Working too much off center usually doesn't lead to much good.
The deblur filter also contains a row of buttons at the bottom.
With the first three buttons you can switch between the free grid, the line and shapes tool, and the circle tool.
The fourth button isn't a button. When you move over it with your mouse (no need to click), the preview image will switch to the original. It's meant as a quick compare. When you drag the bigger preview image, or click in the smaller preview image, or use any slider to change settings, the deblurring will also temporarily drop away, when everything is recalculated. This 'mouse over button' is a lot quicker to compare the result with the original, since it doesn't involve a recalculation.
Then you get a plus and minus button, only shown if you have selected the free grid. With those buttons you can zoom in or out on the free grid.
Next to it there's a button to reset the distortion sliders all to zero.
With the last button you clear the free grid, or set the radius and angle sliders (in the line and circle tool) to zero.
I'm currently not too happy with the zooming of the free grid. I think the free grid should also be able to scroll. So that's another one for the todo list.
Battling distortions
The first thing you'll notice when you start using the deblurring filter, either by clicking in the free grid or using the shapes, is how horrible and mangled up your photo will look if you click too freely or use a radius that's too big.
The problem with Wiener filtering (see also previous post) is that it reacts very badly to noise and that it has a tendency to start ringing on edges.
That's where the sliders on the right come in. Be aware though - something I figured out by applying automation (which isn't in the first version yet) - that if you get a lot of ugly side effects, the kernel you clicked together simply isn't the most suitable. For mildly blurry photos there are solutions that work pretty well, without having to use the sliders a lot. The trick is finding those solutions (or a solution that comes close). That's why all the sliders default to zero. However, for most kernels at some point you will have to use them a little bit, so let me explain what they do.
Kernel smoothing
This procedure lowers the values of the kernel, from the center outwards. The more you slide, the stronger the values are toned down. The effect is that a lot of the edge ringing and other side effects start to fade away, without interfering too much with the actual deblur. Though, if you push this slider too far on smaller kernels, you might lose a lot of the deblurring effect.
Low pass filter
This slider has a very strong effect on the higher frequencies and acts as a form of noise reduction. You will probably have to use it a little bit on most of your deblurring attempts, but if you push it too far, the resulting photo will end up more blurry than your original.
Masking
This is quite a complex procedure, involving Sobel masking and applying Gaussian blur to the mask, in an attempt to focus the deblurring on the edges of your subject, without making the deblurring too harsh. It works quite well if the deblurring side effects aren't too gross. If you push this slider too far, you will end up with the original and not see any deblurring effect anymore. Also, using this slider moderately might make you lose the deblurring effect in the darker parts of the photo.
Localization
Localization keeps the pixels within a local area limited in value, to the minimum or maximum of a similar area taken from the original. Downsides are that you have to push the slider quite far for the best effect and that if you go all the way with the slider, you will lose most of the deblurring effects and you might see a block effect on the highlighted edges. Since it involves looking at the blurry original, this procedure will not work very well on more extensive blur. Before I developed the masking procedure (see previous slider), I used this one a lot, but after developing masking, it was not as useful anymore. I might drop this slider in future versions, so my advice for now is not to get too attached to it and try to correct only with the first three sliders.
Next post I will show how the deblur circles work.
Download
You can download DNGDeblur here.
Previous posts about the specifics of DNGDeblur:
- User Interface I
- Introduction
But first let me show you an option in DNGDeblur that might easily be overseen. It's only applicable to DNGs.
The one or three plane method for DNGs
You can see the option if you have opened a DNG. See the next screenshot, where it is surrounded by the red square.
Option to select the slower three plane method for DNGs...Default it's turned off, since it's slower than the one plane method.
The one plane method only deblurs the green plane of the DNG (after interpolating it in the background into a full monochrome photo). Then, through some comparing with the original DNG, the red and the blue pixels are interpolated back into the overall deblurred DNG. This method works very well for small blur (say within 2 or 3 pixels), but when the blur gets more extensive, it can lead to color loss, mainly in the reds, or to shifted colors overall. This is because the original DNG is used to base the new red and blue pixels on (in the deblurred DNG). But since the original is blurry, it will eventually lead to errors if the blur is too extensive. If that happens it's best to switch to the three plane method. In that method the green, red and blue are interpolated separately, into three monochrome photos. Then they're all deblurred, and the pixel values for the original green, red and blue are written back and thus form the deblurred DNG.
Both methods produce a non-interpolated DNG.
The single plane method is quite fast for the total DNG (although that will depend on your hardware and from which camera the DNG came), so the biggest downside of the three plane method is that it's three times as slow.
For monochrome DNGs the three plane option isn't available, because a monochrome DNG only contains one plane.
Also with JPEG, the option to select the three plane method is lacking, since JPEG already contains three interpolated planes if it's a color JPEG and 24-bits (not really, because it's a compressed format, but once it's decoded and shown on your screen). So with a JPEG, interpolating values back doesn't make sense. It's much easier to deblur the three complete planes and write them back in full. No interpolation necessary.
The one issue with deblurring DNGs and keeping them RAW
The biggest problem is out of my control, and that's the interpolation methods used. Every RAW converter will use a different interpolation algorithm. So the preview you see in DNGDeblur after deblurring, might not be accurate, compared to how your favorite RAW converter will show the deblurred DNG. To get a feel for the differences and how to get the best results out of DNGDeblur, you'll have to experiment a bit.
For the color preview I'm using a fairly simple interpolation, provided by Adobe. The interpolation in the background, to produce the monochrome planes for the actual deblurring - is done through the more sophisticated interpolation also used in DNGMonochrome.
More on the filter
In the free grid you can click with the left mouse button, to turn on a single square, which will then turn green. Click again to turn the square off. You can also 'draw' in the grid by dragging with your mouse. If you drag with the right mouse button held down, you can turn off squares.
Deblur filter, showing the free grid...
Note that after each action (either clicking in the grid or changing any of the sliders), the preview on the right is recalculated, and that causes a noticeable lag. If you have selected the three plane method for DNG (see above in this post) that lag will last longer. Advice is to turn off the three plane method when you're trying to deblur and only turn it on (if necessary) right before creating the final output.
Tip: most deblurring through the free grid works quite well if you start in the center with a small cross and try to improve from there. Working too much off center usually doesn't lead to much good.
The deblur filter also contains a row of buttons at the bottom.
With the first three buttons you can switch between the free grid, the line and shapes tool, and the circle tool.
The fourth button isn't a button. When you move over it with your mouse (no need to click), the preview image will switch to the original. It's meant as a quick compare. When you drag the bigger preview image, or click in the smaller preview image, or use any slider to change settings, the deblurring will also temporarily drop away, when everything is recalculated. This 'mouse over button' is a lot quicker to compare the result with the original, since it doesn't involve a recalculation.
Then you get a plus and minus button, only shown if you have selected the free grid. With those buttons you can zoom in or out on the free grid.
Next to it there's a button to reset the distortion sliders all to zero.
With the last button you clear the free grid, or set the radius and angle sliders (in the line and circle tool) to zero.
I'm currently not too happy with the zooming of the free grid. I think the free grid should also be able to scroll. So that's another one for the todo list.
Battling distortions
The first thing you'll notice when you start using the deblurring filter, either by clicking in the free grid or using the shapes, is how horrible and mangled up your photo will look if you click too freely or use a radius that's too big.
The problem with Wiener filtering (see also previous post) is that it reacts very badly to noise and that it has a tendency to start ringing on edges.
That's where the sliders on the right come in. Be aware though - something I figured out by applying automation (which isn't in the first version yet) - that if you get a lot of ugly side effects, the kernel you clicked together simply isn't the most suitable. For mildly blurry photos there are solutions that work pretty well, without having to use the sliders a lot. The trick is finding those solutions (or a solution that comes close). That's why all the sliders default to zero. However, for most kernels at some point you will have to use them a little bit, so let me explain what they do.
Kernel smoothing
This procedure lowers the values of the kernel, from the center outwards. The more you slide, the stronger the values are toned down. The effect is that a lot of the edge ringing and other side effects start to fade away, without interfering too much with the actual deblur. Though, if you push this slider too far on smaller kernels, you might lose a lot of the deblurring effect.
Low pass filter
This slider has a very strong effect on the higher frequencies and acts as a form of noise reduction. You will probably have to use it a little bit on most of your deblurring attempts, but if you push it too far, the resulting photo will end up more blurry than your original.
Masking
This is quite a complex procedure, involving Sobel masking and applying Gaussian blur to the mask, in an attempt to focus the deblurring on the edges of your subject, without making the deblurring too harsh. It works quite well if the deblurring side effects aren't too gross. If you push this slider too far, you will end up with the original and not see any deblurring effect anymore. Also, using this slider moderately might make you lose the deblurring effect in the darker parts of the photo.
Localization
Localization keeps the pixels within a local area limited in value, to the minimum or maximum of a similar area taken from the original. Downsides are that you have to push the slider quite far for the best effect and that if you go all the way with the slider, you will lose most of the deblurring effects and you might see a block effect on the highlighted edges. Since it involves looking at the blurry original, this procedure will not work very well on more extensive blur. Before I developed the masking procedure (see previous slider), I used this one a lot, but after developing masking, it was not as useful anymore. I might drop this slider in future versions, so my advice for now is not to get too attached to it and try to correct only with the first three sliders.
Next post I will show how the deblur circles work.
Download
You can download DNGDeblur here.
Previous posts about the specifics of DNGDeblur:
- User Interface I
- Introduction
Sunday, November 23, 2014
DNGDeblur - User Interface - I
In this post I will show the main elements of the user interface and talk a bit about the main part: the deblurring filter.
Next few screenshots might be unnecessary and self explanatory to most users, the program is not that complicated, but well, let's do this anyway. Just follow the red squares.
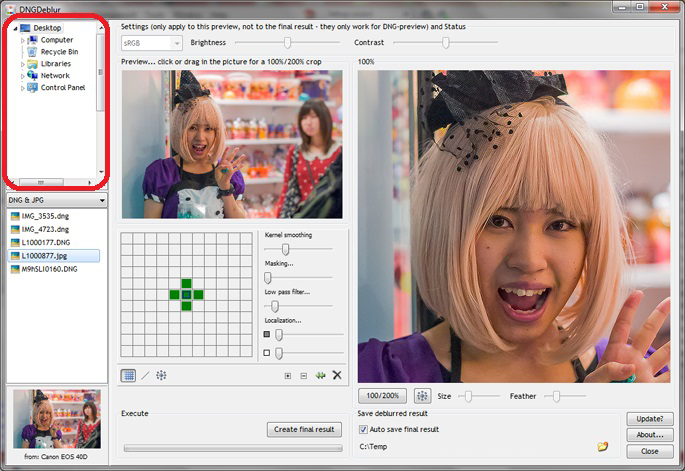 In this list you select the folder your DNGs or JPEGs are residing...
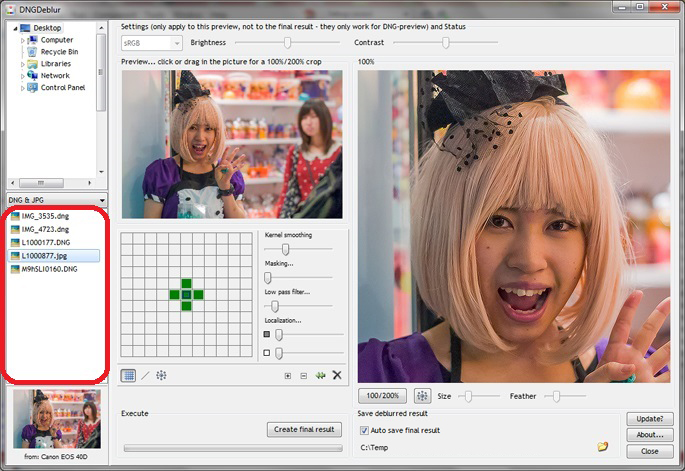 The DNGs and or JPEGs will then show up in this list...
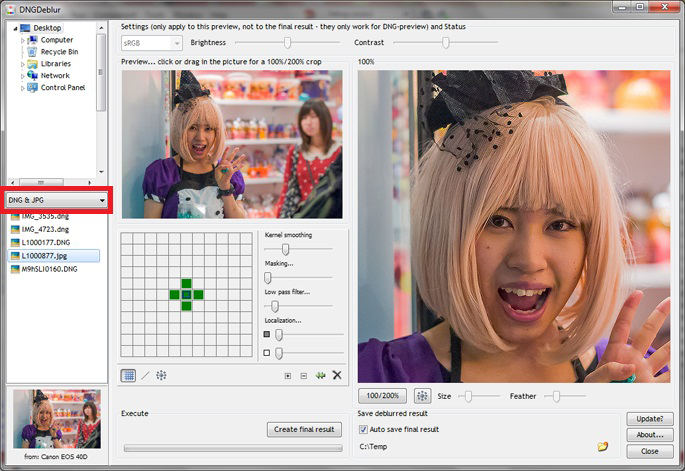 In the middle you can select if you want to see DNGs and JPEGs, or only DNGs or only JPEGs...
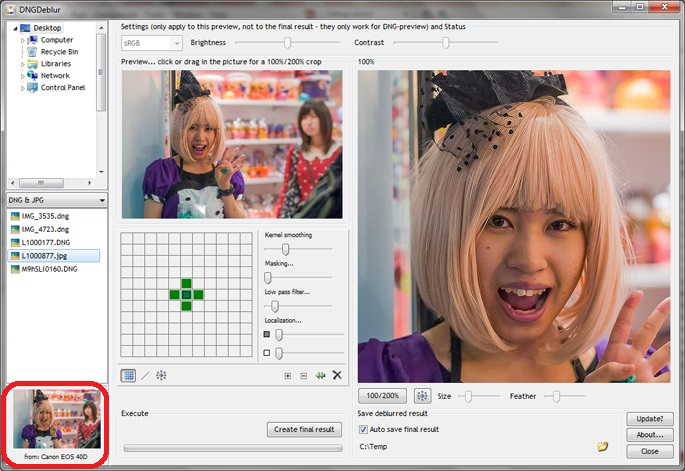 When you select a DNG or JPEG, you will see the preview image here... under it the camera model the photo was taken with. Note though that for JPEGs you will not see the camera model (yet), but an indication if the JPEG is 8-bits or 24-bits per pixel. This screenshot is from an earlier version and shows one of those many bugs I'm still solving, since it's a JPEG selected and this photo was not taken with the Canon 40D...
JPEG versus DNG selection
When you select a JPEG, it's loaded into the program almost instantly. So you will not only see the little preview - indicated in the previous screenshot - but also the bigger images. You can start to work on the photo almost immediately.
But when you select a DNG it first needs to be interpolated to get to a presentable result. That takes some time and it takes too long to do it automatically (then you would be stuck navigating the photo list every time you hit a DNG). So when you select a DNG, you first have to click the 'Open DNG' button, shown in the next screenshot, before you can start working on the photo.
 When you select a DNG you have to click 'Open DNG' before you can start working on the photo. This button won't show if you select a JPEG.
Be aware that the program currently resets everything - without warning - when you select another photo in the list on the left. You will lose any deblurring you have done if you have not created the final result.
Navigating
After clicking the 'Open DNG' button (or selecting a JPEG), you can navigate the photo by clicking or dragging with your mouse in the smaller preview image on top. It will show you the 100% view of your selection on the right. You can also directly move the bigger image on the right, by dragging the image with your mouse (DNGMonochrome users: this will also be in the next version of DNGMonochrome).
 Drag or click in the smaller image to show a 100% view of your selection on the right... You can also drag the big image around with your mouse...
Under the bigger image you have several buttons. With the first one you can switch between a 100% and a 200% view. The other buttons and sliders have to do with the deblurring circles. I'll come back to those later.
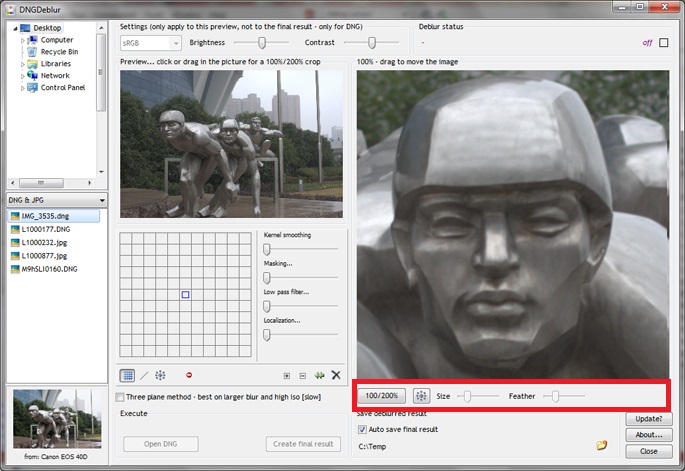 Buttons and sliders under the big image...
Saving or auto saving the final result
When you're happy enough with your deblurred result, you can click 'Create final result', after which DNGDeblur starts to work on the total image. Note that the button 'Create final result' is not available until there's actually some deblurring going on. If you have turned on 'Auto save result' and set a folder, the end result will be saved into that folder automatically. If you have not turned on auto save, DGNDeblur will open a Save dialog when the deblurring process is finished, and you can save the result manually.
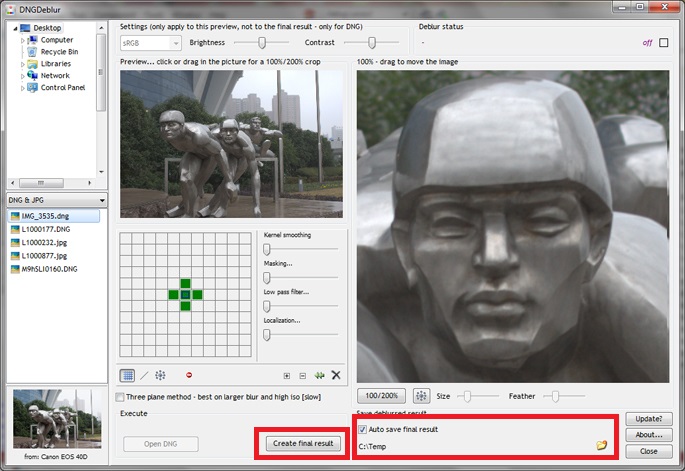 Click the 'Create final result' to produce the deblurred photo, which is then saved automatically if you have turned on 'Auto save', with a valid folder...
The deblurring filter
Obviously, this is the thing everything revolves around. It consists of three parts (for DNGMonochrome users who had a look at the deblurring filter in DNGMonochrome, also this will be in the next version).
The free grid

The line and other shapes tool

The circle - mainly for focus blur

You can switch between the three with the buttons under the filter. Note that currently the line and circle tool (if you switch from the free grid) will destroy anything you did in the free grid. I hope to address that in future versions.
In the free grid you can just click around to create the so called 'kernel'. In the line tool you select the shape and set the radius and angle. In the circle tool it's just the radius.
More technical
The deblurring is based on Wiener filtering. Now, I am not a mathematician and if I try to explain in detail, I will probably make gross mistakes, because I do not understand those rather complex mathematical formulas that go along with it, so for what it's worth - and as far as I understand it - in layman's terms: think of this type of filtering as a form of noise cancellation, like the one they implement nowadays in some head phones. Noise and unwanted sounds from your environment - that do not belong to the audio signal - are blocked, by generating 'anti sound' (since waves can cancel each other out - interference and all that).
So one could say that Wiener filtering for deblurring images, uses 'anti waves', to block out the residue in the image that's left behind by camera shake or focus errors. This is done by first transforming the image through Fast Fourier, and then combining its energy spectrum with the energy spectrum of the 'kernel' (where the kernel is the image you have created by clicking in the free grid or by selecting a shape in the line or circle tool, also transformed through Fourier).
So the kernel is the bit that's creating the anti waves.
Another shorter explanation - probably more correct, but also more vague - could be that Wiener filtering is a method of shaping the energy spectrum of your blurry image - towards a less blurry outcome - with the help of the energy spectrum of the kernel. Almost like a sculptor chiseling away at the photo, where the kernel is your chisel.
Or as the smart people of Wikipedia put it:
"The goal of the Wiener filter is to compute a statistical estimate of an unknown signal using a related signal as an input and filtering that known signal to produce the estimate as an output."
Which is even more vague, basically telling you nothing about what's actually happening. So I hope my own explanation isn't too far off.
But you can already guess the problem: finding the right kernel! If you have no record of how the shake went exactly (or when your subject was also moving), finding the right energy spectrum to correct your blur is not a simple task. That's why this method works quite well on small focus blur or mild camera shake (since the kernel can then be quite generic: a short line, a cross, or a circle and the whole thing then starts to act as some kind of super sharpener). But when the blur becomes more complicated, it's a different story. Then this method becomes more frustrating. And then I haven't even talked about 3D blur, where you didn't just shake the camera a bit, but where you were also moving back and fro at the same time.
This is one reason why I introduced the free grid (to give you and me a fighting chance), since some of the deblurring software out there stops at the line and the circle. But just the line or circle do not necessarily give you the best result for your particular bungled up photo.
I also think the free grid lends itself quite well for some automation I've been experimenting with: trying to estimate the best kernel based on an underlying comparison of the result. It's a very slow procedure, but some of the results have been quite encouraging. I hope to introduce that automation at some point in future versions.
Next post I will go a bit deeper into the workings of the free grid and the sliders.
Download
You can download DNGDeblur here.
Previous post about the specifics of DNGDeblur:
- Introduction
Next few screenshots might be unnecessary and self explanatory to most users, the program is not that complicated, but well, let's do this anyway. Just follow the red squares.
In this list you select the folder your DNGs or JPEGs are residing...The DNGs and or JPEGs will then show up in this list...In the middle you can select if you want to see DNGs and JPEGs, or only DNGs or only JPEGs...When you select a DNG or JPEG, you will see the preview image here... under it the camera model the photo was taken with. Note though that for JPEGs you will not see the camera model (yet), but an indication if the JPEG is 8-bits or 24-bits per pixel. This screenshot is from an earlier version and shows one of those many bugs I'm still solving, since it's a JPEG selected and this photo was not taken with the Canon 40D...JPEG versus DNG selection
When you select a JPEG, it's loaded into the program almost instantly. So you will not only see the little preview - indicated in the previous screenshot - but also the bigger images. You can start to work on the photo almost immediately.
But when you select a DNG it first needs to be interpolated to get to a presentable result. That takes some time and it takes too long to do it automatically (then you would be stuck navigating the photo list every time you hit a DNG). So when you select a DNG, you first have to click the 'Open DNG' button, shown in the next screenshot, before you can start working on the photo.
When you select a DNG you have to click 'Open DNG' before you can start working on the photo. This button won't show if you select a JPEG.Be aware that the program currently resets everything - without warning - when you select another photo in the list on the left. You will lose any deblurring you have done if you have not created the final result.
Navigating
After clicking the 'Open DNG' button (or selecting a JPEG), you can navigate the photo by clicking or dragging with your mouse in the smaller preview image on top. It will show you the 100% view of your selection on the right. You can also directly move the bigger image on the right, by dragging the image with your mouse (DNGMonochrome users: this will also be in the next version of DNGMonochrome).
Drag or click in the smaller image to show a 100% view of your selection on the right... You can also drag the big image around with your mouse...Under the bigger image you have several buttons. With the first one you can switch between a 100% and a 200% view. The other buttons and sliders have to do with the deblurring circles. I'll come back to those later.
Buttons and sliders under the big image...Saving or auto saving the final result
When you're happy enough with your deblurred result, you can click 'Create final result', after which DNGDeblur starts to work on the total image. Note that the button 'Create final result' is not available until there's actually some deblurring going on. If you have turned on 'Auto save result' and set a folder, the end result will be saved into that folder automatically. If you have not turned on auto save, DGNDeblur will open a Save dialog when the deblurring process is finished, and you can save the result manually.
Click the 'Create final result' to produce the deblurred photo, which is then saved automatically if you have turned on 'Auto save', with a valid folder...The deblurring filter
Obviously, this is the thing everything revolves around. It consists of three parts (for DNGMonochrome users who had a look at the deblurring filter in DNGMonochrome, also this will be in the next version).
The free grid
The line and other shapes tool
The circle - mainly for focus blur
You can switch between the three with the buttons under the filter. Note that currently the line and circle tool (if you switch from the free grid) will destroy anything you did in the free grid. I hope to address that in future versions.
In the free grid you can just click around to create the so called 'kernel'. In the line tool you select the shape and set the radius and angle. In the circle tool it's just the radius.
More technical
The deblurring is based on Wiener filtering. Now, I am not a mathematician and if I try to explain in detail, I will probably make gross mistakes, because I do not understand those rather complex mathematical formulas that go along with it, so for what it's worth - and as far as I understand it - in layman's terms: think of this type of filtering as a form of noise cancellation, like the one they implement nowadays in some head phones. Noise and unwanted sounds from your environment - that do not belong to the audio signal - are blocked, by generating 'anti sound' (since waves can cancel each other out - interference and all that).
So one could say that Wiener filtering for deblurring images, uses 'anti waves', to block out the residue in the image that's left behind by camera shake or focus errors. This is done by first transforming the image through Fast Fourier, and then combining its energy spectrum with the energy spectrum of the 'kernel' (where the kernel is the image you have created by clicking in the free grid or by selecting a shape in the line or circle tool, also transformed through Fourier).
So the kernel is the bit that's creating the anti waves.
Another shorter explanation - probably more correct, but also more vague - could be that Wiener filtering is a method of shaping the energy spectrum of your blurry image - towards a less blurry outcome - with the help of the energy spectrum of the kernel. Almost like a sculptor chiseling away at the photo, where the kernel is your chisel.
Or as the smart people of Wikipedia put it:
"The goal of the Wiener filter is to compute a statistical estimate of an unknown signal using a related signal as an input and filtering that known signal to produce the estimate as an output."
Which is even more vague, basically telling you nothing about what's actually happening. So I hope my own explanation isn't too far off.
But you can already guess the problem: finding the right kernel! If you have no record of how the shake went exactly (or when your subject was also moving), finding the right energy spectrum to correct your blur is not a simple task. That's why this method works quite well on small focus blur or mild camera shake (since the kernel can then be quite generic: a short line, a cross, or a circle and the whole thing then starts to act as some kind of super sharpener). But when the blur becomes more complicated, it's a different story. Then this method becomes more frustrating. And then I haven't even talked about 3D blur, where you didn't just shake the camera a bit, but where you were also moving back and fro at the same time.
This is one reason why I introduced the free grid (to give you and me a fighting chance), since some of the deblurring software out there stops at the line and the circle. But just the line or circle do not necessarily give you the best result for your particular bungled up photo.
I also think the free grid lends itself quite well for some automation I've been experimenting with: trying to estimate the best kernel based on an underlying comparison of the result. It's a very slow procedure, but some of the results have been quite encouraging. I hope to introduce that automation at some point in future versions.
Next post I will go a bit deeper into the workings of the free grid and the sliders.
Download
You can download DNGDeblur here.
Previous post about the specifics of DNGDeblur:
- Introduction
Sunday, November 16, 2014
DNGDeblur - Introduction
 Screenshot of a first version - the official release will look slightly different...
Requirements
DNGDeblur runs on Windows only and was tested on Windows 7 and Windows Vista. It might run on Windows 8 without problems, but I haven't tested it on that platform. It needs quite a bit of memory, and a fast processor never hurts.
And to get an important issue out of the way: I do not intend to develop a MAC version.
Supported cameras
In general DNGDeblur can deblur color or monochrome RAW files from a limited number of cameras - when their RAWs are in the DNG format - and JPEGs from any source.
Note that the term 'deblurring' needs to be taken lightly. This program is not a one step solution to your blurry photographs. It will not work satisfactory on every blurry photo you throw at it (more on that in next posts) and you do have to spend some time and effort per photo to get to the best results. If you dislike post processing photos or if you are by nature an impatient person, DNGDeblur might not be for you.
DNGDeblur supports native DNG as produced by Leica cameras (supported are the S2, M8, M9, M, MM and T - the M-E should also work, if not, shoot me an email).
Additionally, if you have files from a Canon EOS 350D, 500D, 550D, 30D, 40D, 5D Mark II or 5D Mark III you can also use DNGDeblur if you convert your RAW CR2 file (the full CR2, not a downsized in-camera RAW) to DNG, using the free Adobe DNG converter (or Lightroom to export as DNG).
Same story for Nikon D200, D800, D800E and the Sony A7s (and to be clear: also these files need to be converted to DNG first).
I doubted the Nikon D800 and the Leica S2 a bit, because those files are so huge that deblurring the RAW might simply not show in the end result (if a smaller JPEG is produced). These RAWs also take quite a bit of time to process. But the files work in DNGDeblur and don't seem to pose any problems, so why not.
DNGDeblur also supports monochrome DNGs produced by DNGMonochrome, but that's hardly an advantage since the deblurring engine in DNGMonochrome is exactly the same as the one in DNGDeblur (although DNGMonochrome doesn't let you reload your monochrome DNG, in that sense DNGDeblur might be handy). The monochrome support in DNGDeblur is mainly meant for the Leica MM.
The deblurred DNG is currently written uncompressed, so don't be surprised if the endresult is bigger than what you started with. Adobe's DNG converter seems to JPEG compress all files it converts (that's lossless compression). The compression used by the Leica M8 and Leica M9 (on the latter it's optional) is different: that's a lossy compression. But also that compression gets lost in translation by DNGDeblur and you'll end up with an uncompressed DNG.
The Circles
Besides deblurring a DNG or JPEG, DNGDeblur can also deblur parts of a DNG or JPEG in so called 'deblur circles', which can be placed on the photo, much like the radial filters of Lightroom. This is especially handy for photos that have large out of focus areas, where only a face or eyes need to be deblurred. You can place more than one of these circles on a photo, resize them, turn them into ellipses, feather them and drag them around. The deblurring will stay confined within the circles and no part of the photo outside the circles is altered when you create the final output. See this post for an example.
So why can't DNGDeblur handle any old DNG?
I know that DNG is supposed to be a general standard, but as it turns out, it really requires implementing total support of the DNG standard in the software. Some cameras use options that other cameras do not use.
The Canon EOS 550D and the 5D Mark II for instance gave me major problems. When I ran their DNGs through DNGDeblur, the resulting deblurred DNGs contained huge color shifts and a wrong white balance compared to the original. None of the other supported cameras showed these problems. Of course: it was the ActiveArea tag again, not properly implemented by me, so pixels started shifting all over the place. I've been there before with the Canon 5D Mark II. And as it turns out: the Canon 550D has an equally awkward ActiveArea tag, hence the same problem with those files. But the problems are solved for both cameras. Just an example to show that I really need to test photos of every camera I intend to support, before I can open up the software for that specific camera.
However, if you have a camera that doesn't fall into the supported list, you can still use DNGDeblur for JPEGs.
JPEG support
Since I'm not totally opposed to the idea that deblurring RAW files is actually quite stupid (more on this stunning revelation later), DNGDeblur can also handle JPEGs. But only if the JPEG is 8-bit or 24-bit per pixel (that should not be a big problem, most JPEGs are). The deblurred JPEG result is always stored as 24-bit per pixel (also if your input JPEG was 8-bit per pixel) and is written with a 100% quality setting (which cannot be changed).
Since I added JPEG support last minute, the EXIF information in the original JPEG is not preserved in the deblurred copy (to get that right requires a bit more time and effort). I hope to address that issue in future versions, since I consider it quite a serious problem. In fact this was one of my main gripes with some of the deblurring software out there: producing low quality JPEGs with all the info stripped. At least I got the quality right, now I just need to keep the EXIF in tact.
[NOTE: EXIF preservation was added in version 1.1.0, so above paragraph is not valid anymore]
So why the doubt about deblurring RAW, calling it stupid even? Well, RAW files are usually quite big, and with the pixel race still going on (see the Nikon D800 or the Sony A7r) RAW files aren't getting any smaller (although the Sony A7s shows that some manufacturers might be reconsidering). It means the kernel to deblur needs to be bigger, which makes it harder to deblur without introducing a lot of artifacts. Deblurring RAW seems to work fine for files up to say give or take 20mp, but when the files get larger I really doubt the practicality of it. It might be smarter to then switch to a smaller JPEG end product, since a then much smaller kernel can have a much stronger effect. Hence the JPEG support (also a nice bonus for people who skip RAW completely).
However, stupid or not, DNGDeblur started out as an experiment, to see if it was actually possible to deblur a RAW file and keep it RAW. And that it is.
Download
You can download DNGDeblur here.
Next post about DNGDeblur I'll show you a bit of the user interface and try to explain how this deblurring actually works.
Tuesday, November 11, 2014
Two cats
 Or one cat moving really fast? No seriously, there were really two...
Kuantan, Malaysia, 5 August 2013
Click on photo for the full version...
Sunday, November 9, 2014
DNGDeblur, almost done...
See the screenshot of the very first version. It's almost done.
Last week I also added JPG support and experimented a bit with some automation, trying to let the computer decide on the best kernel. That second part won't be in version one though, since I'm not convinced yet.
And although DNGDeblur is really aimed at RAW files, it seemed a bit of a waste not to include JPGs. In some cases deblurring the smaller JPG can have an overall better effect and not to forget: some people don't shoot RAW but go directly for JPG.
Saturday, November 8, 2014
Surprised?
 Waitress in a crab restaurant taking a photo of me and my friends... maybe she zoomed in too much on my big nose...
Tokyo, Japan, 10 October 2014
Click on photo for the full version...
Wednesday, November 5, 2014

Tuesday, November 4, 2014
Intermezzo
 Monkey at the beach...
Kuantan, Malaysia, 26 September 2012
Click on photo for the full version...
Monday, November 3, 2014
Not so glossy
 Japan has a very low crime rate, but they do have their criminals...
Tokyo, Japan, 8 October 2014
Click on photo for the full version...
Sunday, November 2, 2014
Glossy
 Boyband, being advertised (including music) on the side of a truck, circling around in the area...
Tokyo, Japan, 8 October 2014
Click on photo for the full version...
Saturday, November 1, 2014
Fashion - II
 Note the shoes, before you get lost in the colors... in Shibuya...
Tokyo, Japan, 12 October 2014
Click on photo for the full version...
Friday, October 31, 2014
Despair
 Late at night on the steps of a temple...
Tokyo, Japan, 10 October 2014
Click on photo for the full version...
Thursday, October 30, 2014
Yet another slider?
Another break in the deblurring business. It will lead to one more slider in the filter, but this might be the 'fix almost all' slider I've been searching for.
The sad part is that I ventured on this solution much earlier, but gave up on it, since the results were not great. The idea was to put a gaussian function over the kernel and thus soften the kernel image towards the edges. But I couldn't get to the right gaussian and make it flexible and fast enough to scale with the radius of the kernel. Besides, the results didn't seem very good anyway on kernels with a small radius - most likely the gaussian dropped off too steep or not steep enough - so I gave up on the idea.
Yesterday I came back to it, still thinking there should be a noticeable difference when lowering the kernel values from the center outwards, so I decided to try a linear approach. Simply lower the values the further they are away from the center, without the curve of a gaussian. And that indeed gave the results I was looking for.
Much of the grosser distortions dropped away, without the need to slide a lot anymore with any of the other sliders. The motion deblurring with the line became a lot more effective, and so did the focus deblurring. And in the free grid, some combinations that before would lead to very big distortions suddenly became usable.
Let me show you an example... this kernel leads to the distortions shown in the photo under it...

Now with the new slider activated and without any changes to the other sliders...
And although this is not an endresult (a bit of sliding with the other sliders is still necessary), it's for this kernel a result I wasn't able to achieve with only the other sliders.
In combination with the deblur circles (actually they are ellipses now) I think I have a much more workable piece of software.
I know... me droning on about it without you being able to try it is frustrating, but it will be released soon. The deblur circles are finished (last step was to be able to turn them into ellipses) and this new slider will most likely be finished this week. Then there's some cleaning up and running some tests to see if I have all the details right, but that shouldn't take up too much time.
The sad part is that I ventured on this solution much earlier, but gave up on it, since the results were not great. The idea was to put a gaussian function over the kernel and thus soften the kernel image towards the edges. But I couldn't get to the right gaussian and make it flexible and fast enough to scale with the radius of the kernel. Besides, the results didn't seem very good anyway on kernels with a small radius - most likely the gaussian dropped off too steep or not steep enough - so I gave up on the idea.
Yesterday I came back to it, still thinking there should be a noticeable difference when lowering the kernel values from the center outwards, so I decided to try a linear approach. Simply lower the values the further they are away from the center, without the curve of a gaussian. And that indeed gave the results I was looking for.
Much of the grosser distortions dropped away, without the need to slide a lot anymore with any of the other sliders. The motion deblurring with the line became a lot more effective, and so did the focus deblurring. And in the free grid, some combinations that before would lead to very big distortions suddenly became usable.
Let me show you an example... this kernel leads to the distortions shown in the photo under it...
Now with the new slider activated and without any changes to the other sliders...
And although this is not an endresult (a bit of sliding with the other sliders is still necessary), it's for this kernel a result I wasn't able to achieve with only the other sliders.
In combination with the deblur circles (actually they are ellipses now) I think I have a much more workable piece of software.
I know... me droning on about it without you being able to try it is frustrating, but it will be released soon. The deblur circles are finished (last step was to be able to turn them into ellipses) and this new slider will most likely be finished this week. Then there's some cleaning up and running some tests to see if I have all the details right, but that shouldn't take up too much time.
Wednesday, October 29, 2014
DNGMonochrome 0.9.83 released
Because with some changes new bugs are introduced... so, some bugfixes in this new release.
Download
You can download the new version of DNGMonochrome here.
- Fixes the result when converting with the 'no interpolation - resize' option not acting properly in the new 200% Tools preview
- Fixes the result when converting with the 'no interpolation - resize' option deblurring too slow in the Tools preview
- Fixes the full red result and full blue result when converting with the 'no interpolation - resize' option not deblurring at all in the Tools preview
Download
You can download the new version of DNGMonochrome here.

Tuesday, October 28, 2014
DNGMonochrome 0.9.82 released
Some small changes and an important bugfix in this new release.
Download
You can download the new version of DNGMonochrome here.
- Splits the localization slider in the deblurring filter into two sliders: one for dark/midtones, and one for highlights... this gives more control over the deblurring distortions...
- In anticipation of the new 'deblurring circles' (not yet available), the 200% preview in the Tools window is dropped, and the 100% preview is enlarged and can be switched to 200%
- Fixes a memory bug that could lead to a 'whoa, that's a bug' notification after deblurring the same photo (in full) several times in one session
- Fixes gamma not changing for the small preview picture in the Tools window
Download
You can download the new version of DNGMonochrome here.
Monday, October 27, 2014
Performance
 Elderly lady performing... not too bad either...
 After her performance... quite content...
Notice also she's wearing indigo blue, also called 'Japan blue'. It's a bit of a traditional color in Japan - a dye made from the Indigo plant - and once you know that and pay some attention to it, you start seeing it everywhere in Tokyo...
Tokyo, Japan, 12 October 2014
Click on photos for the full version...
Sunday, October 26, 2014
A bit gruesome
 Well, this has nothing to do with Japan. A shot I took a few weeks ago, at a pasar malam (night market) in Malaysia and it's a bit gruesome, especially after the wedding photo of yesterday.
These night markets are usually fun to walk around on - although after a few you know what to expect - and so was this one, but the scene captured on the photo above I had never seen before on any of the other markets. It struck me for several reasons. Of course, one of the reasons being that where I come from and where I shop, the meat is neatly packaged and unrecognisable. When buying at this butcher on the pasar malam, you don't get away with the ignorant supermarket bliss, never realising that the meat behind the shiny plastic once had a head. Although I don't think the butcher put it there for that reason. Most likely he wanted to show some degree of freshness to the kill, which might have helped to sell the other parts of the cow also on display in several trays behind the head.
But I was fascinated with the head for another reason: the eyes were still open, and it actually looked not dead at all. Rather peaceful I thought. Like it could any moment let out a satisfied 'moo' - such a nice pasar malam - or lick its lips and nose with its wet tongue (assuming the tongue was still in there). And those two things - the severed head, death and destruction, in combination with this peaceful look - was what fascinated me the most about this scene. Then I realised I had no idea how a non peaceful look would show on a dead cow's head and I snapped a photo.
You can click on the photo for the full version, but I understand if you do not wish to do so...
Malaysia, 3 October 2014
Saturday, October 25, 2014

Friday, October 24, 2014
Girls
 Giggly schoolgirls in Shibuya...
Tokyo, Japan, 8 October 2014
Click on photo for the full version...
Thursday, October 23, 2014
Clerk
 Desk clerk at a crab restaurant...
Tokyo, Japan, 10 October 2014
Click on photo for the full version...
Wednesday, October 22, 2014
Shinyuku
 Of all the Asian cities I've visited, Tokyo beats them all when it comes to the lights and the adverts crammed into only a few streets...
Tokyo, Japan, 8 October 2014
Click on photo for the full version...
Tuesday, October 21, 2014
DNGDeblur
I know I promised it a while ago (deblur color DNGs) and I can assure you it's not turning into vaporware. In fact, I've been using it on some of the recent photos from Tokyo shown on this blog.
But when I was using DNGDeblur in its unfinished state, I realised I needed additional functionality, mainly the option to deblur only part of the DNG. That's now finished. You can place what I call 'deblur circles' on the photo, and then any deblurring done, stays confined within those circles (which can be moved around, changed in size and feathered, a bit like the healing or cloning circles in Lightroom). The advantage is that if you only want to deblur a face or the eyes of a face, you now can (well, I can, you not yet), without touching the rest of the photo.
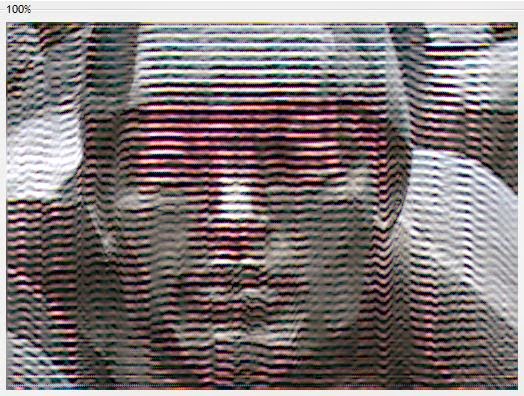
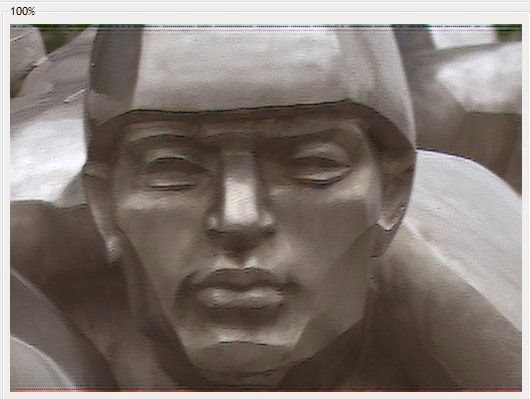
One of the photos I used this method on was published a few posts back, here, the old women in the riksja.
100% crop from a 1280px jpg based on an M9 color DNG, in this state a rather unusable photo... note that this is a real life shot, not some fake blurred image (sadly, because it indicates quite a bit of user error)... Move over the image with your mouse to see the blur corrected version produced by DNGDeblur...
So I placed the circle over her face, deblurred, and then developed the resulting DNG into a 1280px JPG. The advantage being that none of the other parts of the photo got deblurred (no distortions anywhere else in the photo). It saves a lot of checking around to make sure other parts of the DNG don't start to act funny. I can now concentrate on the part I need to concentrate on to get the DNG more presentable.
Now in practice, the true 100% image after deblurring isn't great and after quite some experimentation I figured out that it seems to be ok to have some distortions in the end result as long as the resulting JPG gets downsized compared to the original size. Fifty percent seems doable.
I won't put any dates on the release of DNGDeblur, but it will be there eventually. I will most likely also incorporate these 'deblur circles' in the deblurring filter of DNGMonochrome in a next version.
But when I was using DNGDeblur in its unfinished state, I realised I needed additional functionality, mainly the option to deblur only part of the DNG. That's now finished. You can place what I call 'deblur circles' on the photo, and then any deblurring done, stays confined within those circles (which can be moved around, changed in size and feathered, a bit like the healing or cloning circles in Lightroom). The advantage is that if you only want to deblur a face or the eyes of a face, you now can (well, I can, you not yet), without touching the rest of the photo.
One of the photos I used this method on was published a few posts back, here, the old women in the riksja.
100% crop from a 1280px jpg based on an M9 color DNG, in this state a rather unusable photo... note that this is a real life shot, not some fake blurred image (sadly, because it indicates quite a bit of user error)... Move over the image with your mouse to see the blur corrected version produced by DNGDeblur...
So I placed the circle over her face, deblurred, and then developed the resulting DNG into a 1280px JPG. The advantage being that none of the other parts of the photo got deblurred (no distortions anywhere else in the photo). It saves a lot of checking around to make sure other parts of the DNG don't start to act funny. I can now concentrate on the part I need to concentrate on to get the DNG more presentable.
Now in practice, the true 100% image after deblurring isn't great and after quite some experimentation I figured out that it seems to be ok to have some distortions in the end result as long as the resulting JPG gets downsized compared to the original size. Fifty percent seems doable.
I won't put any dates on the release of DNGDeblur, but it will be there eventually. I will most likely also incorporate these 'deblur circles' in the deblurring filter of DNGMonochrome in a next version.
Monday, October 20, 2014

Sunday, October 19, 2014
Traditional
 Dressed up for a wedding in the park...
Tokyo, Japan, 7 October 2014
Click on photo for the full version...
Saturday, October 18, 2014
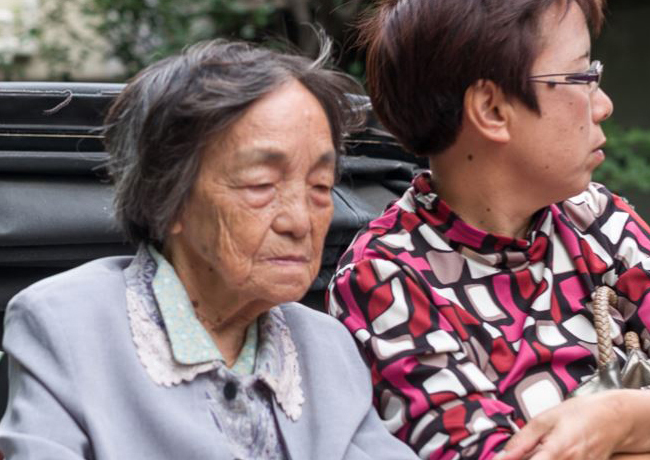
Riksja
 In Asakusa... these riksjas are being pulled by tall and fit looking Japanese guys with strange footwear (shoes shaped as reindeer hoofs)... They also act like a tour guide and will tell you some facts about the area and stop at the landmarks...
 The old women didn't seem to be that interested though, but who can blame her...
Tokyo, Japan, 9 October 2014
Click on photo for the full version...
Friday, October 17, 2014
Selfie
 The 'selfie stick' in action...
Tokyo, Japan, 7 October 2014
Click on photo for the full version...
Thursday, October 16, 2014
Spider
 You see them in parks... they are big and look vicious, and they wear a black and yellow wasp suit - adding to the concern - but I have no idea if they're actually dangerous... Tokyo Tower in the background...
Edit: after some research I think it's a Nephila clavata. Its bite is not lethal apparently, just gives some blistering and local discomfort for about 24 hours. But don't take my word for it, I'm no spider expert, and I'm still unsure if I have the right one...
Tokyo, Japan, 9 October 2014
Click on photo for the full version...
Wednesday, October 15, 2014

Monday, September 29, 2014
DNGMonochrome 0.9.81 released
See the previous post for the big changes in 0.9.8
0.9.81 contains one bug fix.
Download
You can download the new version of DNGMonochrome here.
0.9.81 contains one bug fix.
- After changing brightness or contrast on the preview image, and then clicking the 'noise reduction and deblurring' button under 'Tools', the image in the main screen (underlying the Tools window) would distort. This had no effect on the conversion and was just a visual bug.
Download
You can download the new version of DNGMonochrome here.
Sunday, September 28, 2014
DNGMonochrome 0.9.8 released
Ok, let's not go into the why it took so long, but just present this new version.
New in version 0.9.8
Deblurring
I guess the biggest new thing is the deblurring filter, although I myself do have some reservations about the usefulness, it does deliver on some of my own photos. You can read more about it here, with a short description (no visuals) how to work with it.
Download
You can download the new version of DNGMonochrome here.
New in version 0.9.8
- Drops support for Windows XP. Version 0.9.72 will stay available, but 0.9.8 is not supported anymore on XP
- Drops the sharper setting. Already not as effective anymore due to algorithm changes, it also gave unsatisfactory results on photos with higher pixel counts. The positive effect still left was easier to reproduce with a bit of sharpening in the RAW developer
- Adds deblurring option through Fast Fourier Transform and Wiener filtering
- Adds support for the Leica T
- Adds support for the Canon EOS 550D and EOS 30D (for DNGs produced with Adobe DNG converter from CR2 files)
- Adds support for the Nikon D200, D800 and D800E (for DNGs produced with Adobe DNG converter from NEF files)
- Adds support for the Sony A7s (for DNGs produced with Adobe DNG converter from ARW files. Note that you might need a recent version of Adobe Converter for ARW files. Also note that currently the Sony A7 and Sony A7r are not supported)
- Adds a 'no interpolation' option for modified color cameras that have their Bayer filter removed. These cameras produce a monochrome luminance file but at the same time the file still holds parameters indicating it was shot with a color camera. This then leads to trouble in RAW converters, since the RAW converter is assuming it's a color photo. Using this new 'no interpolation' option will lead to an non-interpolated monochrome DNG and stop the RAW converter from interpolating.
Do not use this option on color DNGs from regular color cameras. - Changes the G1G2 correction to a more intelligent approach (G1G2 correction only applies to the Leica M8, Leica M9 and Nikon D200)
- Adapts the preview image to respond much faster (and smoother) to brightness changes (through the brightness slider)
- Adds a contrast slider for the preview image
- Fixes bug: changing gamma would not work in the cooked preview mode
- Fixes bug: after using the RGB filters in combination with gradient filtering (set to right to left or bottom to top), switching off the gradient and processing the photo again would lead to a regular photo and not an RGB filtered one.
Deblurring
I guess the biggest new thing is the deblurring filter, although I myself do have some reservations about the usefulness, it does deliver on some of my own photos. You can read more about it here, with a short description (no visuals) how to work with it.
Download
You can download the new version of DNGMonochrome here.
Subscribe to:
Posts (Atom)