And another one bites the dust...
Concentrating on the white point brought me mainly more knowledge about color spaces, but it's a bit much to try to explain it here.
The white point is the point within the color space that 'defines' white and is then taken as a reference point for the colors surrounding it. It's stored in the ICC profiles with three values (XYZ). However, shifting it around within the color space, only leads to changes in the proofing photo when the rendering intent is set to ' Absolute'. The other rendering intents (perceptual, relative and saturation) do not react on a changed white point, as I found out by building this thing.
Let me just tell you that I had to collect some knowledge about the XYZ color space (which is a 3D representation of infinite colors) and how to convert it to a 2D xyY representation (and back again). After that things became easy.
Monitors most of the time work in the sRGB color space, which is basically just a small defined chunk out of the XYZ space and actually quite limited. Other working color spaces are CMYK (for printers) and for instance AdobeRGB, which covers more of the XYZ space than sRGB.
So, I designed myself a second editor, one for color points (and the white point), and on the grid you can drag the points around and see the changes in the photo.
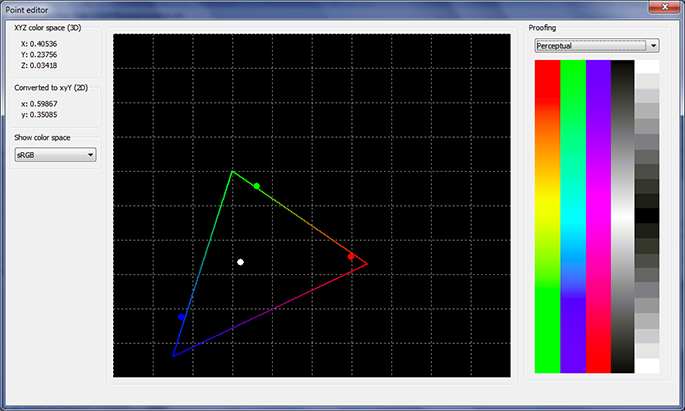 The point editor, showing the white point, the three primary color points and the reference sRGB triangle, with the standard proofing photo on the right...
Some funny results can be achieved by dragging the white point out of the sRGB color space (defined by the triangle) or by reversing the color points (make blue change to red and v.v).
The color points define the boundries of the color space of the profile, and dragging them around has an effect in all rendering intents (not just in the Absolute one like the white point). The editor handles all the points in one screen: the white point and the three primary color points.
After profiling a monitor, the software that comes with the colorimeter (in my case the Spyder 3) usually shifts the color points a bit within the produced profile, depending on the measurements of the colors on the screen. In theory these points (red, green and blue) are the three corners of the sRGB triangle but in a produced profile they usually form their own triangle that doesn't totally match. It really depends on your hardware how well it fits into the actual sRGB space.
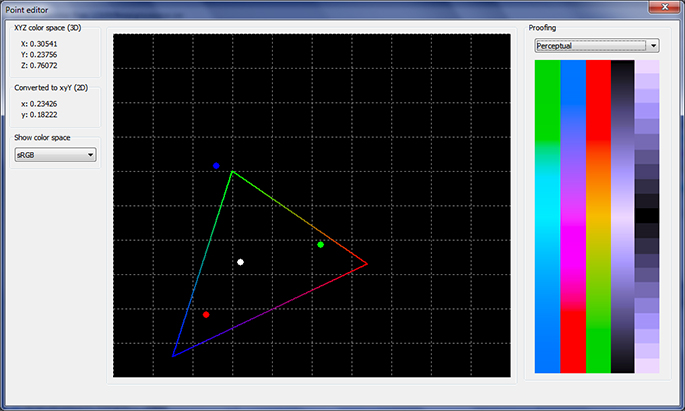 The point editor, showing the proofing image with all the color points swapped... compare it with previous picture and you' ll see that all the colors in the proofing picture have changed place...
The triangle as written, represents the sRGB working space, the usual space for display color profiles. I can also select other 'triangles' in the drop down on the left, covering AdobeRGB, Adobe Wide Gamut RGB, ProPhotoRGB, AppleRGB and some more obscure other formats. They are just a reference though. The colored triangle doesn't have any influence on the color profile.
All these color spaces are bound by defined coordinates within the total XYZ space and easy to reproduce as shapes on a 2D grid. For editing the white and end points in display profiles these additional triangles are only a nice to have, because they don't provide very useful information on a sRGB device. Mind you, the XYZ space is much larger and embeds basically all those sRGB/AdobeRGB/AppleRGB etc. shapes.
I decided not to paint the XYZ one, as to keep the grid simple, but also because it's not easy to draw without the right formulas. It's not a simple triangle like the sRGB space. Another problem is that the examples of pictures of this XYZ color space are deceiving. They are usually colored in, but because your monitor can only show colors within the sRGB space, the colors you see in those examples are never correct.
Here's a youtube that explains what XYZ actually means:
http://www.youtube.com/watch?v=x0-qoXOCOow
In essence this is the whole point of color profiles: to translate and convert between the different color spaces.
Is it useful to edit these details in a color profile?
Well, I'm not sure. I do see some potential for creativity, because you can create some bizare effects on whole batches of photos by creating whacky color profiles and yes, in some cases you might want to adapt these points slightly if you're not happy with an automatically produced profile.
And if anything, playing around with this type of software does give you a pretty good insight in what the different parts of a color profile actually do, and what results to expect when you select it in your color managed application.
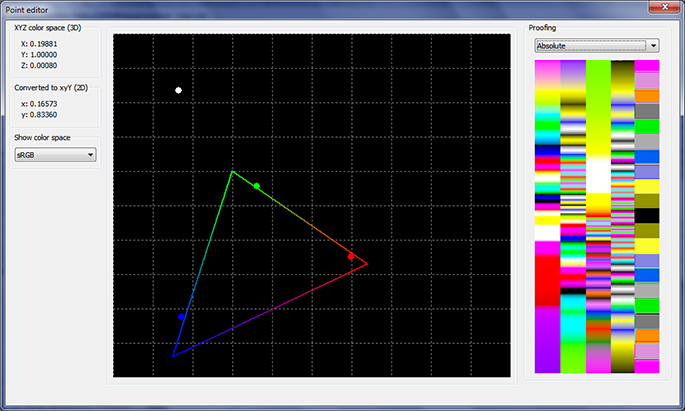 The point editor, showing another very whacky result, accomplished by dragging away the white point...
Personally I find it strange that the supplied software of the Spyder3 doesn't give this level of control, since it's not that difficult to edit this stuff (as proven by a complete color novice). If it's wise, smart or stupid to wánt to edit a color profile, that's nobody's business but the user's...
Ah well, I can now more or less do what I wanted to do with my produced display profiles.
After this there's one more tag to inspect, the CHAD, or CHromatic ADaptation and I have to see if I need to incorporate data about the for now somewhat mysterious D50/D65 parameters... At this point I just know it's kind of a translation thing and probably has no effect on the rendering when changed, but it's in version 4 display profiles, so let's investigate...

 Point editor and proofing photo, with the results of the changes in the left part of the photo (blue and red swapped - funny detail: notice how green stays green in the leaves on the changed left side)... this point swapping is useless mind you... when editing a profile it should be about small changes... this is just to show you the contrast between the changes and the original... obviously this works also for the curve editor...


