Friday, December 16, 2011

Through ratty eyes...

Alley by night in Kuala Lumpur, from a rat's perspective... many of those around in alleys like these...

I photographed this street before, a few years back, also in the evening, and recently I had the chance to take some more photos... the colors are still fascinating, but one side is now boarded up with ugly blue plating, so I couldn't take a photo from a similar position. Was crouching to get this one right, in the mean time trying to watch my back for traffic, and my sides for rats crawling out of pipes and peeking through fencing and grilling...

Besides the rats there's also the smell of garbage and the partly open sewer... sitting still for a long time in these types of alleys isn't advisable... But despite all that, if you ever visit KL, peek into these alleys, because some of them are stunning visually (just stamp around a bit, that usually scares off the rats)...

Malaysia, 26 November 2011

Click on photo for the full version...

Tuesday, December 6, 2011

Hong Kong, two albums

Clouds over Hong Kong, 20 March 2011

Running a little bit behind with the albums... here's the second and first album from Hong Kong. Click on the photos to view the 17 photos from the second album (photo above) and the 13 photos from the first album (photo below).


Taking a break, in Kowloon Park, Hong Kong, 18 March 2011

Click here for the total index.

Tuesday, November 29, 2011

Knees of Poseidon

I'm usually not a fan of pretentious titles for my photos, but this one took several attempts over multiple days to get right... At some point I was even risking the camera, setting it up basically in the sea on a rock that had sea water splashing against it and around it and then also over it... I could grab the camera in time and get out, so I grant myself some freedom here - title wise - due to the stress this photo took... See, when you take a photo, the photo sometimes takes something back...

It's a 30 second exposure of rocks in the sea at night...

Malaysia, 18 November 2011

Click on photo for the full version...

Monday, November 28, 2011

Leaving the harbour

...out to sea...

Malaysia, 17 November 2011

Click on photo for the full version...

Monday, November 21, 2011

Alien

If you ever wondered where the makers of 'Alien' got their inspiration for that creepy E.T. that sucks itself to your face, this surely must have been it...

I couldn't get closer for a better shot, nor test if the creature was actually still alive - perhaps turning it over would have done the trick - because it was laying on a fallen dry river bed that couldn't be walked on... I'd probably had lost my shoes if I had tried or even get stuck myself... it was powerful mud...

Malaysia, 17 November 2011

Click on photo for the full version (I think it's dead, but maybe it's just playing dead, so be careful...)

Sunday, November 20, 2011

Sure, I'll eat that

Feeding a monkey (don't worry, it was approved food)...

Malaysia, 18 November 2011

Click on photo for the full version...

Saturday, November 19, 2011

Girl on beach

14 November 2011

Click on photo for the full version...

M9Tether 2.2 released

New in 2.2

I added a second remote option to the program.

You can now use your wireless (or wired) mouse to control the camera. It's less cumbersome to set up than the remote option through iTunes. Select the remote option in the new drop down (choices are iTunes or Mouse) and then click the 'Remote...' button on the right...

With the mouse you can shoot with the left button, or change some of the camera's settings (selecting the setting by clicking the right mouse button and changing the setting by using the scroll wheel of the mouse).

The iTunes option is extended and now also includes the ability to change the Format setting remotely.

Note that you will have to add the format tracks from 'The Album' to your iTunes library for this to work. 'The Album' can be located in the M9Tether installation folder (default would be C:\Program Files\M9Tether) and it contains the silent MP3 files that need to be added to your iTunes library.

For a full description follow the links on the download page.


Enabled for the new firmware

Version 2.2 also enables firmware sensitive functionality (Temperature reading / ImageUniqueID reading / Ramdisk mode) to work with the newest firmware (1.174).

M9Tether was updated in the meantime to version 2.2b... no changes other than making it also work with firmware 1.176

Bug fixes

Fixes a problem with the repeat timer button, which sometimes didn't show (the button behind the option 'Timed shoot').

Fixes a problem where the confirmation for 'Aperture overwrite' wouldn't show.


Download

See http://www.mymymyohmy.com/software/m9tether.html for the details and download.

Tuesday, October 11, 2011

Colors in the Night

Malaysia, 11 October 2011

Click on photo for the full version...

Friday, September 9, 2011

Them colors...

So, any color news this week?

Well, yes...

First I wanted a proper solution for the Y problem.

As you might remember, I did solve Y with a manual slider, but wasn't totally happy with that, because in every profile I inspected, green has the biggest Y and blue the smallest (poor blue).

It seemed to me there's a relationship between the color points and Y.

If I swap red and green, green needs to get the Y of red, and red needs to get the Y of green, else the colors go wonky (apart from switched).

Then I thought: why not adapt Y within the 'plane' of Y?

Which means: when I manually shift green to red, as soon as green arrives at red, it should have the same Y as red (get lower during shifting towards red) and v.v.

So now, when moving any point around, the 'height' of the point (its Y) will be decided by its position within the fixed plane defined by the three points of the triangle (which all have a different height).

Yes dear reader, that involved some math indeed, and it wasn't easy to find the proper solution of how to find the height of a random point if it needs to be in a specific plane, but I found it.

Now there's a choice in the point editor: either lock Y in the plane of 'Y' (defined by the Y's of the triangle) and have Y adapt automatically when you shift the color points around, or change Y manually per point. In fact, I also introduced a third option: let the big Y move with the small y.

You decide...

Then I concentrated on the proofing picture. I can now load my own photo, and split it, so I can see the difference of the edits compared to the original, and I can save the changed photo, since the color tranlation is done on the pixel level of the photo (mind you, this saving of the photo is just a bonus and not the aim... it's about changing a color profile, not about editing individual photos through messing up a profile, although that is a possibility now)... let me show you...

Point editor and proofing photo, with the results of the changes in the left part of the photo (blue and red swapped - funny detail: notice how green stays green in the leaves on the changed left side)... this point swapping is useless mind you... when editing a profile it should be about small changes... this is just to show you the contrast between the changes and the original... obviously this works also for the curve editor...

It's too early to call the application finished - I still have a myriad of small issues to solve, but all the essential building blocks for editing display profiles are in place now...

Sunday, September 4, 2011

Problem solved...

Well, I still have to read up on the XYZ space, to more or less confirm my idea, but I at least solved the missing Y problem.

The grid to edit on is 2D, so the third dimension is lacking. Then after adding the slider for Y it turned out that Y actually changes the luminosity of the color in the proofing photo.

The color gets brighter or darker (again opposite of what you would expect: when Y goes down, the color becomes brighter. I suspect that has to do with the fact that the content of the edited profile is compared in the translation with the standard profile and the difference of values is taken...).

Then I thought: that third dimension, imagined on a 2D grid, is as if you're actually pushing the point away from the viewer, or pulling it back, towards the viewer.

So... when 'pulling' it towards the viewer (by increasing Y) the point in the grid (red, green, blue or white) should get larger.

And when Y decreases, the point on the grid should get smaller (the point gets further away in the imaginary third dimension).

That third dimension isn't there, but you can simulate it this way, as if you're looking into a cube.

It gives a very nice impression of the amounts of the color.

So now you can shift the point, and make it larger or smaller.

Problem solved without complicated 3D DirectX efforts...

The improved point editor, with possibility to edit Y... the bigger the point, the higher Y, the 'closer' it is... in this example blue is pushed away the most, with green being the closest...

Mistakes... oh my...

Playing around with the point editor, I suddenly realised I'm overlooking something important.

I have a color profile made by Microsoft, and in that profile the color points are swapped.

However, when I did that in some of my profiles, the colors turned ugly: the colors didn't swap properly in the proofing photo.

So, comparing the two profiles and looking at the raw data, I suddenly realised that editing the 2D representation (xyY) skips over the 3D Y component (the big Y stays the same).

I already knew that (it led to the problems with the black point), but in my somewhat rushed efforts to experience the color changes, I didn't realise the importance of a static Y.

I then included a swap function in the point editor, which simply copies color point red to say color point green, but this time all three values: not just a recalculated xy, but the full XYZ in one go.

That worked perfectly with nicely swapped colors.

My conclusion for now: the 2D should just be a representation and the editing should be done on the full XYZ values.

In 3D?

Well, I don't know... first I will add a slider for the Y, to see what the effect actually is of a changing Y component, because obviously: building a 3D editor is a whole different ballgame! Then we're talking DirectX and such... it's not out of the realm of possibilities I suppose, but it won't be finished tomorrow...

I guess a somewhat limped 2D editor with a third component on a slider will have to do for a while, untill I get a clearer picture of what's necessary exactly for a full intuitive XYZ edit.

It is funny though, how my color quest keeps answering my own questions about the lack of color profile editors and the price of existing ones...

Saturday, September 3, 2011

The Black Point

Covering the white point and the color end points (red, green and blue) in previous post, I forgot about the black point.

It's the reference point for 'black'.

I tried to incorporate it, but I only have a few profiles which contain a black point setting.

And the problem is: all values for XYZ are zero in those profiles.

And zero for all values is a problem, because the conversion functions (from XYZ (3D) to xyY (2D) and then back) all result into zero if the big Y is zero.

It means: dragging the point doesn't lead to updated XYZ values. The zero Y (which is used unchanged in the conversion from xyY to XYZ) spoils it.

To actually still see the effect I fiddled a bit with Y (give it a value bigger than zero) but it doesn't seem to matter for the color conversion. XYZ then do update, but there's no changes in my proofing photo in none of the rendering intents (perceptual, relative, saturation or absolute).

It seems the black point isn't taken into consideration at all.

Could be that it only does 'something' in say Output profiles (for printers for instance). The color conversion functions in the Windows API only handle Display profiles, not Output profiles, but it could also be that it only has an effect when changed in the start profile (which I have to find out by using the multi-profile proofing, which isn't in place yet for the editors).

I'll investigate this a bit further, see if the photo should update or not and if I'm at fault here...

Friday, September 2, 2011

The Point

And another one bites the dust...

Concentrating on the white point brought me mainly more knowledge about color spaces, but it's a bit much to try to explain it here.

The white point is the point within the color space that 'defines' white and is then taken as a reference point for the colors surrounding it. It's stored in the ICC profiles with three values (XYZ). However, shifting it around within the color space, only leads to changes in the proofing photo when the rendering intent is set to ' Absolute'. The other rendering intents (perceptual, relative and saturation) do not react on a changed white point, as I found out by building this thing.

Let me just tell you that I had to collect some knowledge about the XYZ color space (which is a 3D representation of infinite colors) and how to convert it to a 2D xyY representation (and back again). After that things became easy.

Monitors most of the time work in the sRGB color space, which is basically just a small defined chunk out of the XYZ space and actually quite limited. Other working color spaces are CMYK (for printers) and for instance AdobeRGB, which covers more of the XYZ space than sRGB.

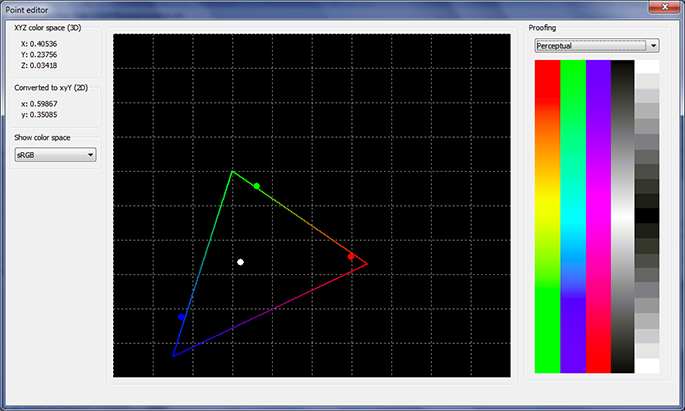
So, I designed myself a second editor, one for color points (and the white point), and on the grid you can drag the points around and see the changes in the photo.

The point editor, showing the white point, the three primary color points and the reference sRGB triangle, with the standard proofing photo on the right...

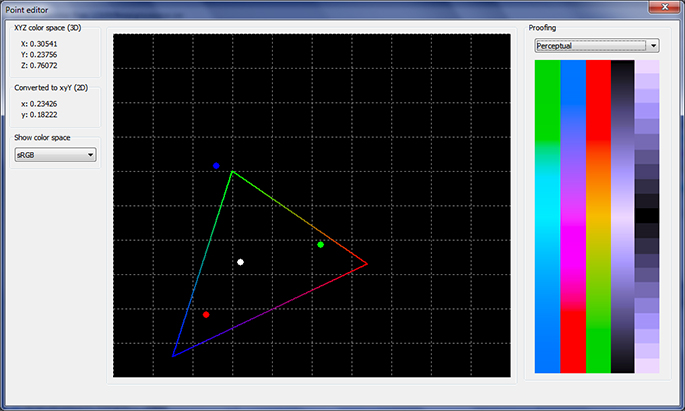
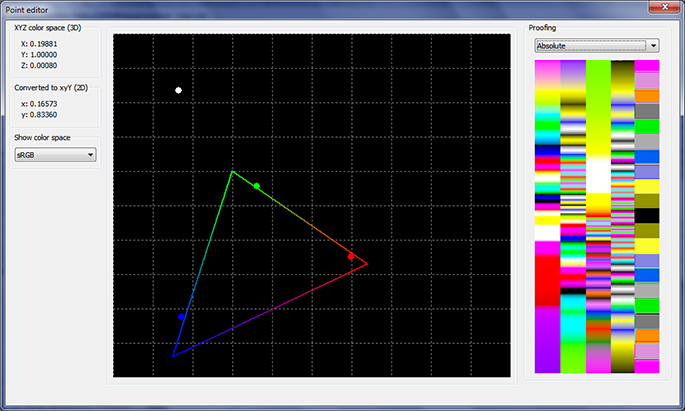
Some funny results can be achieved by dragging the white point out of the sRGB color space (defined by the triangle) or by reversing the color points (make blue change to red and v.v).

The color points define the boundries of the color space of the profile, and dragging them around has an effect in all rendering intents (not just in the Absolute one like the white point). The editor handles all the points in one screen: the white point and the three primary color points.

After profiling a monitor, the software that comes with the colorimeter (in my case the Spyder 3) usually shifts the color points a bit within the produced profile, depending on the measurements of the colors on the screen. In theory these points (red, green and blue) are the three corners of the sRGB triangle but in a produced profile they usually form their own triangle that doesn't totally match. It really depends on your hardware how well it fits into the actual sRGB space.

The point editor, showing the proofing image with all the color points swapped... compare it with previous picture and you' ll see that all the colors in the proofing picture have changed place...

The triangle as written, represents the sRGB working space, the usual space for display color profiles. I can also select other 'triangles' in the drop down on the left, covering AdobeRGB, Adobe Wide Gamut RGB, ProPhotoRGB, AppleRGB and some more obscure other formats. They are just a reference though. The colored triangle doesn't have any influence on the color profile.

All these color spaces are bound by defined coordinates within the total XYZ space and easy to reproduce as shapes on a 2D grid. For editing the white and end points in display profiles these additional triangles are only a nice to have, because they don't provide very useful information on a sRGB device. Mind you, the XYZ space is much larger and embeds basically all those sRGB/AdobeRGB/AppleRGB etc. shapes.

I decided not to paint the XYZ one, as to keep the grid simple, but also because it's not easy to draw without the right formulas. It's not a simple triangle like the sRGB space. Another problem is that the examples of pictures of this XYZ color space are deceiving. They are usually colored in, but because your monitor can only show colors within the sRGB space, the colors you see in those examples are never correct.

Here's a youtube that explains what XYZ actually means: http://www.youtube.com/watch?v=x0-qoXOCOow

In essence this is the whole point of color profiles: to translate and convert between the different color spaces.

Is it useful to edit these details in a color profile?

Well, I'm not sure. I do see some potential for creativity, because you can create some bizare effects on whole batches of photos by creating whacky color profiles and yes, in some cases you might want to adapt these points slightly if you're not happy with an automatically produced profile.

And if anything, playing around with this type of software does give you a pretty good insight in what the different parts of a color profile actually do, and what results to expect when you select it in your color managed application.

The point editor, showing another very whacky result, accomplished by dragging away the white point...

Personally I find it strange that the supplied software of the Spyder3 doesn't give this level of control, since it's not that difficult to edit this stuff (as proven by a complete color novice). If it's wise, smart or stupid to wánt to edit a color profile, that's nobody's business but the user's...

Ah well, I can now more or less do what I wanted to do with my produced display profiles.

After this there's one more tag to inspect, the CHAD, or CHromatic ADaptation and I have to see if I need to incorporate data about the for now somewhat mysterious D50/D65 parameters... At this point I just know it's kind of a translation thing and probably has no effect on the rendering when changed, but it's in version 4 display profiles, so let's investigate...

Tuesday, August 30, 2011

The Editor

[Please note that this post is part of a series describing my first wobbly steps into the world of ICC color profiles. The aim is to build an ICC color profile editor from scratch. Seeing how I started this project with no knowledgde whatsoever on the subject, it's wise to realise that some of my findings described in these posts are incorrect. The incorrect conclusions are usually corrected in later posts. For the whole series in one go, click here.]

So, the curve editor I wrote for this color project is approaching its final stages. It still lacks some functionality, but for testing purposes it's quite ok now. Let me show you some examples...

The editor itself is the big black square with the curves, and next to it on the right is the standard proofing picture I use. There will be the option later on to load a random photo, but this thing covers at least the basics: colors and grays.

The first picture is a random profile and you see the TRC curves, all blended together (red, green and blue) in a gamma 2.2 curve.

(for real it looks a bit clearer, the JPG quality and down scaling make the screenshots a bit fuzzy).


Then in the second picture you see I've pulled blue down and the effect is immediately visible in the color transition in the picture on the right (grays turning blue).


With the control point setting on the left I can switch the number of vertical lines in the editor. It means I can set the number of 'points' to pull or push the curve. The more points, the smaller the changes. The nicest curves are actually created with a low number of control points. Gives very smooth results. The highest number of points is 32.

In picture 3 you see the curves out of control in an 8 point setting and the color translation becomes unusable, with the grays especially in the mid tones and highlights turning into everything but gray...


And as you can see, it's actually not that easy to spot that this is a totally whacked color profile if you only focus on the colors. It seems to be the grays that tell the story the quickest. Gray is always a combination of a similar amount of red, green and blue. Any deviation is quickly spotted if you concentrate on the gray scale.

For calibration the editor works basically the same, but the curves have an opposite effect when they move. Pulling blue down decreases blue in the calibration, but with the TRC pulling blue down increases blue through the color translation.

I've still some work left to change the TRCs that are stored as parametric curves (those only have the gamma stored as a number, but not a whole curve) and then I can move on to more daunting parts of a profile: the gamut! (or something :-) )

Friday, August 26, 2011

Those TRCs

[Please note that this post is part of a series describing my first wobbly steps into the world of ICC color profiles. The aim is to build an ICC color profile editor from scratch. Seeing how I started this project with no knowledgde whatsoever on the subject, it's wise to realise that some of my findings described in these posts are incorrect. The incorrect conclusions are usually corrected in later posts. For the whole series in one go, click here.]

So, my assumption in previous color post turned out to be correct: The TRCs (Tone Reproduction Curve) work on the actual color translation.

It's a similar effect as the calibration curves have on the screen.

When I edit the TRCs, the colors of my proofing photo change, even when calibration is turned off.

Mind you, I'm still struggling with some problems. The TRCs are stored quite differently per profile. Sometimes 256 values, sometimes 512 values, sometimes as a parametric curve. And more annoyingly: they seem to work in the reverse direction. Pulling blue down increases blue in the color transformation, as opposed to the calibration curves.

I'm not fully sure if that's supposed to happen or if I am making programming mistakes here. Seeing how my changes (after saving) result in the expected (changed) curve when I reopen the profile, I'm inclined to believe this is what's supposed to happen...

I do have some ways of testing that, so that's one of the things to try out.

And it's not hard to understand why the hardware (the colorimeter) is necessary, because it's almost impossible to tweak these things on sight, especially since I'm now dealing with six curves (calibration and profiling), which all have an effect on the colors.

I don't intend to edit TRC curves at this point (although the application will be able to). Most of my profiles have 'gamma 2.2' stored in the TRC (as text) and that seems to be sufficient. I was a bit unsure about TRCs claiming gamma 2.2 without any additional curve data stored, but I guess now that the color translator (the CMM) knows how to deal with this.

A gamma curve isn't difficult to create when the value is known.

It will however be one of my next steps anyway: figure out what happens in profiles that don't have TRC data, but simply 'gamma #.#' stated. Does the gamma indeed adapt in the photo when I change it from 2.2 to say 1.8?

Once that's done, I think my profile editor needs a name and will see the daylight as a first version of a more elaborate application, because there's still more to edit.

Will take some time though, first I have to tame those TRCs in all their incarnations...

Thursday, August 25, 2011

Waiter

...trying to sell his pizzas, but the potential customers aren't convinced yet...

Rome, 19 July 2011

Click on photo for the full version...

Wednesday, August 24, 2011

Curving...

[Please note that this post is part of a series describing my first wobbly steps into the world of ICC color profiles. The aim is to build an ICC color profile editor from scratch. Seeing how I started this project with no knowledgde whatsoever on the subject, it's wise to realise that some of my findings described in these posts are incorrect. The incorrect conclusions are usually corrected in later posts. For the whole series in one go, click here.]

So what's the situation at the moment on the color front?

Well, I had to spend some time on the curve editor, to be able to actually change the calibration.

As you know, last time I was able to get to the calibration curves of any ICC profile, and show them.

At this point I'm actually able to change them and see the effect. In essence I'm done with what I wanted: adapt my ugly grays. Lifting the blue slightly solves my problem. The last thing I need to do is save the edited data, a minor task.

Of course that's not enough, because now I'm intrigued!

The next step is to concentrate on the TRC's and accomplish a similar thing: edit them and experience the effect of my changes.

What is that effect?

I'm not fully sure yet, but I suspect the TRC's do a similar thing as the calibration curves, but in the actual color transition. Because here's the thing:

I have two profiles with the same calibration curves, but different TRC curves, and obviously, when switching between profiles, my screen stays the same, but the colors of the photo change. So my guess is that adapting the TRC's will actually change the colors through the color translation... Also something I will find out when I connect the editing of the curves to the 'live' TRC data and make a direct link with the color translating, being able to see the effect instantly.

It's less useful, because I think editing a profile manually this way will lead to color chaos, but for tiny changes and small tweaks it might be useful.

After that I want to have a look at the white point and the color end points (I believe they have to do with the 'gamut').

If I can also change those and see the effect I'm pretty sure there's not much else left where display profiles in the sRGB color space are concerned...

Saturday, August 20, 2011

GOG?

[Please note that this post is part of a series describing my first wobbly steps into the world of ICC color profiles. The aim is to build an ICC color profile editor from scratch. Seeing how I started this project with no knowledgde whatsoever on the subject, it's wise to realise that some of my findings described in these posts are incorrect. The incorrect conclusions are usually corrected in later posts. For the whole series in one go, click here.]

I'm starting to understand why color software is so expensive, and seriously, people programming that stuff must be extreme geeks... my rating has gone up quite a bit since I dove into this project, and I think if you read it all, you'll agree... I gained quite a few points on the geek meter!

And seriously folks, I haven't even scratched the surface. In my color quest I have run into some pretty scary math... let's not talk about that yet...

If you want to read my earlier posts on the subject, click here, that will show you all four posts, that's including this one.

I left you last time with a little bit of knowledge about TRC tags and their content.

I was right in that post: The Tone Reproduction Curve isn't the thing that's loaded into the video card. For the calibration I needed the separate vendor specific tag, called VCGT (Video Card Gamma Table). It was developed by Apple, and my mysterious spyder profile uses it.

And yes, I succeeded in loading that data straight into my video card and see the immediate effect it has on my desktop (ugly yellow grays).

My application now shows all the color profiles on my system, and if it's a display profile it gets loaded immediately when I select it (my whole screen changes) and then the color bit is applied to a photo and the photo is converted.

It's a two step process and works pretty well.

And yes, now my photo does show the yellowish grays, because my screen changed.

But wait... I also have my regular profile with the nice grays, so comparing the bad profile with the good one would be nice.

But of course, nothing is easy in computer land: the good profile doesn't have a VCGT tag!

So where to get my calibration data from, I wondered? Obviously it's in the profile somewhere.

Well, that profile is made by Microsoft.

They don't use an Apple tag (who can blame them), but in stead they integrate their own system (called Windows Color System or WCS) in the ICC profile with their own 'MS00' tag.

So there you have it... there's:

- TRC tags with data and sometimes just stating 'gamma #.#' (I now think that's dependant on the ICC profile version, 2 or 4)
- VCGT tag, which holds the calibration data for the video card
- MS00 tag, which holds the WCS implementation as XML (mind you, that's way more than just the calibration data, it's a full WCS profile)

So far I've only seen either VCGT or MS00, but not together.

So what happens if both are lacking? I don't know. Perhaps no calibration is done then, or the TRC is used after all. It's something I can figure out once the application can also edit the curves.

I proceeded with the MS00 tag and extracted the XML from the ICC profile and had a look.

Confusingly enough (remember, even with TRC tags in the spyder profile, the calibration data came from the VCGT tag), Microsoft calls its calibration data also TRC... and more confusing, they store it differently (not as a collection of 256 numbers per color channel but as parameterized curves). Took me a few hours of futile experimenting (I was close but not close enough) and then the Internet, but then I found it: WCS uses the GOG model (Gain / Offset / Gamma) to describe the gamma ramp. The first math I found looked incomprehensible, but eventually I found some documentation describing it, and it's quite a simple formula.

And it works.

Now I can select profiles containing the VCGT tag or the MS00 tag, and the effect is shown immediately on my screen, and in pretty curves too and the desktop looks exactly the same as loading them through the official Windows Color Management module...

Obviously there's a big hurdle to take, because of the WCS and GOG approach: it calculates curves based on three numbers. How to get back to the three numbers after editing the curve? Something tells me that might be complicated if the curve is edited out of shape too much... oh well, I will deal with that when I get there...

Here's the curves for the spyder profile (VCGT) and the second picture are the curves (GOG) from my regular profile. Only the top curves are used in the calibration of the monitor. At this point I'm not sure what the TRC's are used for exactly but I'm sure once I can change them and see the effect, I'll find out... You can see where the yellow is coming from in the spyder profile (overlapping red and green with blue pushed down too much...)... A white curve means all colors are blended together, so the three curves are similar...


The curves of the dirty gray profile (curves are coming from the VCGT tag)...


Curves of the clean grays profile (the one I'm using now - curves are based on the WCS GOG model)...

Thursday, August 18, 2011

The Ramp

[Please note that this post is part of a series describing my first wobbly steps into the world of ICC color profiles. The aim is to build an ICC color profile editor from scratch. Seeing how I started this project with no knowledgde whatsoever on the subject, it's wise to realise that some of my findings described in these posts are incorrect. The incorrect conclusions are usually corrected in later posts. For the whole series in one go, click here.]

Well, I'm not sure if anyone is actually reading this, but I made some progress.

Small steps...

If you remember, last time I figured out that my dirty grays were due to the calibration part of the color profile, and that my dirty screen didn't have anything to do with the color translation math within the profile (I'm not even sure if you can call it that mind you, the math to convert colors is actually done by something called a CMM, but let's not get into that)...

Turns out the stuff that makes my screen itch is indeed part of the video card, and it's called a gamma-ramp.

The numbers within the gamma-ramp are causing the yellow cast.

Then I found two useful functions in the Windows API, to read and set the gamma ramp of the video card.

I then built myself a little component to actually show the curves - a fascinating detour in the world of linear functions, splines and bezier curves - and there I had it...

Of the three colors that make up my screen (red, green and blue) blue gamma was pulled away too much, resulting in unbalanced grays.

Then I figured out that within a color profile, the numbers that look like the gamma ramp, are stored in what's called TRC tags (Tone Reproduction Curve). There's four of those, but my system can only handle three (red, green, and blue, the fourth one is for gray).

Well, so far so good.

I'm now able to browse through a list of color profiles, show the effect on a loaded photo, and show TRC's stored in the profile.

Obviously, the next step is to actually load those curves straight into the video card (and make that optional), so the calibration effect of the gamma curves in color profiles for a display is immediately visible.

Then to complete this phase and to be able to correct the yellow cast, I need to make the curves editable.

But of course I ran into a snag, which I haven't figured out yet.


The snag

The gamma curves differ.

When I read the data directly from the profile, I get different curves then when I read the gamma-ramp from the video card after the profile is loaded.

Quite simple: the profile TRC data can't be applied directly to the gamma-ramp in the video card. There's a bit of calculus involved, and I haven't figured out yet what the formula is.

I now suspect the TRC tags themselves are just a standard setting, and the deviation for dark, middle and light tones sits in a private tag, because the TRC tags in some profiles do not actually point to a collection of numbers at all, but to a small piece of text saying 'gamma 2.2'. I understand what the text means, and gamma 2.2 is easy to create as a lookup table, but now I have to figure out how my gamma ramp in the video card gets out of whack when the curves just state 'gamma 2.2' (because they do in my mysterious spyder profile).

Where are the numbers coming from? If it was just a standard calculation I wouldn't have yellow grays, but neutral grays. No doubt they're coming from another tag in the profile (possibly vendor specific), because my video card doesn't know what 'gamma 2.2' means. It needs the numbers. So... I need to delve deeper into the profile...

I'll get there...

Saturday, August 13, 2011

Me And The Mysterious Spyder

[Please note that this post is part of a series describing my first wobbly steps into the world of ICC color profiles. The aim is to build an ICC color profile editor from scratch. Seeing how I started this project with no knowledgde whatsoever on the subject, it's wise to realise that some of my findings described in these posts are incorrect. The incorrect conclusions are usually corrected in later posts. For the whole series in one go, click here.]

So, how far am I with my color quest? Well...

I have part of it under control in my fledgeling application... I can select a profile and see the consequences in a loaded picture, JPG or otherwise. I can also show color transitions between two profiles...

But here's the deal: it didn't make a lot of sense so far.

I think I know why...

The profile the Spyder made, shows horrible grays when I load it into Windows.

But, when I select the profile to convert a photo (under my regular color profile with normal grays loaded into Windows), the grays of the converted photo (converted from regular to the spyder profile) stay gray. The colors change - I can see the adaptation - but the yellow cast isn't there, and the colors don't seem outrageous at all.

That didn't make sense to me.

I expected yellow grays to show up in the photo, since yellow grays is what I see when I load the profile into Windows 7.

Now, I had written a long story about this, with possible causes, but then I stumbled upon a website which claimed something simple I wasn't fully aware of: loading the profile into Windows 7 does change the monitor settings (called 'calibration'), but NOT the colors (called 'profiling') - of course, the colors look changed due to the monitor calibration being different, but it's not due to any color conversion going on - there's no conversion between an sRGB standard profile and the Spyder's one.

That totally made sense.

A color managed application has to explicitly convert the photos it shows, using the profile set by windows with a possible starting point being an embedded profile in the photo itself (or standard sRGB if no profile is embedded). And the desktop and any 'color unmanaged' application is not following the color part of the profile: it's only following the calibration part (it can't escape that, because calibration is done through the video card).

The yellow cast is caused by something in the video card's LUT (LookUp Table), not by the color conversion in the profile.

Mind you - to add to my confusion - a color profile can be set to four different rendering intents (the way a photo is 'painted' to the screen). And the Spyder profile does produce yellow cast in a converted photo when I set it to render Absolute in stead of Perceptual. That might (or not) be an indication what it is in the LUT causing the yellow cast, since the renderings differ for instance in how they treat the white point. It could be that the loaded profile uses an absolute setting where the LUT is concerned... but I'm speculating here.

This whole business was confirmed by testing with a completely different profile selected in a color managed application - Photoshop - with that weird Spyder profile loaded into Windows... the yellow grays stayed, no matter which profile I selected in the proofing part of Photoshop...

The yellow cast is like a completely different property that's skipped by the color management functions. I couldn't get a black and white photo to look black and white on my screen, no matter which profile I selected in the proofing module.

Imagine: my color transitions work fine, but it's as if someone (the video card) draped a yellowish filter over the screen.

I'm not sure how to deal with this problem, nor what's causing this specifically.

It's not the color transformation math. So does the LUT contain a seperate entry for grays? Is it the gamma? Has it to do with the white point?

In the case of 'Me And The Mysterious Spyder' it seems I'll have to tweak the video card portion of the profile, not so much the color part... but at the moment the knowledge is lacking on how the two interact...

I'm still a bit unclear on the interaction, because I can't imagine the profile designed specifically for my monitor by the Spyder doesn't somehow mix the two. If I tweak the LUT part, is the color part still correct or is the color transformation actually counting on a lack of one of the color channels?

Well, let's find out...

So it's back to the documentation, I guess you now understand why, seeing my confusion about the subject :-)

In the meantime I'll work further on the proofing part, because I have an explanation for the lacking yellow in converted photos, so the application is actually working properly so far...

I contemplated showing you the examples, but your browser might be color managed, in which case you probably would see something different than what I am seeing. And apart from the philosophical questions one can also ask (are you seeing what I'm seeing and how to confirm that?), this subject is unclear enough as it is...

Friday, August 12, 2011

Roof...

...in St Peter's Basilica...

Rome, 21 July 2011

Click on photo for the full version...

Monday, August 8, 2011

Your Colors or Mine?

[Please note that this post is part of a series describing my first wobbly steps into the world of ICC color profiles. The aim is to build an ICC color profile editor from scratch. Seeing how I started this project with no knowledgde whatsoever on the subject, it's wise to realise that some of my findings described in these posts are incorrect. The incorrect conclusions are usually corrected in later posts. For the whole series in one go, click here.]

So what have I been doing in the meantime?

Well, I dove into color profiles and their mysteries!

Not very exciting unless you're a geek.

It started when I decided it was time to try to calibrate my screen.

I have been using a color profile mind you, but that's always been a more visual oriented approach.

So I bought myself a Spyder3 - which is a colorimeter you attach to the screen - and let it do its tricks to determine what the profile actually should be for my screen (if you're a complete novice, google 'color profiles' to find out why you need them).

Low and behold... it worked... but the results were doubtful to say the least.

The screen became too dark, and the pretty neutral gray I had created visually, turned into a dirty yellowish brown. Only with my color imagination stretched beyond borders I could visualise 'gray'... but only because I knew it should be...

That wasn't right.

No matter how I fiddled with the software, the profile didn't budge. Every time again those horrible grays.

And anyone who's got knowledge about this subject will tell you that neutral grays are important.

In the end I went back to my visual profile. The grays actually look gray in that one, and on sight I adapted the profile slightly towards the created profile by the Spyder (using Windows Color Calibration functionality).

I concluded the hardware of my laptop is probably too limited for a truly proper profile.

Then I thought: why not fine tune the profile the Spyder produces? Perhaps I can tweak it a bit and get rid of those yellowish brown grays that way...

Then I discovered that's not really easy, because there's no good software around to do that.

Actually there is, but you have to pay through the nose for it. Kodak produces some modules, but those range from 600 to 6000 dollars. Incredible, just for tweaking a color profile. There's more manufactures out there, but prices are equally staggering.

At www.color.org you can download a profile inspector for free, which allows some manual editing, but it's not intuitive at all, and more importantly: you don't see the immediate result.

So then I thought: I'll write my own editor.

Kind of a bold thought actually, with me knowing virtually nothing about color profiles or how they operate.

Even more daring when I tell you that I dont want to build just a profile editor, I also want to see what my photo will look like with an adapted profile, preferably on the fly. So it needs to have proofing.

Currently - after frustrating days - I'm now finally getting somewhere.

I first concentrated on reading the profile and extracting the header information. Similar like the application on www.color.org. Then I realised I needed proofing, so I dove into the actual use of color profiles under Windows 7. I won't bore you with the details, but I'm currently capable of converting bitmaps between different color profiles, exactly the thing I need. Well, not exactly, because now I have to make it work with at least JPGs... another hurdle... but I'm getting somewhere.

Then if that actually works on my screen, I will have to start designing a user interface for the data in the profile. And that means understanding first what's going on inside of them and how the math works.

There's comprehensive documentation out there, so I still have good hopes, but it will be a while before I have a functioning editor (if ever).

I'll keep you posted...

Sunday, August 7, 2011

Bridges

...over the Tiber...

Rome, Italy, 20 July 2011

Click on photo for the full version...

Thursday, August 4, 2011

King Tut

Living statue at Piazza Navona...

Rome, Italy, 21 July 2011

Click on photo for the full version...

Saturday, July 30, 2011

Scalinata della Trinita dei Monti

...or 'Spanish Steps'...


At the fountain in front of the 'Spanish Steps'...


Rome, Italy, 19 July 2011

Click on photos for the full version...

Thursday, July 28, 2011

Dome

Dome and roof of St. Peter's Basilica...

Rome, Italy, 21 July 2011

Click on photo for the full version...

Tuesday, July 26, 2011

Capturing the light

In St. Peter's Basilica...

Rome, Italy, 21 July 2011

Click on photo for the full version...

Monday, July 25, 2011

Marcel

...captivating his audience with his dancing finger puppets, on Piazza Navona..​.

Rome, Italy, 21 July 2011

Click on photo for the full version...

Saturday, July 23, 2011

Self portrait

In St. Peter's Basilica..​.

Rome, Italy, 21 July 2011

Click on photo for the full version...

Pantheon

Sunlight through the opening in the roof hitting part of the inside upper wall of the Pantheon..​.

Rome, Italy, 20 July 2011

Click on photo for the full version...

Thursday, July 21, 2011

Rome

St. Peter's Basilica, the balcony where the pope does his thing (waving and such)...

Rome, Italy, 21 July 2011

Click on photo for the full version...

Saturday, June 25, 2011

M9Tether 2.1 released

Version 2.1 contains two new features.


New in 2.1

The first is a light trigger through webcam. Read about that one and how to use it here (with pretty screen shots).

The second feature is the ability to overwrite the guessed aperture with your own preset f/stop. Read about my struggles with that one here.

Adds scaling possibility through a value in the ini-file, enabling M9Tether to be shown smaller or larger than the default. For a short explanation on how to change scaling see here.


Bug fixes

Fixes a problem when shooting tethered manually: the results would not open in the set (or default) application.

And not really a bug: changed the EXIF temperature reading to more reliable code.


Download

See http://www.mymymyohmy.com/software/m9tether.html for the details and download.

Friday, June 17, 2011

Yet another quirk

Working on a new feature of M9Tether, I noticed yet another quirk of the M9 (they're really stacking up).

I'm trying to overwrite the makernote field of the photos produced by the M9, specifically a field called 'approximateFNumber'.

The name is an invention of ExifTool, since I don't think Leica published this information.

Lightroom however reports on this field, showing what the f/stop more or less was when the photo was taken, but it's usually off. And that's because the field is a guessed value (hence the 'approximate'), based on light reading of the sensor and of an extra thingie on the M9, near the red dot. There's no electronic connection between lens and body, so the M9 never knows for sure what the aperture of the lens was.

A user suggested an option in M9Tether to overwrite this 'guessed' field with the actual value, which I thought was a great idea. You set the aperture in M9Tether, and it's written into the field automatically on the transferred photos.

After some research I managed to decypher the makernote field.

The value is not an f/stop at all, but a number, representing the f/stop.

Then it took me a while to figure out how to get from the number to the f/stop. That involved some math (at first I thought it was a simple table representing the whole and half f/stops, but not so...)

Then, with the new feature finished - quite cool, I tell M9Tether 'fill in f/5.6' and Lightroom reports a nice f/5.6, even when the M9 thought it was f/16 - I noticed that the M9 doesn't update the approximateFNumber field internally when shooting tethered through the 'Shoot' button.

Manually everything works ok, but if you change the aperture of the lens and take a shot through the button, the approximateFNumber isn't updated, no matter how big the aperture change: it just stays the same.

Until you take another photo, then it's updated.

For some mysterious reason it's lagging one photo behind.

And for a geek like me that's infuriating, since I also want to present the original 'guessed' value, which now turns into a super-guessed-totally-wrong value on some photos.

I've tried everything. Resetting, clearing the cache, releasing certain objects in between... to no avail. And it's not just the transferred photos. Also the photo on the SD card. Exactly the same problem. So it's not a matter of the transfer starting too early or going wonky with old data.

The annoying part is that the makernote field for guessed f/stop isn't written directly, but calculated from the earlier mentioned other values, obtained by measuring light. And those values dó change, also when using the 'Shoot' button. These values are also stored in the makernote, so they're quite easy to trace.

This makes me believe it's not something I can fix directly.

If the base values dó change, the approximateFNumber should also change, but it doesn't. It's like the camera skips over the calculation or takes the values from the previous measurement, in hindsight.

So now I'm investigating formulas to get to the aperture indirectly through the measured light values, since those are adapted immediately. But the documentation I could find on this (for the M8) doesn't make sense. The formulas work sometimes, but not all the time, so I'm slightly stuck...

Now, you'd think this isn't a huge problem, because for the overwrite feature MTether overwrites the field anyway, who cares what it was originally?

Well, not totally true.

I'd like to present the guessed value next to the proposed value, so the user can decide last minute. And worse, at least the first photo taken with M9Tether through the 'Shoot' button after an aperture change, will have a wrong 'guessed' value.

I'm not sure at the moment how to deal with this one...

The M9, you've gotta love it, but I think the PTP implementation deserves more attention from someone at Leica.

I'd be happy to do some consulting for them, cause by now I can dream PTP...

[Edit: then finally, after some more experimenting, I realised it: the 'Shoot' button doesn't engage the metering system like the shutter button... it's like 'soft' release, and most likely that's why the values come too late to be written into the photo... I know this still sounds a bit off, but it must be something along those lines, because I was wrong with the light reading values: they also stay the same... the PTP release simply skips over some stuff necessary for this to go right, because it can't lock exposure... it probably fills the right registers when the photo is already being taken as opposed to regular release through the shutter button, where the metering is done on the second stop when pressing down... A little experiment confirmed this: shooting two photos through the Shoot button and changing the aperture in between, but engaging the meter between the two shots by pressing the shutter button half way and releasing it (without taking a photo)... Then the second photo reports the right value... Seems there's no way around this one until Leica releases a two stage trigger through PTP (if ever) in stead of this instant shoot, which apparently relies on the previous shot for the makernote values...]

Thursday, June 16, 2011

M9Tether version 2.0b released

Version 2.0b doesn't contain new stuff, but it's adapted to deal with the new camera firmware (1.162).

Version 2.0a only operates fully on firmware 1.138, with some functionality blocked if the software detects different firmware. It was a bit of security, so I could test new firmware myself first. It seems firmware 1.162 doesn't change PTP in any way, and everything seems to work without problems, so I unlocked it in version 2.0b.

If you want to use RAMDisk mode, see camera temperature and shutter count, and you have firmware 1.162 loaded, download and install this new version.

See http://www.mymymyohmy.com/software/m9tether.html for the details and download.

Wednesday, June 8, 2011

M9Tether version 2.0a released

Well, sad to say, that didn't go very smooth.

A last minute change before releasing 2.0, without retesting all the new options, led to problems.

If you removed the SD card, started up the camera and the software, and answered 'yes' to the RAMDisk question, you would be presented with an access violation.

It's fixed in release 2.0a and should now work as promised.

See http://www.mymymyohmy.com/software/m9tether.html for the details and download.

Monday, June 6, 2011

M9Tether version 2.0 released

Version 2.0 contains some bug fixes and two new features.


RAMDisk mode

Adds 'RAMDisk mode'. RAMDisk mode allows for shooting tethered without SD card and it speeds up the transfer (especially shooting DNG benefits). Read about this new feature here. There are some considerations, so please read the whole page.


Remote control through iPod

Adds remote control through iPod via iTunes (most likely also through iPhone/iPad). Read about this feature (and how to install) here.


Bug fixes

Adds check on the transfer folder. M9Tether will now warn if it doesn't have permission to write into the folder. In previous versions this could lead to an error in the middle of a transfer, freezing up the camera.

Fixes bug on Vista and possibly on some Windows7 systems: closing the application with the restore option on, could cause M9Tether to freeze, because the restore commands were sent to the camera too rapidly, invalidating the WPD software representation of the camera. This led to a freeze of the software. This seemed to be mainly a problem on Windows Vista.


Download

See http://www.mymymyohmy.com/software/m9tether.html for the details and download.


Version 2.1?

Yes, that one is already in the making and will have the ability to trigger the camera through your webcam, reacting to sudden changes in brightness.

Monday, May 23, 2011

Another crazy idea?

I have been looking into methods of making M9Tether more remote. To be able to control it (on the PC) through Wifi. It's for a specific need: those lightning shots.

I want to place the camera and laptop outside, but control the whole setup from inside.

You have no idea what mosquitoes can do (or perhaps you have...) if you don't move around. And these photos take extended periods of time trying to stand still, waiting for the moment... in the meantime I'm being sucked dry by these pesky creatures.

The first thing you think of obviously is the iPod (or a really long USB cable, but that's rather impractical).

But there's two problems with the iPod: I don't like Apple's App Store policy (in fact I don't like Apple at all... they surpassed Microsoft with their control issues). You actually have to pay them to develop for iPod... and you need an Apple computer (perhaps not anymore, but it's kinda handy).

So I thought: how to utilize the iPod without actually writing an application for it?

Now, Apple wrote quite a neat remote for iTunes, so that got me thinking.

What if I supply an M9Tether album, with the tracks having command names? So you'd have in the album for instance 'M9TetherShoot.mp3'. Than if you play it, through the remote, the camera would shoot...

Yes I know, it sounds kinda out there, and rather improvised, but I think it would work... You could actually control the whole camera that way.

I already got M9Tether to play tracks from iTunes, not that practical... now what I need is the reversed. If iTunes plays a track, M9Tether's got to act...

[Edit1: well, this actually works! It's not very sophisticated yet, but whenever I start playing a song in iTunes - also through the remote - the camera snaps a photo...]

[Edit2: It's a little bit more sophisticated now. Whenever I play a track with the name 'M9T_Shoot' it snaps a photo, then it rewinds the track after the camera is done... it's indeed a crazy idea, but it works beyond expectation and it's now possibile to not just shoot, but also adapt the settings, e.g. with a trackname like 'M9T_SetISO400'... I think I might be able to drag this even further into bizarro land, because it should also be possible for the endresult (the photo if it's JPG) to show on the iPod, if I can immediately set the album artwork...]

[Edit3: Well, setting the album artwork actually works, but it's not refreshed properly on the iPod (you have to click around a bit before it shows) and it makes the whole setup unstable, so I'm going to leave that one for now. In the meantime I can shoot remote and set ISO remote. It works like a charm, although through my Wifi router there is some lag. That's gone when I connect the iPod directly to my laptop, the intended setup anyway. Now just a matter of extending the album and this feature is finished...]

M9Tether 1.9 released

Version 1.9 contains some bug fixes and a few new options.


Showing camera temperature

(yes yes, also in Fahrenheit... but not in Delisle, Kelvin, Newton, Rankine, Réaumure or Rømer... sorry for that... and apologies also to any other scientist out there who invented a temperature scale not mentioned here... And might I add: points for effort to Delisle! He's clearly The Man! He seems particularly nutty, swimming against the tide and all that, I like him already... I might add him after all in version 2.0...)


Adds temperature reading from the EXIF data (it's not read directly from the camera but from the photos that are shot).

This only works if JPGs are viewed in the internal viewer of M9Tether, or files are stored on the PC. If both options are turned off, there's no photos passing through to read the EXIF data from.

The temperature field is read from the makernote data. I'm not 100% sure I have all the offsets right. Please shoot me an email if you see unrealistic temperatures pop up and if possible include the photo that caused the wrong reading (only JPGs directly from the camera please, no DNG or JPG later exported from the DNG - contact under 'Contact' on the download page).

In anticipation of new firmware I've locked this function to only operate on firmware 1.138. Any new firmware will first be tested by me and I'll then release a new version to reinstate it. Rather no temperature, than scare you with a possible wrong one - help, my camera is on fire - since new firmware might deal differently with the makernote field.


ImageUniqueID or shutter count

Adds ImageUniqueID reading (the shutter count - or so it's commonly believed) from the EXIF data.

This only works if JPGs are viewed in the internal viewer of M9Tether, or if files are stored on the PC. If both options are turned off, there's no photos passing through to read the EXIF data from.

The ImageUniqueID is presented in the Info window, with a timestamp. It will show you the last number M9Tether encountered.

Be aware that this number is not necessarily the latest one. If you shoot tethered without transferring to the PC and without viewing the JPGs, no photos pass through to read the value from, so you'll be looking at an outdated value. That's why the date/time stamp was added.

If you see '[to be determined]' it means no photos have passed through yet.

In anticipation of new firmware I've locked this function to only operate on firmware 1.138. Any new firmware will first be tested by me and I'll then release a new version to reinstate this option.

OMG My Camera Has Been Used Before I Bought It, It Wasn't As New As I Thought It Was, Have I Been Cheated?!

Don't be shocked if the shutter count differs from the filename count. It's quite normal to have 200 - 300 shots difference. Those are the shots taken at the Leica factory when they test the camera. If the difference is a lot bigger (or mymymyohmy, the shutter count is actually smaller than the file name count!) consider that M9Tether might contain bugs or that your photo numbering got reset (e.g. by switching memory cards or loading new firmware)...


Save option in JPG viewer

Adds option to save the JPG in the viewer. This option seems redundant, since the JPG is stored on the SD card, but a new future option where the RAM disk of the Leica will be used, makes this a useful addition. If you had 'transfer to PC' switched off you still can save the photo this way.

Two buttons ('Save' and 'Save As...') were added to the button row that pops up when you move your mouse towards the bottom of the viewer. The save options are also added to the right click popup menu.

Use 'Save' to save it under the set folder in the main window, with the current file name (it will warn if a file with the same name already exists). If the set folder in the main window doesn't exist, the Save button will be disabled.

Use 'Save As...' for a new location and/or new file name.


Bug fixes

Fixes some memory bugs where PROPVARIANT structures were not initialized. I don't think these bugs were a big problem to the functionality of the program, but nevertheless...

Fixes a crash on the Cancel button in the window that appears when starting up M9Tether with multiple PTP devices connected to the PC. The application would attempt to close a device that hadn't been opened yet.


Download

See http://www.mymymyohmy.com/software/m9tether.html for the details and download.


Version 2.0?

Yes, that one is already in the making and will contain the RAM disk addition, enabling you to shoot tethered with faster transfer times and without SD card. It's working quite well, but I have some details to work out before I can release it.

Saturday, May 21, 2011

Lightning over Malaysia III

Photo taken 21st of May 2011, click on it for the bigger one...

Friday, May 20, 2011

Secret II

The 'secret' RAM disk of the Leica M9 proves to be rather useful.

It didn't give me the big speedup I was hoping for though, but the transfer does go faster.

On my PC transferring a JPG (fine / max resolution) takes about 6 seconds before it shows up in the viewer. With the RAM disk enabled it takes about 4 seconds. That's still a respectable 30% speed gain.

Another big advantage: you can shoot tethered without the SD card in the camera. The camera happily takes a shot and stores the photo on the RAM disk, without complaining about a lacking card.

I have to fine tune this a bit. The object on the RAM disk needs to be deleted before the next shot is taken, and I haven't accomplished that yet. Makes testing a bit awkward, because after one shot I need to switch the camera off to empty the RAM disk, else the camera freezes up. Also the DNG + JPG setting doesn't work, because the RAM disk can only hold one object (even when the RAM disk is not filled up fully).

So my first step will now be some functionality to automatically wipe it clean after transfer.

Another headache with this: the filename on the RAM disk is always the same: M9_0001.dng. I haven't checked the EXIF yet to see if the unique numbering simply continues or what the next shot on the SD card is, but when using this I obviously have to implement some solution to give the transferred file a unique name on the PC.

I'm still unclear as to what the RAM disk is exactly or why Leica put it in there. I've been asking around, but so far no answers. There's not many options though. It's either for internal testing at Leica, or for tethered shooting, with the specifics about it perhaps released to some software vendors when they ask for it.

Leica does not mention this in their technical specifications (under 'storage' they only mention the need for a card), so thus far I am inclined to believe I discovered something undocumented.

Wednesday, May 18, 2011

M9Tether development - secret discovered?

Got some feedback from a M9Tether user in the UK, who likes to photograph in Canada on snowy mountains (I'm a stickler for privacy, so I won't mention his name without his permission).

He seemed quite happy with it, but had some remarks. One of them was the idea to overwrite the aperture field in the EXIF data, since it's a guessed value. The camera doesn't know the F-stop of the lens because there's no electronic connection between lens and camera body. The camera just guesses a bit through a secondary light reader (a small dot near the red label).

I liked the idea.

Set a value in M9Tether and the field is filled in properly, since you know what the F-stop is. Obviously there's a lot of room for error if you change the aperture but not the setting in M9Tether, but hey, then it's your own fault. And I won't touch the DNGs on the SD card. This would only be done on the transferred files, so the original is always there as a backup 'guess'.

So I dove into the EXIF of the DNG and JPGs produced by the M9.

Turns out the setting is in the Makernote field and overwriting it isn't too difficult, but it requires some more research on my part, plus some safety features, like anticipating firmware changes.

If the targeted field starts to shift after new firmware it could seriously corrupt files.

Then I discovered something else: the temperature of the camera is also stored in the Makernote.

And since reading is somewhat easier than writing, I decided to start with that one.


Secret?

Then I got interested again in some mysterious fields I haven't been able to figure out. And low and behold, I think I discovered a Leica secret!

I've successfully enabled the RAM disk in the Leica (yes there is a RAM disk in there, I just don't know what I'm looking at: the buffer or something additional - if you read this and you know what it is, let me know) and I am now able to actually record a DNG on it. It has exactly enough space for one DNG.

So far that RAM always stayed empty, I've looked at it before.

I presume Leica put that RAM disk in there for either testing the M9 internally in their factories, or for tethered shooting. The option to turn on the RAM disk isn't documented (not that I know of anyway), but it's a very pleasant discovery if it does what I think it does.

Haven't tried to get the image out yet - which seems to be mandatory, because a second shot freezes the camera: the ram disk is full.

So at this point I'm not sure if this is going to lead to something. Also have to figure out if the necessary events for picking the DNG from the RAM disk are available, and if that succeeds, if the pick up can be done before the write to the SD card (if that's still going on, also something I have to test). I might then be able to start skipping the SD card reading (that would be a big bonus). If this succeeds it will speed up the transfer quite a bit.

Will keep you updated and I think I will release 1.9 soon with at least the temperature reading...

Monday, May 16, 2011

Annoyance

Discovered something annoying about Lightroom.

When exporting to JPG the saturation of the original isn't the same. The JPG looks slightly under saturated compared to the original in Lightroom.

After some Googling this seems to be a well known problem, with a lot of people pointing to color spaces (sRGB versus ProPhotoRGB) or monitor profiles.

Now, despite the fact that profiles and color spaces surely can have their effect (depending on the program you view the JPG in) I don't think that's the whole story.

I have my doubts, because if it's ProPhotoRGB versus sRGB, why is it that an exported TIFF in ProPhotoRGB (doesn't matter with what settings, 8/16 bit, compressed or non-compressed) with Lightroom, on a monitor without a profile, also looses saturation when viewed in Lightroom?

When I compare the original RAW with the exported TIFF there's a difference, mainly in saturation.

Surely an uncompressed 16 bit TIFF should look exactly the same when exported with the same color space as the original, when viewed in the same program that supposedly uses ProPhotoRGB as working color space? But it doesn't... so what am I missing here?

I must add though that the assumption that Lightroom uses ProPhotoRGB is mainly taken by hear say. It's claimed by a lot of people on the Internet, but I think the first step should be to confirm it myself through some info from Adobe.

Then I'll be doing some more testing, since it seems that there's also a difference between RAW files. My older Canon 40D files seem to be less affected by this problem than my 5DII files. But perhaps it's me not noticing this sooner, because it's not something you would expect. Or perhaps it requires certain tweaks in Lightroom that I only applied to my recent photos.

I also want to have a good look at the DNG files. Perhaps this is more specific to the RAW conversion of Canon files.

I have a vague idea that this problem has 'something' to do with the 'blacks' slider and less with color spaces (or perhaps the mysterious black point moving around, thus a combination of converting color spaces with a cranked up 'blacks' slider), but I'll be testing that a bit more.

Yes dear reader, when it comes to the digital world, almost nothing is simple. These manufacturers don't seem to be able to come up with a lot of definite standards. Try browsing through your PhotoShop's 'color settings' and you'll know what I mean. It's a mess. No sane person would actually want to know how it works, but sometimes you have to... so, reluctantly I'm now diving into the fascinating world of color spaces...

Some suggest you should export as TIFF, then do the main work in PhotoShop, but that adds a tremendous amount of work to the whole work flow and it sort of defeats the purpose of all those handy sliders in Lightroom. If it's really color space, I wonder why Lightroom can't be switched to sRGB.

Here's an example, created in a somewhat unorthodox way: they are shots, snipped directly from the screen. That does seem to preserve the original saturation.


The first is from the original as viewed in the Lightroom Develop module. The second is from an exported 16-bit TIFF in ProPhotoRGB also viewed in the Develop module.

The difference is what I see in Lightroom.

Kinda ironic that I can see my saturated example as JPG, but that I have to copy/paste it directly from my screen. Come on Adobe...

I mean, how is it possible that a simple cheap screen grabber gives me the JPG I expect to see, but the export from a sophisticated piece of software doesn't come close (well, relatively speaking)?

I don't have an explanation.

Obviously, with the JPG export the ProPhotoRGB to sRGB conversion doesn't help, which might explain the stronger effect with the JPG compared to the TIFF, but I first like to figure out why the TIFF looses color too and if I'm missing something here (apart from my saturation!)...

Saturday, May 14, 2011

Slideshow

Added somewhat of a slideshow to the main album page. Some of my own personal favorites. They are randomized, which means the order in which they are shown will change every time you refresh the page. You can click on any of them to see the full version.

Turns out there was an error in the photobrowser code, causing Firefox not to show that last thumbnail with 'Info' on it if you viewed an album. That one is fixed.

The 'Info' thumbnail produces a page with some info about the album and a background story if there is one. The info page also shows any related albums.

Also, you might have spotted it already, the first album of Hong Kong is online.

For the album with 13 photos click on the photo and for the story click on the very last thumbnail in the album.

Thursday, May 12, 2011

Festival

Although technically some of the photos in the next 'new' album do not meet my self imposed present day standards, I show them anyway, since some of them do reflect the atmosphere of the event quite well. Also the resizing to 'bigger' doesn't help some of them, so not all photos are resized in this album (mostly the portrait ones).

It also contains a few new ones not shown before.

For the album click on the photo and for the story click on the very last thumbnail in the album.

Monday, May 9, 2011

Downside Up

Was playing around with older photos from Zoo Kuala Lumpur.

Was concentrating on this one:

Not great, bad lighting, black creatures lit from above hanging upside down at the wrong time of day with the sun full out. Makes it hard to see any details or their heads and the contrast is harsh. Fill flash might have worked, but I wasn't that advanced back then.

I do have flashes now for the Canon, but I hardly use them.

They're inconvenient, too much hassle, and with a bit of a lens they propel the camera to 2 kilos. Let alone the fact that flash photography is darn complicated. As if taking a good photo isn't difficult enough...

Truth though is that this photo was taken with a Canon EOS 40D, which has the built in flash, I simply didn't realise I should use it during the day...

Anyway, playing around with the photo I thought: what if I turn the picture over, like they were standing?

And I found the result to be quite interesting (note that the crop is a bit different, so this one has more bats):

They transform into these elegant fashion models, wrapped in designer clothing, with the one in the corner about to break into dance (and perhaps song)... little Grace Jones'... you can almost see him tip-toeing around the others on some Tchaikovsky...

They also seem more vulnerable, standing up, and less intimidating... these guys just eat fruit by the way, so they're quite harmless...

Amazing faces also these bats. They somehow reminded me a bit of pictures of Egyptian gods, and after some googling it turns out I was thinking of Anubis, ancient Egyptian god, protector of the deceased and their tombs. The guy with the jackal head...

Still the not so great lighting, that didn't change :-)

Anyway, thought I should share...

Click on any of the photos above for the full new album of Zoo Kuala Lumpur with 21 photos.

Saturday, May 7, 2011

Qibao

The next reworked album is not for the squeamish, vegetarians or devout animal lovers.

They better not click on the photo, which in itself looks harmless: the album behind it isn't, especially with the bigger size photos...

Don't say I didn't warn you if you choose to ignore these words (and note that despite my somewhat dry sense of humour, I'm really only partially kidding here)...

It was the next - rather gloomy - day in Shanghai, visiting Qibao... from that same brochure:

Located in the center of Minhang District of Shanghai, only 18 kilometers (11.18 miles) from the downtown area, Qibao Ancient Town can satisfy your curiosity about ancient water townships without the bother of either long distance or the rush of crowds. As the only ancient town forming part of greater Shanghai, with a history spanning over one thousand years, Qibao is more than just a living fossil of ancient Chinese conurbation and urban planning.

The town was built in Northern Song Dynasty (960-1126) and grew into a prosperous business center during Ming (1368-1644) and Qing Dynasties (1644-1911). Qibao is the Chinese for 'seven treasures' and there are two popular theories about its derivation. The more reliable one says that the name originates from the Qibao Temple, famed for its good reputation. It was this that contributed to the growth of business and culture of the previously unknown town. The other theory seems more popular among the local people who tell folk tales about seven treasures. These were an iron Buddha made in Ming Dynasty, a bronze bell also dating from the Ming Dynasty but said to have mysteriously appeared from nowhere, a Gold Script Lotus Sutra written by an imperial concubine of the 10th century, a one-thousand-year-old Chinese catalpa tree, a jade axe, a gold cockerel and a pair of jade chopsticks. Actually of these seven treasures, the existence of only first four can be verified while only the Scripture and the bell have survived to this day.


Click on the photo to see the whole album...

Click here for the total index.

Thursday, May 5, 2011

Favorites?

Sometimes people ask me: what are your own personal favorites?

Well, actually nobody has ever asked me that, but let's pretend...

I have a bunch, with some favorite-favorites, so when they ask me that question I always show them at least this one:


Or, depending on my mood, this one:


No just kidding... Charlie is cool, but he's no match...

I meant 'or this one':

If you stare at it a bit you can almost hear the silence... I think it's the still water responsible for that effect... anyway...

The weather was nasty.

It was cold - December, around 5 degrees Celsius - and drizzling almost the whole day. My shoes were soaking, the water was creeping up my trousers and my mood wasn't too great after slouching through the rain with only 4 hours of sleep.

But that all lifted pretty quickly when I saw the scenery.

And there are some advantages to not so great weather: less tourists polluting the nice scenes and the rain and mist do give a different atmosphere you won't find in the brochures.

It's Zhouzhuang, an hour drive from Shanghai, also called 'the Venice of China'... you can see why...

From a Chinese travel brochure:

Zhouzhuang, one of the most famous water townships in China, situated in Kunshan City which is only 30 kilometers (18 miles) southeast of Suzhou. It is noted for its profound cultural background, the well preserved ancient residential houses, the elegant watery views and the strong local colored traditions and customs. In the Spring and Autumn Period (770 - 476 BC), Zhouzhuang was a part of the fief Yaocheng and called Zhenfengli. After being donated to Full Fortune (Quanfu) Temple by Zhou Digong, a very devout Buddhist, in 1086 during the Northern Song Dynasty (960 - 1127), Zhouzhuang got its present name as a memorial of the donor. In an area of half a square kilometer (124 acres), 60 percent of the Zhouzhuang's structures were built during the Ming and Qing Dynasties, which is from 1368 to 1911.

These photos are from one of the reworked Shanghai 2007 albums, click on any of the photos above, to see them all.

Click here for the total index. You'll find all the reworked and new albums under 'New albums' (how convenient...).