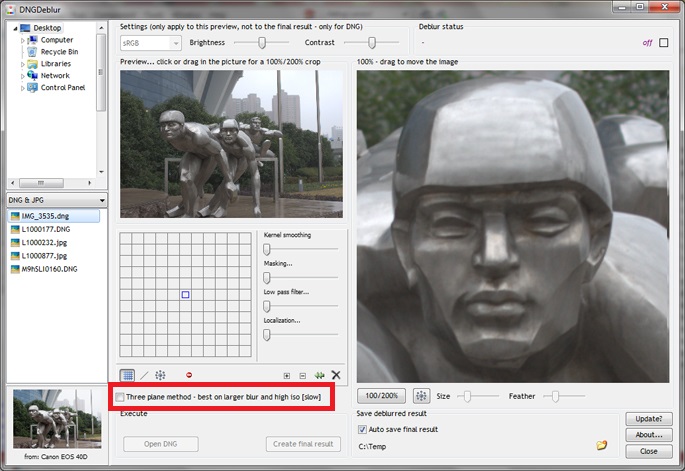
But first let me show you an option in DNGDeblur that might easily be overseen. It's only applicable to DNGs.
The one or three plane method for DNGs
You can see the option if you have opened a DNG. See the next screenshot, where it is surrounded by the red square.
 Option to select the slower three plane method for DNGs...
Default it's turned off, since it's slower than the one plane method.
The one plane method only deblurs the green plane of the DNG (after interpolating it in the background into a full monochrome photo). Then, through some comparing with the original DNG, the red and the blue pixels are interpolated back into the overall deblurred DNG. This method works very well for small blur (say within 2 or 3 pixels), but when the blur gets more extensive, it can lead to color loss, mainly in the reds, or to shifted colors overall. This is because the original DNG is used to base the new red and blue pixels on (in the deblurred DNG). But since the original is blurry, it will eventually lead to errors if the blur is too extensive. If that happens it's best to switch to the three plane method. In that method the green, red and blue are interpolated separately, into three monochrome photos. Then they're all deblurred, and the pixel values for the original green, red and blue are written back and thus form the deblurred DNG.
Both methods produce a non-interpolated DNG.
The single plane method is quite fast for the total DNG (although that will depend on your hardware and from which camera the DNG came), so the biggest downside of the three plane method is that it's three times as slow.
For monochrome DNGs the three plane option isn't available, because a monochrome DNG only contains one plane.
Also with JPEG, the option to select the three plane method is lacking, since JPEG already contains three interpolated planes if it's a color JPEG and 24-bits (not really, because it's a compressed format, but once it's decoded and shown on your screen). So with a JPEG, interpolating values back doesn't make sense. It's much easier to deblur the three complete planes and write them back in full. No interpolation necessary.
The one issue with deblurring DNGs and keeping them RAW
The biggest problem is out of my control, and that's the interpolation methods used. Every RAW converter will use a different interpolation algorithm. So the preview you see in DNGDeblur after deblurring, might not be accurate, compared to how your favorite RAW converter will show the deblurred DNG. To get a feel for the differences and how to get the best results out of DNGDeblur, you'll have to experiment a bit.
For the color preview I'm using a fairly simple interpolation, provided by Adobe. The interpolation in the background, to produce the monochrome planes for the actual deblurring - is done through the more sophisticated interpolation also used in DNGMonochrome.
More on the filter
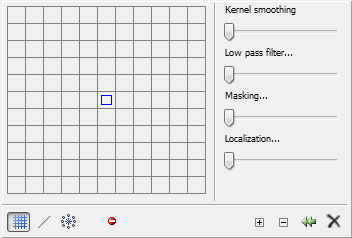
In the free grid you can click with the left mouse button, to turn on a single square, which will then turn green. Click again to turn the square off. You can also 'draw' in the grid by dragging with your mouse. If you drag with the right mouse button held down, you can turn off squares.

Deblur filter, showing the free grid...
Note that after each action (either clicking in the grid or changing any of the sliders), the preview on the right is recalculated, and that causes a noticeable lag. If you have selected the three plane method for DNG (see above in this post) that lag will last longer. Advice is to turn off the three plane method when you're trying to deblur and only turn it on (if necessary) right before creating the final output.
Tip: most deblurring through the free grid works quite well if you start in the center with a small cross and try to improve from there. Working too much off center usually doesn't lead to much good.
The deblur filter also contains a row of buttons at the bottom.
With the first three buttons you can switch between the free grid, the line and shapes tool, and the circle tool.
The fourth button isn't a button. When you move over it with your mouse (no need to click), the preview image will switch to the original. It's meant as a quick compare. When you drag the bigger preview image, or click in the smaller preview image, or use any slider to change settings, the deblurring will also temporarily drop away, when everything is recalculated. This 'mouse over button' is a lot quicker to compare the result with the original, since it doesn't involve a recalculation.
Then you get a plus and minus button, only shown if you have selected the free grid. With those buttons you can zoom in or out on the free grid.
Next to it there's a button to reset the distortion sliders all to zero.
With the last button you clear the free grid, or set the radius and angle sliders (in the line and circle tool) to zero.
I'm currently not too happy with the zooming of the free grid. I think the free grid should also be able to scroll. So that's another one for the todo list.
Battling distortions
The first thing you'll notice when you start using the deblurring filter, either by clicking in the free grid or using the shapes, is how horrible and mangled up your photo will look if you click too freely or use a radius that's too big.
The problem with Wiener filtering (see also previous post) is that it reacts very badly to noise and that it has a tendency to start ringing on edges.
That's where the sliders on the right come in. Be aware though - something I figured out by applying automation (which isn't in the first version yet) - that if you get a lot of ugly side effects, the kernel you clicked together simply isn't the most suitable. For mildly blurry photos there are solutions that work pretty well, without having to use the sliders a lot. The trick is finding those solutions (or a solution that comes close). That's why all the sliders default to zero. However, for most kernels at some point you will have to use them a little bit, so let me explain what they do.
Kernel smoothing
This procedure lowers the values of the kernel, from the center outwards. The more you slide, the stronger the values are toned down. The effect is that a lot of the edge ringing and other side effects start to fade away, without interfering too much with the actual deblur. Though, if you push this slider too far on smaller kernels, you might lose a lot of the deblurring effect.
Low pass filter
This slider has a very strong effect on the higher frequencies and acts as a form of noise reduction. You will probably have to use it a little bit on most of your deblurring attempts, but if you push it too far, the resulting photo will end up more blurry than your original.
Masking
This is quite a complex procedure, involving Sobel masking and applying Gaussian blur to the mask, in an attempt to focus the deblurring on the edges of your subject, without making the deblurring too harsh. It works quite well if the deblurring side effects aren't too gross. If you push this slider too far, you will end up with the original and not see any deblurring effect anymore. Also, using this slider moderately might make you lose the deblurring effect in the darker parts of the photo.
Localization
Localization keeps the pixels within a local area limited in value, to the minimum or maximum of a similar area taken from the original. Downsides are that you have to push the slider quite far for the best effect and that if you go all the way with the slider, you will lose most of the deblurring effects and you might see a block effect on the highlighted edges. Since it involves looking at the blurry original, this procedure will not work very well on more extensive blur. Before I developed the masking procedure (see previous slider), I used this one a lot, but after developing masking, it was not as useful anymore. I might drop this slider in future versions, so my advice for now is not to get too attached to it and try to correct only with the first three sliders.
Next post I will show how the deblur circles work.
Download
You can download DNGDeblur here.
Previous posts about the specifics of DNGDeblur:
- User Interface I
- Introduction

No comments:
Post a Comment