Sunday, November 16, 2014

DNGDeblur - Introduction

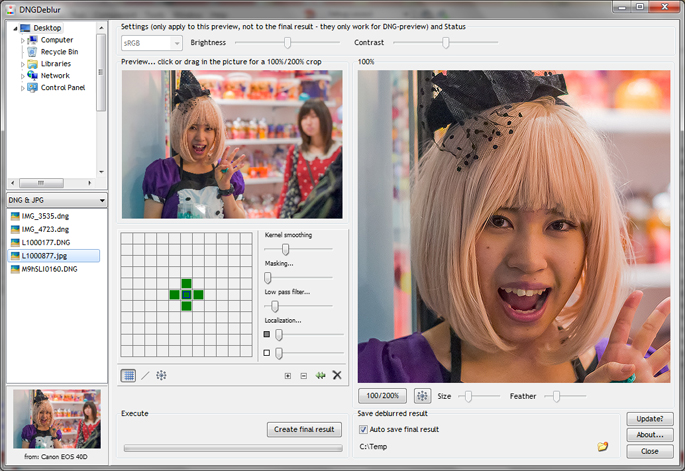
Screenshot of a first version - the official release will look slightly different...


Requirements

DNGDeblur runs on Windows only and was tested on Windows 7 and Windows Vista. It might run on Windows 8 without problems, but I haven't tested it on that platform. It needs quite a bit of memory, and a fast processor never hurts.

And to get an important issue out of the way: I do not intend to develop a MAC version.


Supported cameras

In general DNGDeblur can deblur color or monochrome RAW files from a limited number of cameras - when their RAWs are in the DNG format - and JPEGs from any source.

Note that the term 'deblurring' needs to be taken lightly. This program is not a one step solution to your blurry photographs. It will not work satisfactory on every blurry photo you throw at it (more on that in next posts) and you do have to spend some time and effort per photo to get to the best results. If you dislike post processing photos or if you are by nature an impatient person, DNGDeblur might not be for you.

DNGDeblur supports native DNG as produced by Leica cameras (supported are the S2, M8, M9, M, MM and T - the M-E should also work, if not, shoot me an email).

Additionally, if you have files from a Canon EOS 350D, 500D, 550D, 30D, 40D, 5D Mark II or 5D Mark III you can also use DNGDeblur if you convert your RAW CR2 file (the full CR2, not a downsized in-camera RAW) to DNG, using the free Adobe DNG converter (or Lightroom to export as DNG).

Same story for Nikon D200, D800, D800E and the Sony A7s (and to be clear: also these files need to be converted to DNG first).

I doubted the Nikon D800 and the Leica S2 a bit, because those files are so huge that deblurring the RAW might simply not show in the end result (if a smaller JPEG is produced). These RAWs also take quite a bit of time to process. But the files work in DNGDeblur and don't seem to pose any problems, so why not.

DNGDeblur also supports monochrome DNGs produced by DNGMonochrome, but that's hardly an advantage since the deblurring engine in DNGMonochrome is exactly the same as the one in DNGDeblur (although DNGMonochrome doesn't let you reload your monochrome DNG, in that sense DNGDeblur might be handy). The monochrome support in DNGDeblur is mainly meant for the Leica MM.

The deblurred DNG is currently written uncompressed, so don't be surprised if the endresult is bigger than what you started with. Adobe's DNG converter seems to JPEG compress all files it converts (that's lossless compression). The compression used by the Leica M8 and Leica M9 (on the latter it's optional) is different: that's a lossy compression. But also that compression gets lost in translation by DNGDeblur and you'll end up with an uncompressed DNG.


The Circles

Besides deblurring a DNG or JPEG, DNGDeblur can also deblur parts of a DNG or JPEG in so called 'deblur circles', which can be placed on the photo, much like the radial filters of Lightroom. This is especially handy for photos that have large out of focus areas, where only a face or eyes need to be deblurred. You can place more than one of these circles on a photo, resize them, turn them into ellipses, feather them and drag them around. The deblurring will stay confined within the circles and no part of the photo outside the circles is altered when you create the final output. See this post for an example.


So why can't DNGDeblur handle any old DNG?

I know that DNG is supposed to be a general standard, but as it turns out, it really requires implementing total support of the DNG standard in the software. Some cameras use options that other cameras do not use.

The Canon EOS 550D and the 5D Mark II for instance gave me major problems. When I ran their DNGs through DNGDeblur, the resulting deblurred DNGs contained huge color shifts and a wrong white balance compared to the original. None of the other supported cameras showed these problems. Of course: it was the ActiveArea tag again, not properly implemented by me, so pixels started shifting all over the place. I've been there before with the Canon 5D Mark II. And as it turns out: the Canon 550D has an equally awkward ActiveArea tag, hence the same problem with those files. But the problems are solved for both cameras. Just an example to show that I really need to test photos of every camera I intend to support, before I can open up the software for that specific camera.

However, if you have a camera that doesn't fall into the supported list, you can still use DNGDeblur for JPEGs.


JPEG support

Since I'm not totally opposed to the idea that deblurring RAW files is actually quite stupid (more on this stunning revelation later), DNGDeblur can also handle JPEGs. But only if the JPEG is 8-bit or 24-bit per pixel (that should not be a big problem, most JPEGs are). The deblurred JPEG result is always stored as 24-bit per pixel (also if your input JPEG was 8-bit per pixel) and is written with a 100% quality setting (which cannot be changed).

Since I added JPEG support last minute, the EXIF information in the original JPEG is not preserved in the deblurred copy (to get that right requires a bit more time and effort). I hope to address that issue in future versions, since I consider it quite a serious problem. In fact this was one of my main gripes with some of the deblurring software out there: producing low quality JPEGs with all the info stripped. At least I got the quality right, now I just need to keep the EXIF in tact.

[NOTE: EXIF preservation was added in version 1.1.0, so above paragraph is not valid anymore]

So why the doubt about deblurring RAW, calling it stupid even? Well, RAW files are usually quite big, and with the pixel race still going on (see the Nikon D800 or the Sony A7r) RAW files aren't getting any smaller (although the Sony A7s shows that some manufacturers might be reconsidering). It means the kernel to deblur needs to be bigger, which makes it harder to deblur without introducing a lot of artifacts. Deblurring RAW seems to work fine for files up to say give or take 20mp, but when the files get larger I really doubt the practicality of it. It might be smarter to then switch to a smaller JPEG end product, since a then much smaller kernel can have a much stronger effect. Hence the JPEG support (also a nice bonus for people who skip RAW completely).

However, stupid or not, DNGDeblur started out as an experiment, to see if it was actually possible to deblur a RAW file and keep it RAW. And that it is.


Download

You can download DNGDeblur here.


Next post about DNGDeblur I'll show you a bit of the user interface and try to explain how this deblurring actually works.

Tuesday, November 11, 2014

Two cats

Or one cat moving really fast? No seriously, there were really two...

Kuantan, Malaysia, 5 August 2013

Click on photo for the full version...

Sunday, November 9, 2014

DNGDeblur, almost done...

See the screenshot of the very first version. It's almost done.

Last week I also added JPG support and experimented a bit with some automation, trying to let the computer decide on the best kernel. That second part won't be in version one though, since I'm not convinced yet.

And although DNGDeblur is really aimed at RAW files, it seemed a bit of a waste not to include JPGs. In some cases deblurring the smaller JPG can have an overall better effect and not to forget: some people don't shoot RAW but go directly for JPG.

Saturday, November 8, 2014

Surprised?

Waitress in a crab restaurant taking a photo of me and my friends... maybe she zoomed in too much on my big nose...

Tokyo, Japan, 10 October 2014

Click on photo for the full version...

Wednesday, November 5, 2014

In the subway - II

Tokyo, Japan, 12 October 2014

Click on photo for the full version...

Tuesday, November 4, 2014

Intermezzo

Monkey at the beach...

Kuantan, Malaysia, 26 September 2012

Click on photo for the full version...

Monday, November 3, 2014

Not so glossy

Japan has a very low crime rate, but they do have their criminals...

Tokyo, Japan, 8 October 2014

Click on photo for the full version...

Sunday, November 2, 2014

Glossy

Boyband, being advertised (including music) on the side of a truck, circling around in the area...

Tokyo, Japan, 8 October 2014

Click on photo for the full version...

Saturday, November 1, 2014

Fashion - II

Note the shoes, before you get lost in the colors... in Shibuya...

Tokyo, Japan, 12 October 2014

Click on photo for the full version...

Friday, October 31, 2014

Despair

Late at night on the steps of a temple...

Tokyo, Japan, 10 October 2014

Click on photo for the full version...

Thursday, October 30, 2014

Yet another slider?

Another break in the deblurring business. It will lead to one more slider in the filter, but this might be the 'fix almost all' slider I've been searching for.

The sad part is that I ventured on this solution much earlier, but gave up on it, since the results were not great. The idea was to put a gaussian function over the kernel and thus soften the kernel image towards the edges. But I couldn't get to the right gaussian and make it flexible and fast enough to scale with the radius of the kernel. Besides, the results didn't seem very good anyway on kernels with a small radius - most likely the gaussian dropped off too steep or not steep enough - so I gave up on the idea.

Yesterday I came back to it, still thinking there should be a noticeable difference when lowering the kernel values from the center outwards, so I decided to try a linear approach. Simply lower the values the further they are away from the center, without the curve of a gaussian. And that indeed gave the results I was looking for.

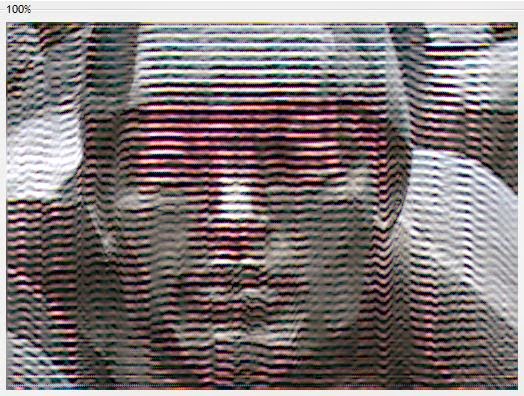
Much of the grosser distortions dropped away, without the need to slide a lot anymore with any of the other sliders. The motion deblurring with the line became a lot more effective, and so did the focus deblurring. And in the free grid, some combinations that before would lead to very big distortions suddenly became usable.

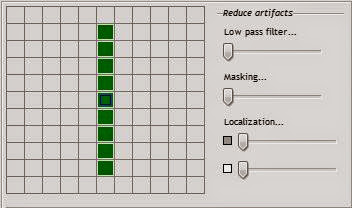
Let me show you an example... this kernel leads to the distortions shown in the photo under it...


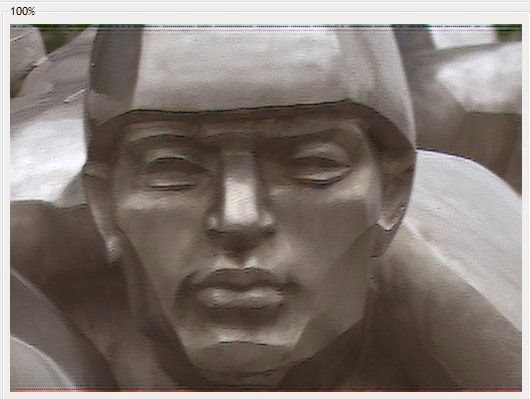
Now with the new slider activated and without any changes to the other sliders...


And although this is not an endresult (a bit of sliding with the other sliders is still necessary), it's for this kernel a result I wasn't able to achieve with only the other sliders.

In combination with the deblur circles (actually they are ellipses now) I think I have a much more workable piece of software.

I know... me droning on about it without you being able to try it is frustrating, but it will be released soon. The deblur circles are finished (last step was to be able to turn them into ellipses) and this new slider will most likely be finished this week. Then there's some cleaning up and running some tests to see if I have all the details right, but that shouldn't take up too much time.

Wednesday, October 29, 2014

DNGMonochrome 0.9.83 released

Because with some changes new bugs are introduced... so, some bugfixes in this new release.

  • Fixes the result when converting with the 'no interpolation - resize' option not acting properly in the new 200% Tools preview
  • Fixes the result when converting with the 'no interpolation - resize' option deblurring too slow in the Tools preview
  • Fixes the full red result and full blue result when converting with the 'no interpolation - resize' option not deblurring at all in the Tools preview

Download

You can download the new version of DNGMonochrome here.

Tokyo at night - I


Tokyo, Japan, 9 October 2014

Click on photo for the full version...

Tuesday, October 28, 2014

DNGMonochrome 0.9.82 released

Some small changes and an important bugfix in this new release.

  • Splits the localization slider in the deblurring filter into two sliders: one for dark/midtones, and one for highlights... this gives more control over the deblurring distortions...
  • In anticipation of the new 'deblurring circles' (not yet available), the 200% preview in the Tools window is dropped, and the 100% preview is enlarged and can be switched to 200%
  • Fixes a memory bug that could lead to a 'whoa, that's a bug' notification after deblurring the same photo (in full) several times in one session
  • Fixes gamma not changing for the small preview picture in the Tools window

Download

You can download the new version of DNGMonochrome here.

Monday, October 27, 2014

Performance

Elderly lady performing... not too bad either...


After her performance... quite content...

Notice also she's wearing indigo blue, also called 'Japan blue'. It's a bit of a traditional color in Japan - a dye made from the Indigo plant - and once you know that and pay some attention to it, you start seeing it everywhere in Tokyo...

Tokyo, Japan, 12 October 2014

Click on photos for the full version...

Sunday, October 26, 2014

A bit gruesome

Well, this has nothing to do with Japan. A shot I took a few weeks ago, at a pasar malam (night market) in Malaysia and it's a bit gruesome, especially after the wedding photo of yesterday.

These night markets are usually fun to walk around on - although after a few you know what to expect - and so was this one, but the scene captured on the photo above I had never seen before on any of the other markets. It struck me for several reasons. Of course, one of the reasons being that where I come from and where I shop, the meat is neatly packaged and unrecognisable. When buying at this butcher on the pasar malam, you don't get away with the ignorant supermarket bliss, never realising that the meat behind the shiny plastic once had a head. Although I don't think the butcher put it there for that reason. Most likely he wanted to show some degree of freshness to the kill, which might have helped to sell the other parts of the cow also on display in several trays behind the head.

But I was fascinated with the head for another reason: the eyes were still open, and it actually looked not dead at all. Rather peaceful I thought. Like it could any moment let out a satisfied 'moo' - such a nice pasar malam - or lick its lips and nose with its wet tongue (assuming the tongue was still in there). And those two things - the severed head, death and destruction, in combination with this peaceful look - was what fascinated me the most about this scene. Then I realised I had no idea how a non peaceful look would show on a dead cow's head and I snapped a photo.

You can click on the photo for the full version, but I understand if you do not wish to do so...

Malaysia, 3 October 2014

Saturday, October 25, 2014

Wedding

Bride and groom posing for their wedding photos... see also here...

Tokyo, Japan, 7 October 2014

Click on photo for the full version...

Friday, October 24, 2014

Girls

Giggly schoolgirls in Shibuya...

Tokyo, Japan, 8 October 2014

Click on photo for the full version...

Thursday, October 23, 2014

Clerk

Desk clerk at a crab restaurant...

Tokyo, Japan, 10 October 2014

Click on photo for the full version...

Wednesday, October 22, 2014

Shinyuku

Of all the Asian cities I've visited, Tokyo beats them all when it comes to the lights and the adverts crammed into only a few streets...

Tokyo, Japan, 8 October 2014

Click on photo for the full version...