Thursday, June 28, 2012

DNGMonochrome - an experiment - VI


...what's lurking in your DNG files that you haven't seen yet?

Turning M9 color DNGs into monochrome DNGs

A series about the development of an experimental piece of software, called DNGMonochrome, able to convert color DNGs into monochrome DNGs...

The software is available here.

Before we go on, let me first show you another example of a photo I was recently experimenting with. It was a difficult shot... at night, dark, a black dog that didn't want to stay put for very long... ISO 640, 1/15sec, not easy to focus but I think I managed on the shimmer in her eyes... I decided to turn the dog into black & white in Lightroom, so she was a good candidate for DNGMonochrome.

Meet Fatty Davis, street dog turned pet, actually a name we constructed after me producing the black & white photo, because she reminded me of a photo of Betty Davis...

(No offense to Betty Davis... Betty, you were awesome, loved your eyes!)

Here's both versions of the unprocessed photo, only cropped and with contrast/brightness adaptations to get the results as similar as possible. There's no big version of this one, so the results here are the uploaded sizes.
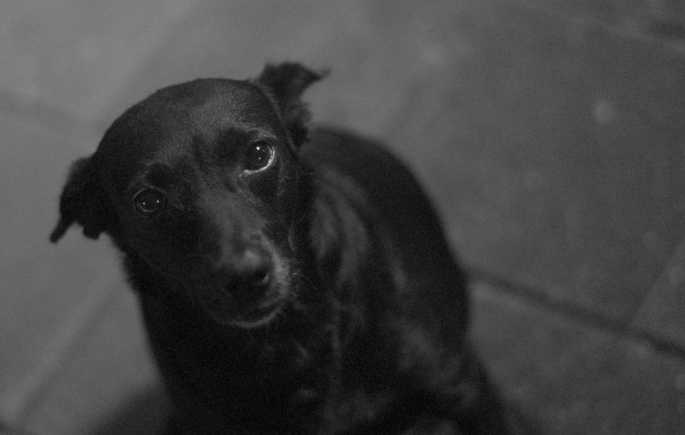

Fatty Davis done by Lightroom B&W...
No sharpening or noise reduction (color nor luminance)...
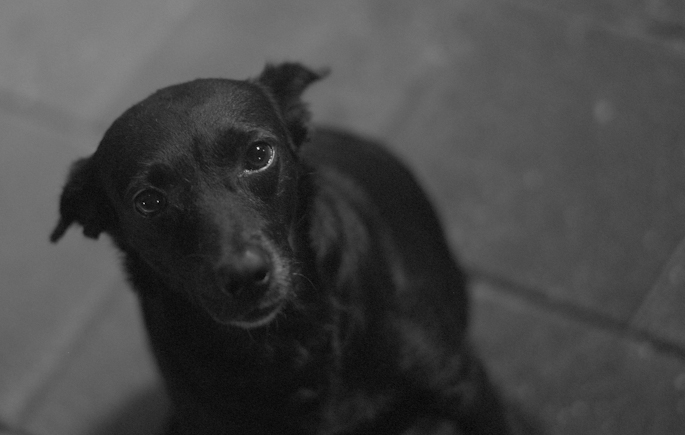


Fatty Davis done by DNGMonochrome...
No sharpening or noise reduction... note also the background and compare, especially the tiles on the right...


No sharpening or noise reductions on either one, and sharpening for the shown size is also not necessary, but noise reduction? Because especially when you start zooming in you discover that on the Lightroom version you really have to work a lot harder to get the results more acceptable... the color noise is detrimental...
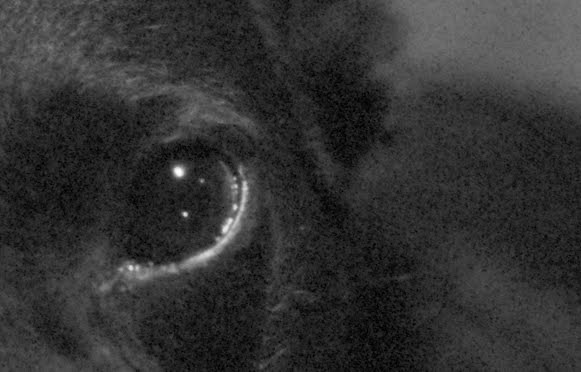

In The Eye of Fatty Davis, done by Lightroom B&W...
No sharpening or noise reduction... (where's the shine?)
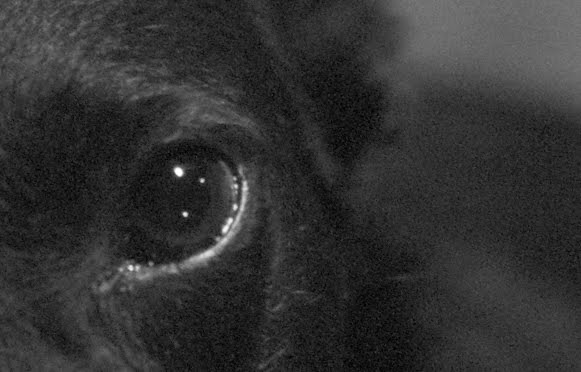


In The Eye of Fatty Davis, done by DNGMonochrome...
No sharpening or noise reduction... (oh, there it is...)


And yes, of course you can get rid of that color noise. Desaturating might actually help out here (didn't try that). But look at the bigger photos: there is hardly a difference to be had by Lightroom's color mixing, because this is the result I was going for. A black dog, in the dark night, on gray tiles... the color photo was already pretty monochrome.

The colors (and the color noise) are absolutely useless. And in such a case I want to get rid of them completely, and not by damaging detail with a slider.

I would then much rather start with the sharper monochrome result, and without the mush and color crud.

Besides, on this particular photo, Lightroom lost, because even with toned down color noise, sharpening and other adaptations, DNGMonochrome produced the nicest sharpest result, with less effort, and it fully preserved those shiny eyes, which is what this photo is about.

That said, and that being true for this photo: that doesn't mean it's true for all the other photos out there (we all know it's not, because most photos are not about black dogs named Fatty Davis...).

My point is that DNGMonochrome shouldn't be considered a replacement, but a very handy tool for photos that can use it. And this was one of those photos that perfectly illustrates my point.


The Girls from part V
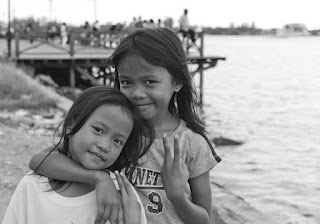

Summilux 50mm f/1.4 asph, ISO 160... shot with the sun behind the kids and me not professional enough to properly expose for their faces, led to a photo I had to push a bit (raised exposure and blown highlights in the sky)... the photo is slightly cropped... no sharpening and no noise reduction... the shown size (320 pixels here) is not the uploaded size... click on either one for a 1280 pixels version... stick to the 'full' version... the other sizes are automatically down scaled and do not reflect the true output...

M9 color DNG turned into two different monochrome DNGs with DNGMonochrome and the Ratio II algorithm...

So what's happening with these girls?

Yes indeed... sitting there with my Bayer filter and after getting a bit tired of those green pixel values, I thought 'what a waste... such a nice color sensor and it's all gone...'.

So I decided it would be fun to try the same trick on the red pixel values, more or less creating a monochrome photo with a strong virtual red filter on the lens.

The effect is that areas with a lot of red get lighter, areas with less red get darker.

The left result is the regular monochrome DNG and the right result is the 'red filtered' monochrome DNG.

I have to warn you though, this part in the software is truly experimental, because at first I wasn't thrilled about the quality of the results.

The quality problem arises from the fact that on a Bayer filter you have 50% of green, but only 25% of red.

There's less solid information to start with, but the bigger problem is that the area of 'guessing' is extended (from 50% to 75%), which increases the margin of error.


Idea Number Seven

I then tried a multitude of ideas to improve the quality, and with Idea Number Seven, after a week of fruitless attempts, I finally had some success, confirmed by the MSE calculation.

It's a slow procedure (takes about 2 or 3 minutes per photo on a fast computer) but it does lift the quality of the red interpolated result, more towards the quality of the regular monochrome result.

However, the red interpolation really needs the best combination of algorithms (Ratio II mixed with Gradient or the full Gradient). If you start with Ratio I you can quickly discover defects when zooming in to about 300%.

It's simply not as solid as the result based on the green values and the red interpolation produces slightly more noise.


Blooper

This is from one of the ideas I had, a test run. It was Idea Number Five, which took a gross 45 minutes to calculate. Not wanting to wait for a test result on the whole photo I just ran a part of it... The dark band is the red filtered part in the otherwise regular monochrome photo. As you can see, when put like this, it really resembles a filter, like something was put in front of the lens.

I was interested mainly in my test subject's face and in the shopping bags carried by the out of focus persons on the right, since those are bright orange in the original color version. They made for a nice reference point to see if they would lighten up (that they did... Idea Number Five didn't totally suck and it resembles Idea Number Seven, which is a lot faster...).
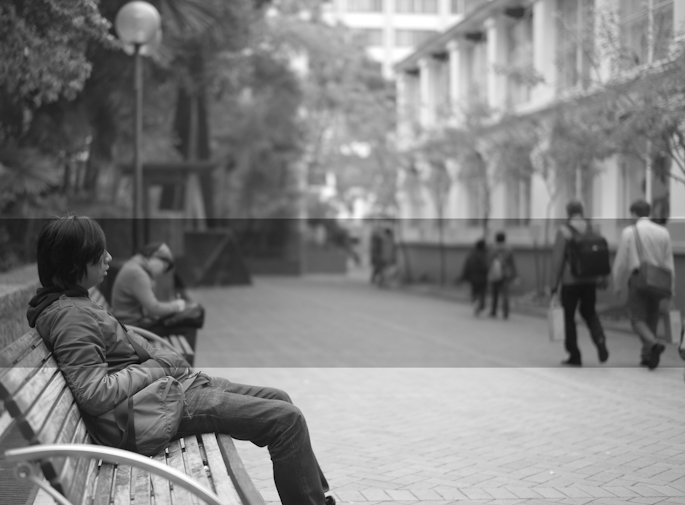

Blooper... test run of Idea Number Five that took too long per photo, so I only ran parts of it to see what the results would be... The darker band is the red filtered part in an otherwise regular monochrome photo... Idea Number Five didn't make it...


And what about blue?

Yes of course, that one too. I haven't shown you that one, but based on the same method as the red filter, DNGMonochrome can also produce a blue filtered version. In fact I'm also investigating orange and yellow filters. But because I'm still not color interpolating these colors are more difficult. Red and blue are relatively easy, because they exist as such within the sensor values. For orange or yellow that's a different story. Although orange might be achieved by cleverly mixing the regular and red result, I haven't tried that, because essentially that's color interpolating (now that would be some detour). It might introduce color noise and spoil the clean results so far... My current 'orange' approach works differently but is still flawed. Other options than red and blue won't be in the software until I'm sure I can make them work without losing too much quality.


We were already pretty sick of this whole endeavor, but now you're also downgrading the sensor! (Richard - desk officer at the color police...)

Now, at this point, some not so clever desk officers at the color police might start claiming that by using this method you are effectively reducing the sensor to 4.5 mega pixels (as opposed to the 18 mega pixels the sensor carries), because there is only 25% of red on the sensor (25% of 18 million is 4.5 million). Essentially it would be the same as claiming that the luminance interpolated photo is downgrading the sensor to 9 mega pixels.

Don't let them talk you into this, because it's not true.

Although the red on the sensor is only 25%, the interpolation algorithm actively uses the green and blue values to determine the outcome of the pixel under consideration. Without the green and blue values, the algorithm is lost. It needs those values to determine where (and how) to look for the proper value for the pixel being interpolated.

It means that the 75% of the sensor not carrying red, is still extremely useful and necessary to get to a good outcome.

If you would fill the sensor with zeros for the green and blue values, then it would be true, but then your photo would look pretty ugly. Like an up-scaled version of a photo from a 4.5mp sensor. You would be filling the gaps with information only based on the red values and that's not how the algorithms work.

Claiming that this method is downgrading the sensor (in any way shape or form) is false.

The sensor is utilized the full 100%, no matter if you interpolate based on the green values, based on the red values or based on the blue values.

Richard of the color police can only claim that the end result will be less good (quality wise) compared to starting with 50% green pixel values (and assuming the same algorithm is used for both versions).

And the red and blue result is indeed less good, even with my extended method. It's simply impossible (I think) to get to the same quality as starting with 50% green. No matter how smart the algorithm, you have to extend the area in which you are averaging, so you increase the margin of error. At some point at some magnification - if you compare it to the result that started from a solid 50% - that will show.


Fun

I must say, this has been fun for me personally.

I don't have any 'filter' experience, so seeing what purely red does to a photo is interesting. Especially human skin is influenced a lot. It gets whiter, turns shiny, almost glowing, imperfections are eradicated.

At first I thought it was the algorithm being fuzzy, but close inspection (especially when I ran the similar blue result, which has an almost opposite effect) revealed that's not the case. This is the strange 'glowy' effect the virtual red filter has on skin. Not too surprising of course, seeing that blood runs through it (I was also wondering if the 'glowing' effect might have something to do with infrared, but that's very much out of my league... I know the M9 has a filter to block infrared, but I don't know how strong that is - so I might be totally off base here).

See the next two photos, normal monochrome and red filtered monochrome. They're almost two different persons (these are test photos people... looking at the red filtered result I'm not sure if you should try this with any of your subjects if you know them well... I asked and graciously got permission from the person you're seeing here, to use his image and these results in this experiment... he's less dangerous than he looks here, but sometimes it's wise to make sure anyway...).
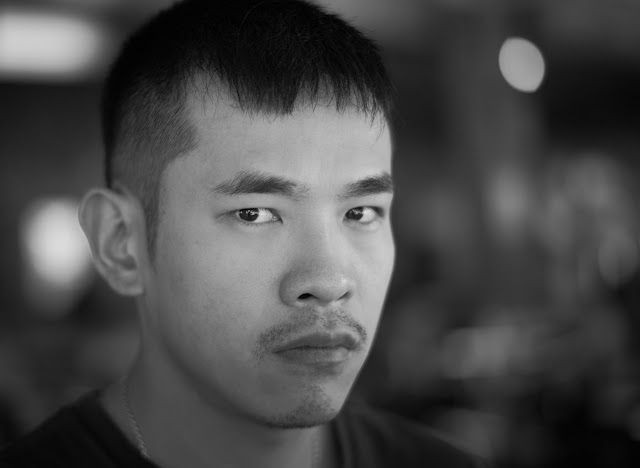

'Are you looking at me?'

M9 color DNG turned regular monochrome with DNGMonochrome... no sharpening or noise reduction...

The shown size here (640 pixels wide) is not the uploaded size. Click on the photo for the full 1280 pixel wide version...
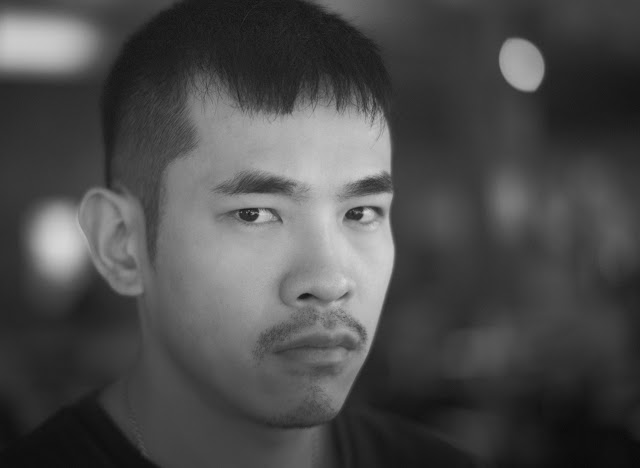


'Are you still looking at me?'

M9 color DNG turned red filtered monochrome with DNGMonochrome... no sharpening or noise reduction...

The shown size here (640 pixels wide) is not the uploaded size. Click on the photo for the full 1280 pixel wide version...

This was the Summilux 50mm asph wide open, hence only one eye is in focus... me practicing my focusing skills... no sharpening or noise reduction on either one, but I might have turned on the 'smart median filter' on the red result, and used Ratio II with a Gradient mix... I also put some more effort in the post processing of these DNGs... remember that I too am new at dealing with monochrome DNGs... it does take some getting used to, because although there's no color, you still have a lot of options to change the appearance of the photo...

Notice that the ISO was 640 on this one. On the regular monochrome (no noise reduction applied) you really can't tell. I only checked ISO after I saw the red result, which is more noisy (especially visible in the background).


Downsides?

Yes, that too... obviously the quality is slightly less compared to the luminance interpolated result, I already discussed that. It shows especially on 'busy' photos with a lot of detail, like in the next example. I also think this method is only suitable for some photos. Unless you're after special effects, using this on people like I did here might cause some aggression.

The effect - as you can see - is not very subtle and without too much effort you can turn your subjects into waxy ghosts.

For landscapes you might be happy with it though.
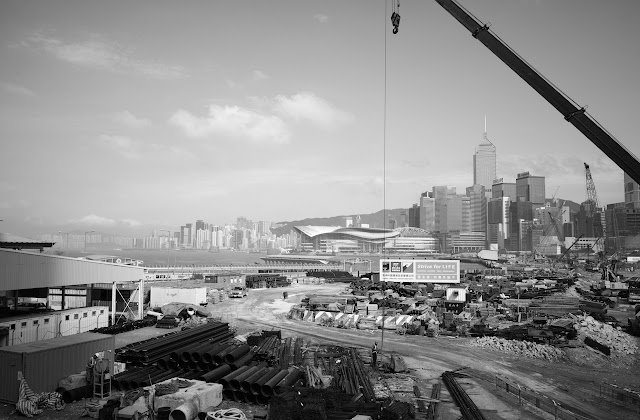


Hong Kong skyline shot over a building site...

M9 color DNG turned regular monochrome with DNGMonochrome... no sharpening or noise reduction...

The shown size here (640 pixels wide) is not the uploaded size. Click on the photo for the full 1280 pixel wide version...
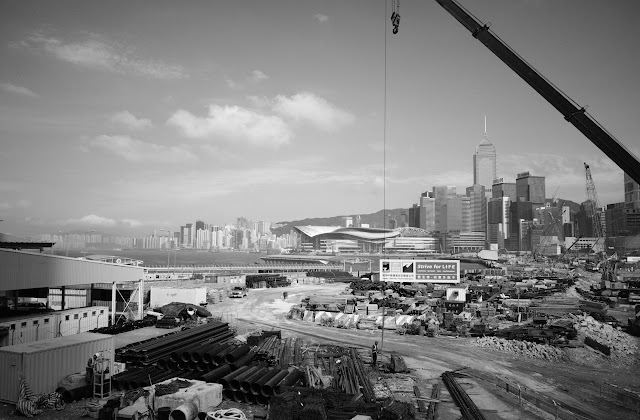


Hong Kong skyline shot over a building site...

M9 color DNG turned red filtered monochrome with DNGMonochrome... no sharpening or noise reduction... the sky turns darker, clouds jump out a bit more and the container in the left bottom corner completely changes 'color', as do numerous other objects in this photo, compared to the regular result...

The shown size here (640 pixels wide) is not the uploaded size. Click on the photo for the full 1280 pixel wide version...

I call it 'a virtual red filter' but I'm assuming a real red filter doesn't totally block green and blue like this method (guessing here, I have not investigated the workings of real red filters out there or what spectrum they cover... I assume you also have a choice there...). Essentially with this method, you're only looking at the full red or full blue result. That can be very interesting I think, but my advise would be if you do use these options: go for the more solid algorithm settings, and inspect the results carefully if you intend to print large.


Almost done

Well folks, I'm almost done... next part will be the conclusion of this series and I'll let you know how long you still have to wait to try this yourself...

... continue with conclusion
... back to part V

Tuesday, June 26, 2012

Caught one...

Kota Kinabalu, Sabah, Borneo, Malaysia, 1 May 2012

Click on photo for the full version...

Monday, June 25, 2012

DNGMonochrome - an experiment - V


...what's lurking in your DNG files that you haven't seen yet?

Turning M9 color DNGs into monochrome DNGs

A series about the development of an experimental piece of software, called DNGMonochrome, able to convert color DNGs into monochrome DNGs...

The software is available here.


About noise

Did you know you can count noise in photographs?

What noise is exactly I won't explain here. Google is your friend (not necessarily a good friend, but he or she is quite useful sometimes, provided it's not a 'doodle' day...).

To actually 'count' noise requires some math to calculate what's called a peak signal to noise ratio, basically testing the difference between the 'base' photo and the results after interpolating.

It's mainly useful to compare different algorithms on the same photo. It needs to be the same photo by the way, because the numbers of the same algorithm can differ per photo.

And although it's not too difficult to implement it (to compare my own implementations of the different algorithms), running such math on a Lightroom B&W is more complex, seeing that I do not have access to the internals of the B&W Lightroom DNG. I can't test such a DNG against the 'base' DNG, because that B&W version only exists within Lightroom.

It means that photos first have to be exported as TIFF, which complicates this approach. I really didn't feel like going through that much trouble. But I also wondered if by default the Lightroom one wouldn't lose the battle on such testing, because of the color noise in those B&Ws. In that sense I do not know if it would be a fair comparison.


The median filter

One of my attempts to reduce noise involved implementing a median filter. It's a bit of a crude method but it works quite well.

The median filter looks at a 3 pixel by 3 pixel area, assessing the pixel in the middle. If that middle pixel is the highest of all the 9 pixels, it gets replaced by the 'median' value of the other pixels. Median value here stands for 'the middle value' in a sorted list. Then the 3 by 3 block shifts a column and does its trickery again. It does make the end result a tiny bit less sharp - still better than Lightroom - but it does a good job in killing off noise (and dead pixels).

I also implemented a smarter version of this filter, one that only tackles noise in areas that are more equal to begin with. It preserves more detail (and dead pixels).

Both filters will be an optional step in the software, but although useful I have to advise against using them, since there's very good software out there to tackle noise. DNGMonochrome produces a DNG which is fully editable in Lightroom or Photoshop, so any noise can be removed in those programs (or more specific programs designed to remove noise), in a more sophisticated way than through a median filter.


Intermezzo, before you get too bored


Was wondering what he thought of it all, but he didn't want to come out...

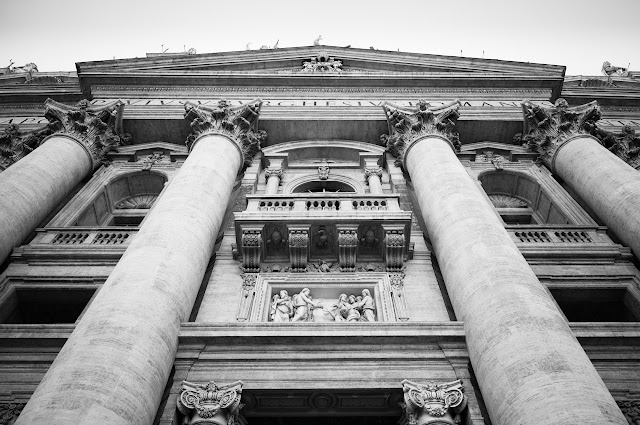
St. Peter's Basilica in Rome, with the balcony the pope does his thing on, waving and such...

I was standing at the favorite spot of every tourist out there, constantly being pushed and bumped into, so I had to be quick... focus is aimed a little bit too high...

The shown size here (640 pixels wide) is not the uploaded size. Click on the photo for the full 1280 pixel wide version...

And on the topic of religion: yes, this is also a converted DNG... It renounced its colors to rejoice in the glory of monochrome (well okay, I forced it to, with my software, yes... I can't deny that... but I assure you it's very happy now... no, you can't talk to it yourself, I'm its spokesperson!)


Some harder evidence

Not very happy not knowing how to assess my results, I decided to try to implement at least a Mean Squared Error calculation (or 'MSE', the basis of the peak signal to noise ratio) on the red pixel values, comparing the raw with the interpolated results.

It could just as easily have been the blue pixel values by the way, but not the green values, because those don't change (remember green doesn't borrow from red or blue). The MSE would end up as 0 (zero) for all my results, not telling me anything.

Now, because the raw has much lower red values than the end result, the MSE ends up rather high. I do not start with a full base photo (this is slightly problematic) but with a low red channel that gets altered through values based on green, ending up much higher. I can't help that. I could only use these numbers to compare results between the algorithms I use. In an absolute sense they don't tell anything and there are some additional problems due to the lack of a 'zero' reference - which I won't discuss here in detail, to avoid these posts getting even more nerdy - that make these numbers not rock solid.

They do however confirm my observation of the results, and they form a good starting point for my additional experiments with the algorithms, so I present them anyway (based on the photo I showed you in part III) - the lower the number, the 'better' the performance.

Be aware though that 'better' here is a scientific 'better' and a very limited 'better'. The simple assumption of the mean squared error and the peak signal to noise ratio is that 'lower noise' is 'better'. But 'better' as we usually understand it, can be very personal and subjective.

The one in bold is the winner, the one in italic is the loser. The difference is the difference between winner and loser.

6315708 = Ratio I
6309402 = Ratio II
6305433 = Gradient
difference = 10275

Here the Gradient (the more smooth result - comparable to Lightroom) wins.


Then I compared the same three with the 1 pass median filter:

+ Median filter
6243200 = Ratio I
6267345 = Ratio II
6284818 = Gradient
difference = 41618

And this is rather interesting, because now Ratio I wins, although it's sharper looking than Gradient, even after the median filter. I'm not sure what to conclude, other than: if the noise is cleared, Ratio I wins.


Then I compared all three with the smart median filter, which only tackles noise in more uniform areas.

+ Smart Median filter
6266575 = Ratio I
6274593 = Ratio II
6286318 = Gradient
difference = 19743

Basically the same result but with expected less difference.

At this point I was a bit surprised, seeing that Gradient looks so much like Lightroom. I had expected it to perform better. It's low on noise to begin with, but it seems fairly easy to beat by Ratio I and II if the noise is removed from those.


And then I compared the mix-over, where Gradient is used for high contrast edges and Ratio I or Ratio II for the more uniform areas:

6315389 = Ratio I + Gradient
6309276 = Ratio II + Gradient

+ Median filter
6242971 = Ratio I + Gradient
6267246 = Ratio II + Gradient

+ Smart Median filter
6266258 = Ratio I + Gradient
6274468 = Ratio II + Gradient

So there we have it: strongest combination is the mixed two algorithms in combination with the median filter.

And the difference between the overall best result and worst result is 72737.

In winning order:

6242971 = Ratio I + Gradient + Median filter
6243200 = Ratio I + Median filter
6266258 = Ratio I + Gradient + Smart Median filter
6266575 = Ratio I + Smart Median filter
6267246 = Ratio II + Gradient + Median filter
6267345 = Ratio II + Median filter
6274468 = Ratio II + Gradient + Smart Median filter
6274593 = Ratio II + Smart Median filter
6284818 = Gradient + Median filter
6286318 = Gradient + Smart Median filter
6305433 = Gradient
6309276 = Ratio II + Gradient
6309402 = Ratio II
6315389 = Ratio I + Gradient
6315708 = Ratio I

Ratio I is clearly plagued by noise (but we already established that visually), else the median filter would not have such a strong effect on these numbers. Applying the median filter to Gradient, only makes it jump a few positions. But applying it to Ratio I makes that one jump from position last to almost the winner... rather an improvement...

Frankly, I don't care a lot about these numbers. Visually I like the mix over between Ratio I and Gradient or Ratio II. And noise can be tackled in Lightroom.


And resolution?

But does this tell anything about additional resolution?

I'm afraid not.

Conclusions on resolution I think need to be established visually. I have no idea how to measure those differences. I see sharper output with Ratio I, II and even with Gradient, compared to Lightroom. For me that's enough, even if I don't know if I'm allowed to call that 'resolution'.

The results do have me puzzled a bit where the Gradient algorithm is concerned - here the lack of a base photo might play a role -, so I will be conducting some more experiments on that one. I can not fully explain why it lags behind when the median filter is turned on, seeing that it's the most complicated algorithm and produces Lightroom similar results. It might be that its initial design is better suited for color than for monochrome, which means it can be improved.

My aim is to end up with only one algorithm that does it all, preserving as much of the sharper output of Ratio I and II, but without the artifacts of Ratio I.

Be aware though - as stated before - the numbers need to be taken lightly.

Ratio I - used without the assistance of Gradient - still produces artifacts. In anyone's healthy eye, that would not be considered 'better', even if the numbers state it is.

You be the judge if you decide to try the software.

Note that these conclusions and numbers are only valid for the particular photo I ran the tests on (until proven otherwise). I haven't run extensive tests like these on other photos. The test photo has large areas of out-of-focus background, which might influence the numbers. I might incorporate the MSE in the software so you can compare the different combinations yourself on your own DNGs.


And now for something completely different

Before I end this episode, let me show you two more results, both with the Ratio II algorithm, since this was a lot of text (and almost the pope), but only one photo so far.

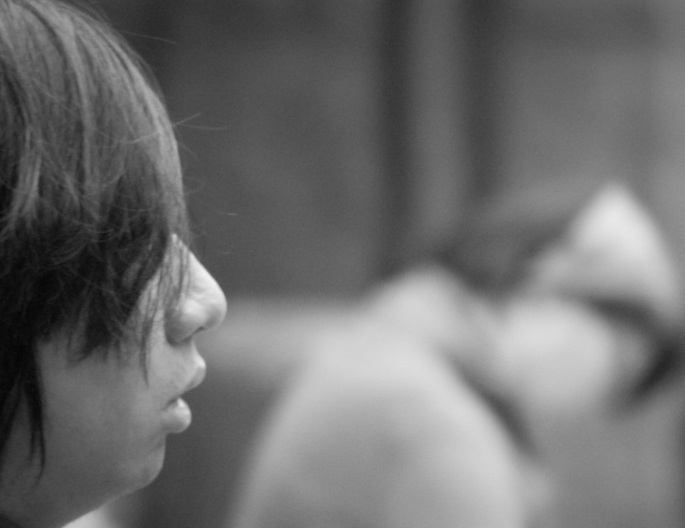
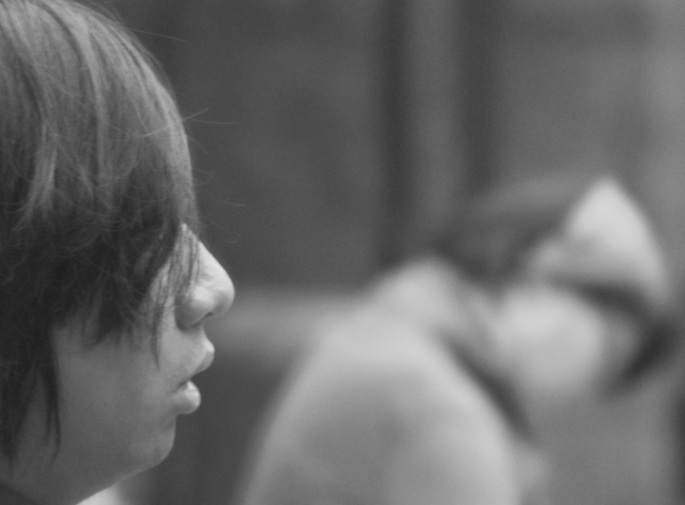
Compare the two.

I will talk about this next time.

They're both monochrome DNGs... and no - for the clever reader - I'm still not color interpolating nor are these differences created by changing brightness or contrast...

(If you do guess right, don't tell the color police, because for this they surely gonna lock me up!)

Things are about to get a little bit more Frankenstein in the next part, stay on the road!


Summilux f/1.4 asph, ISO 160... shot with the sun behind the kids and me not professional enough to properly expose for their faces, led to a photo I had to push a bit (raised exposure and blown highlights in the sky)... the photo is slightly cropped... no sharpening and no noise reduction... the shown size (320 pixels here) is not the uploaded size... click on either one for a 1280 pixels version... stick to the 'full' version... the other sizes are automatically down scaled and do not reflect the true output...

M9 color DNG turned into two different monochrome DNGs with DNGMonochrome and the Ratio II algorithm...

... continue with part VI
... back to part IV

Wednesday, June 20, 2012

DNGMonochrome - an experiment - IV


...what's lurking in your DNG files that you haven't seen yet?

Turning M9 color DNGs into monochrome DNGs

A series about the development of an experimental piece of software, called DNGMonochrome, able to convert color DNGs into monochrome DNGs...

The software is available here.

In part III, I ended showing you the results of my second attempt... a ratio based algorithm, implemented after not being fully satisfied with my first (gradient based) attempt.

(On a side note: these algorithm names are not 'official' names... despite the fact I call them 'ratio' and 'gradient' they are in fact - where their core working is concerned, and after me tuning them - not that different... it's just easier for me to keep them apart that way...)

Not fully sure what I was looking at, I ran another photo through the software and started to compare that one... here are the 100% crops of the shot with a Summilux 50mm f/1.4 asph, ISO 200, 1/60 sec...

Lightroom color DNG turned B&W - no sharpening or noise reduction - notice the girls cap above the flower...

Ratio based algorithm converted M9 DNG to monochrome - no sharpening or noise reduction... compare the vest under her chin...

The complete photo at the end of this post...


More tests

To make sure - looking for mistakes, something wrong with my method - I re-ran the JPG conversion and I paid some more attention to the crop sizes. Then I tried the same in Photoshop and not in Lightroom.

Results were similar (same type of RAW converter).

Then I tried to get the Lightroom one sharper, without using sharpening but by playing with the color mix, assuming a certain mix might be responsible.

That didn't help at all.

Then I tried a different method of black and white, by desaturating.

That didn't help either.

I then started to inspect my results at 400%.

Not very pleasant, this serious pixel peeping at 400%, but I was determined to find fault, if there was any...


Why 400%?

Well, question on my mind was: how far do you zoom in to look for defects?

At what percentage do you say: this becomes unreasonable?

Should it be 200%, 400%, 800%, a 1000%?

I thought for practical use, I would be reasonably safe if I could repair obvious problems visible at around 400%.

It depends on a potential print size I suppose, but printing is a world in itself.

I don't print a lot and the biggest photo printer I owned was A4 - 210 x 297 millimeters - 8.27 x 11.69 inches - (it broke down on me recently and I haven't replaced it yet... it means I can't run print tests at the moment), but I also feel a true test of this method should be at least A3 - 297 x 420 millimeters - 11.69 x 16.54 inches.

A quick detour in the realm of printing seemed to suggest that 150% should be okay. So setting the standard 250% higher than that should suffice, was my idea.


Problems with the algorithm, oh my...

I then discovered upon very close inspection this algorithm didn't do a great job on high contrast edges. It's prone to aliasing. Especially visible for instance on the nose bridge of my test subject. In the color version there's a bit of blooming going on there, and the ratio based algorithm doesn't know how to deal with that properly.

I also discovered what signal processing people call 'ringing'. A faint echo, in black, behind highlighted edges.

After some brooding on how to solve these issues, I decided to try to enhance the gradient based approach with a variant of the VNG algorithm (Variable Number of Gradients), to see how that one would deal with the nose bridge.

It's actually comparable to my very first attempt (the gradient based algorithm) but it's more extensive in determining the best average and it looks at a slightly larger area.

I obviously also had to adapt it slightly, since I'm not color interpolating.

And although it fixed the nose bridge of my test subject, then the results became very similar to the more fuzzy Lightroom output and my first gradient based attempt.

I had lost the advantage.


Mixing once more

I then decided to try to combine the algorithms.

Use the ratio based algorithm for the detail, and let the newest gradient based algorithm deal with the more contrasty edges.

And after experimenting a bit with the two algorithms on how to combine them best, that worked out pretty well.

Retaining the sharper output, I managed to fix for instance my test subject's nose bridge.

It made me feel a little bit like a doctor in a private clinic (Frank and Stein), where they perform plastic surgery... but what the heck...

However, wondering about some other aspects of the ratio based algorithm in comparison with the gradient based - noise levels for instance, but I'll get back to that - I decided to have a closer look at the ratio based algorithm.

That led to an adaptation - after all, this was an experiment - let's call it ratio II.


Stay on the road. Keep clear of the moors!

I fully understand if by now you have wandered off the path of my monochrome journey - feeling a bit lost - because at this part of my travels I am juggling 2 algorithms (gradient and ratio) in at least 4 different shapes (Gradient I, Gradient II, Ratio I, Ratio II) and some of them mixed (Ratio I and Gradient II), trying to compare all the results with Lightroom... and we're only half way!

Things will get more whacky in a few parts from now... stay on the road... (personally I never believed they would have been safer if they'd stayed on the road...)... somewhere at the end of this quest I will try to recapture a bit.

But since I more or less dropped Gradient no. I (overtaken by Gradient II), let's just call that one 'Gradient'.

See the crops here of 400%, direct screenshots from Lightroom - this is how Lightroom presents 400% - then cropped more carefully in Photoshop.

Lightroom color DNG converted to B&W...

Ratio I - first ratio based implementation... notice how the nose bridge turns quite ugly, like some pixels are chipped away... there's also what signal processing people call 'ringing' going on... almost like an echo - in black - right after the brightness of the nose bridge...

Gradient - result is very much like the Lightroom B&W, the nose bridge is fixed, but the fuzz is back... apart from the nose bridge, note how the background of this one differs compared to the B&W of Lightroom, with a much more even distributed - less blotchy - kind of noise...

Ratio I and Gradient mixed - the bridge is fixed - still a very slight amount of ringing - but without the fuzz in the rest of the photo... currently the limit can be set through the software... if you desire the full gradient result, that's also possible...

Ratio II - ratio based leaning towards Gradient - the bridge is also fixed in this one - although let's say by a less experienced surgeon - and it has less noise compared to Ratio I - sharpness wise I would say it's somewhere in the middle between Ratio I and Gradient...


Observations

Now, some interesting observations can be made if you look at these crops.

First of all - if you please - compare Gradient to the Lightroom B&W. They are rather similar. But notice the background of both crops. I believe here one of the advantages of the monochrome approach is showing: the noise of Gradient is less blotchy and more evenly distributed than the Lightroom background. I suspect that's the color noise (or lack thereof) making the difference. I also think Gradient, - despite producing similar (or close to) results as Lightroom - has a very slight edge in sharpness.

Besides - although I am trying to stay objective, which isn't easy - I really feel the Lightroom one is over the top smooth. Perhaps it's a consequence of the forced color interpolation, where they have to get to this result to make the color version look okay. It's not my favorite, scrolling through these crops.


Noise

But second, also quite noticeable: Ratio I is way more noisy than Gradient, Ratio II and Lightroom (if you discount the color noise).

This method in itself doesn't cause additional noise, at least not that I can establish visually: it's the choice of algorithm. Since Gradient is as clean as the Lightroom B&W.

Ratio II however (shown last), which internally leans a bit more towards Gradient, is less noisy and doesn't suffer from the nose-bridge faults as produced by Ratio I.

Sharpness wise, Ratio II seems to sit somewhere in the middle, but I feel it's closer to Ratio I than to Gradient.

But the noise, the noise... it leads to again some questions, which I will try to tackle in the next part: about noise, what can be done about it. Including some harder evidence on the different algorithms I am using, deciding which one is the best 'scientifically'...

You might be surprised...


Surprised by the Light

Captured her and her mum in the subway, at the moment the train left the underground tunnel back to the living... the sudden change from dark to light left the little girl completely mesmerized...

Photo is rotated a bit (shot from the hip, I had to rotate anti clock wise) and cropped... also some slight post crop vignetting was added... no sharpening and no noise reduction... the shown size (640 pixels here) is not the uploaded size... click on it for a 1280 pixels version... stick to the 'full' version... the other sizes are automatically down scaled and do not reflect the true output...

Color M9 DNG turned into monochrome DNG with DNGMonochrome and the Ratio II algorithm...

... continue with part V
... back to part III

Sunday, June 17, 2012

DNGMonochrome - an experiment - III


...what's lurking in your DNG files that you haven't seen yet?

Turning M9 color DNGs into monochrome DNGs

A series about the development of an experimental piece of software, called DNGMonochrome, able to convert color DNGs into monochrome DNGs...

The software is available here.

Now, before we continue, let me first show you one of my early results... else you might lose faith - with me droning on about things you might already know - or start to suspect that my last name is Frankenstein (it's not by the way... that would have been funny...)

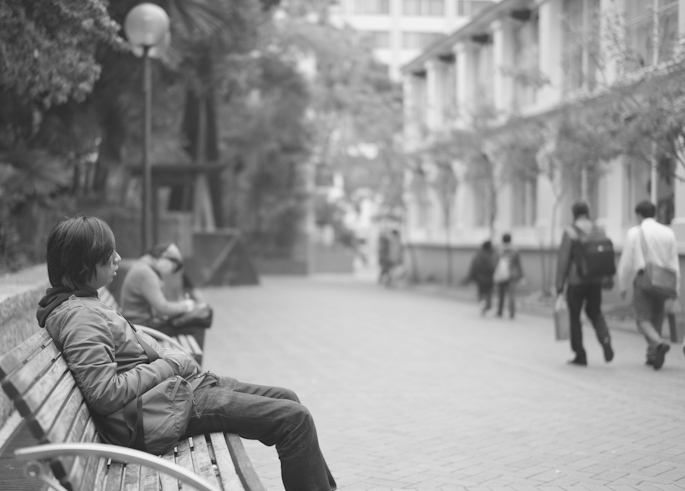
It's a color DNG turned into a monochrome DNG with DNGMonochrome - actually a bit of a world premiere - then imported into Lightroom. There I applied some exposure, brightness and contrast adaptations and then I exported it as JPG with a 100% quality setting.


Early on result from DNGMonochrome... photo was shot with Leica M9 and Summilux 50mm f/1.4 at ISO 200 (EV +0.7... most likely a mistake by turning the dial without noticing... I changed that option later on, because I kept making the same mistake)... no sharpening or noise reduction applied and no effects added... photo is shown the same size as exported (685 pixels wide)...

I also used this photo a lot in my experiments, so most examples are taken from this one. If you're the guy in the photo, my apologies in advance for abusing you like this.

At the end of this series I will show a larger version of this photo, possibly a link to a full size JPG.

And to make sure - you might still not be fully clear on the concept, since I've hardly explained it yet: this is not a color photo turned black & white the Lightroom way. It's an M9 DNG turned into a monochrome DNG outside Lightroom... then it was imported into Lightroom as monochrome DNG - Lightroom recognizes it's a monochrome DNG and skips the interpolation - and the JPG you see here is based on that monochrome DNG.


But you promised...

Yes, I know.

Let's continue, because at the end of part II, I was going to show you what a color DNG from the M9 looks like when we skip the color interpolation...

If you don't color interpolate, and you don't substitute the raw values for color values, and you possess some skills to get your RAW file to show up without all that (Google 'dcraw' if you want to try this yourself), you get this:

Without color interpolation...

Now, you might have to get a bit closer to your screen to see what's wrong with it.

Zooming in even further on the photo, it becomes clear this isn't right.

Without color interpolation... highly zoomed in...

The brighter parts are the green pixel values, the darker parts - within similar areas of brightness - are the blue and red pixel values. And in these examples (they are muddled up slightly, because they are JPG exports, which makes the distinction between red and blue - as different gray values - hard to make) the pixels haven't borrowed information from each other.


Luminance and chrominance

The green filtered pixels are brighter because they capture luminance values, whereas the red and blue filtered pixels register chrominance values. There are also twice as many green pixels compared to the red or blue pixels, as you can see in part II, if you look closely at the picture of the Bayer filter. Green is in the majority.

I will skip over this very important aspect, because explaining the difference between luminance (brightness) and chrominance (not to be confused with chromaticity, as explained here) isn't easy and a bit beyond these posts. So, lazy as I am, I leave it up to you and Google if you want to know more about these differences.

And the differences are important, because the method I'm using ignores some properties of the light captured. That's unavoidable, because those two (luminance and chrominance) belong to a color model, but I'm not interested in color (for now).

Ah well, Frankenstein (the first movie) was also in black & white... so let's continue shall we, and see what monster we can create...

(...yes, I know you liked the book better...)


Back to the photo


It's inescapable: there needs to be some borrowing going on to get to a more normal result.

But... as you can also see in the bigger photo higher up this page... the non interpolated black & white image is fairly clear. Without the interpolation you can still make out the image if you don't zoom in too far.

The green pixels didn't do a bad job.

It's the red and the blue pixels causing the biggest problem.

So even if you don't want color, you still have to do something with the raw file to turn it into a presentable image.


The Idea up close

So, back in my brain, the idea was simple enough: some of the color interpolation functions out there are based on algorithms that first look at the luminance part of the sensor pixels (registered by the green pixels). They interpolate the different pixels on luminance (by adjusting red and blue first, based on the luminance value of the green pixel).

It's known as gradient based interpolation.

So then I thought: what if you take such an algorithm, interpolate the values of an M9 DNG with it, and then put the new values for red and blue back into the DNG, telling it also it's now a monochrome DNG? Without disturbing the green pixels?

It's borrowing (red from green and blue from green), but it's very limited borrowing (green not from red and blue, red not from blue and blue not from red...).


Surprise!

Well, to my surprise - half of the time I hardly know what I'm doing - that actually worked. Then you get this:


Now, is that nice?

No... but this is an almost 1000% crop turned into JPG.

Here's two more reasonable crops, and let's start comparing a bit, time for some pixel peeping:

Gradient interpolated version (first implementation) from the converted (now monochrome) M9 DNG - no sharpening or noise reduction applied...

And here's the crop from the Lightroom (3.6) converted color DNG to B&W - no sharpening or noise reduction applied...

You decide which one you like better.

Now in color photos this gradient algorithm can cause some pretty nasty side effects on the edges, but since we're not dealing with color here, that doesn't seem to be much of a problem.

My own subjective observation:

- I think the Lightroom one looks slightly sharper
- I think the gradient one has the nicer background

Overall I wasn't unhappy with this result.

I had just interpolated my own photo.


Home made

It's a bit like growing your own flowers, making your own cheese, baking your own cake or brewing your own beer. Even if the flowers turn out puny, the cheese turns out green - when it should have been yellow - the cake collapses half burned, even if the beer doesn't get you drunk - just a bit nauseous - you still enjoy it: because you made it yourself.

But the joy about my home brewed photo didn't last when I compared the two crops, because the gradient algorithm hadn't done a very good job in resolving detail.

In fact, that part was a bit disappointing, since my idea and assumption were not confirmed.

Not that I had a very strong opinion about what the outcome should be, but I did expect a little bit more than this, especially in comparison with the Lightroom method.


Resolution, where are you?

So that led to an adaptation. A bit of a mix of different algorithms, now leaning more towards a ratio based approach, but keeping the edge detection properties of the gradient based approach.

And then things started to clear up...

Ratio based algorithm... no additional sharpness applied... scroll back a bit to suddenly see the fuzziness in previous crops.... look at his hair...

I was actually quite surprised by this result.

I expected some improvement, but this - to my eye - seemed quite a leap.

It made me a little bit suspicious...


Suspicion

Because let me be honest here: I wasn't sure what I was looking at.

Is it more resolution, more sharpness, or just a more noisy 'gritty' algorithm that looks sharper but really isn't?

Is the more smooth result perhaps more 'true' and is this 'resolution' just fake?

Remember that interpolating is fancy guessing.

One could easily guess wrong.

I will get back to this in the more 'scientific' part of this series, because I do have a few answers, but it's a bit too early to talk about those...

At this point I just thought: for a 100% crop this doesn't look bad at all.

So I decided to stick with this approach for a while and run some more tests, which I will show you in the next part...

... continue with part IV
... back to part II

Friday, June 15, 2012

DNGMonochrome - an experiment - II


...what's lurking in your DNG files that you haven't seen yet?

Turning M9 color DNGs into monochrome DNGs

A series about the development of an experimental piece of software, called DNGMonochrome, able to convert color DNGs into monochrome DNGs...

The software is available here.

Some background on digital sensors

For starters, the sensor in a digital camera can not register color. The pixels in the sensor can only measure the light hitting it and translate that analogue signal into a digital value. And that value doesn't tell you what color the light had when it struck the pixel.

To overcome this problem, a camera that needs to produce color photos is outfitted with a Bayer filter, pasted on top of its sensor.


Image of a small part of a Bayer filter - a drawing of it - grossly enlarged...

This Bayer filter (named after its inventor) turns every sensor pixel into a pixel that can only register the red, green or blue component of the light hitting it. That way you can more or less figure out how bright the red light was at a specific spot on the sensor, compared to the green or blue light (note the 'more or less' here).

Above image of the Bayer filter only shows a tiny part of such a filter, since the sensor of the M9 contains about 18 million pixels, and every pixel has one of these three color filters (red, green or blue) on top of it. So imagine 18 million of these square colored thingies, one square thingy (either green or red or blue) on top of one sensor pixel.

Color cameras out there don't all use the same type of Bayer filter. The above image is specific to some cameras, but not to all. Some cameras use Bayer filters with four colors, some use Bayer filters with the colors in a different arrangement and some use filters with different colors altogether. And the Foveon sensor for instance, operates on an entirely different principle. It uses a layer technique to filter and split the light hitting it.

So what happens if you don't add a Bayer filter on top of the sensor? Well, if it isn't a Foveon sensor, then you get a camera that can only take black & white photos, since there's no way of knowing what the color was of the light hitting the sensor.

Such a camera would produce a monochrome RAW file.

But let's first stick to the color photo...


Getting to the color photo

First of all, those sensor values registered when you took the photo are put in a file. And since this file contains the direct sensor output (the 'raw' output) it's called a 'RAW' file. The Leica M9 produces a RAW file in the form of a DNG, which is an Adobe invention (an extension of the TIFF format actually) and stands for Digital Negative.

So when the RAW file comes out of your camera, it contains the values of every sensor pixel.

The RAW file then needs to be put through a RAW converter (Lightroom e.g. contains such a RAW converter), which can translate the values to colors on your screen. Which means the RAW converter needs to know what type of Bayer filter was on the sensor, else it can't determine which value is from the red, green or blue filtered pixel.

In an M9 DNG (or read 'M9 RAW file') that information is stored in the camera profile, which is stored in the DNG. The camera profile contains information that describes the structure of the Bayer filter (the mosaic info), so the RAW converter knows where to look for red, green and blue within the 18 million values the RAW file holds.

Then, in order for a pixel on your screen to show the correct color (as 'seen' by your lens and you), these different color values produced by the Bayer equipped sensor - put in the RAW file that comes out of the camera - need to be mixed back again.

This process of 'mixing back' is known as color interpolation and this step is also performed in the RAW converter (or 'in camera' if you shoot JPG and not RAW).

Here's the rub: a green sensor pixel needs to turn into a pixel on your screen that also contains some of the blue and red light, else it would stay green forever (which is fine if your subject was actually green, but not if it was orange, yellow or purple, to name a few colors - not to mention the myriad of shades of green out there in the real world)... and a red sensor pixel needs to borrow some of the green and blue light, else it would stay a red dot in your photo... similar for the blue pixel (you get the point).

The green, red and blue pixels need to borrow from each other to turn into a full color pixel on your screen.

All software that can read RAW files need to color interpolate in order to show a correct picture on your screen.


Something fishy and slightly evil

But you can already smell something fishy: those pixels borrowing from each other, that isn't something we should be happy about.

It's an evil necessity.

Without it we won't have a color photo, but with it we don't have an outstanding color photo, because we lose something in that whole process: color interpolation is basically fancy guessing. Because if you have a green pixel, and two blue pixels next to it... how much blue should the green one get? And where should a blue one look for its additional green and red? Up, or down, or left, or right, or south east, north west or in all possible directions, or in just a few?

Don't be shocked, but your color photo is actually a bit of lie... fancy guesswork.

An image torn apart in three colors and then mixed back again.

It's rather messy and a little bit violent...


The Algorithm

To add or not to add (and how much to add and from where to add), that's the question. And that question is answered by the color interpolation algorithm. And there are many of those algorithms around. From very simple 'just look at the neighboring pixel' to extremely fancy neural network approaches. If you start searching for color interpolation algorithms on the Internet, you can easily find 20 different approaches within minutes (well okay, perhaps a bit longer if you're new to this).


Back to monochrome

In an original monochrome RAW file, coming out of a black & white camera - with a sensor without Bayer filter - the color interpolation isn't necessary, since nobody is expecting color out of a black & white camera. Well, no, of course that's not the real reason, besides... some very unreasonable people - in a moment of weakness and when low on money (the Leica MM is not cheap) - might still expect a color photo out of such a camera (which is really impossible).

No, it's simply not necessary.

The pixels aren't torn apart into separate colors. They're one big happy family all working together to produce one photo that isn't split into three different colors.

It makes for increased resolution, and sharper photos, since the previously 'red' and 'green' and 'blue' pixel now carry the full information (they don't exist anymore as pixels that register a 'split' value). No 'evil' interpolation is necessary (of course, you do have to be happy with only black & white out of your camera and stay reasonable...)

It's much more peaceful.


And back to my brain again

Then I thought: what would happen if you treat an M9 DNG (or read 'M9 RAW file') as a monochrome DNG?

Let's not color interpolate and see what happens (I bet it's not pretty)...

... continue with part III
... back to part I

Wednesday, June 13, 2012

The Golden Hour III

Kota Kinabalu, Sabah, Borneo, Malaysia, 30 April 2012

Click on photo for the full version...

Tuesday, June 12, 2012

DNGMonochrome - an experiment - I

One of my latest projects involved an idea I had, based on an assumption, inspired by the new Leica MM.

That new 'all black & white camera' got me thinking about RAW converters and at some point I realized it was possible to turn M9 DNGs into monochrome DNGs.


...what's lurking in your DNG files that you haven't seen yet?

Turning M9 color DNGs into monochrome DNGs

A series about the development of an experimental piece of software, called DNGMonochrome, able to convert color DNGs into monochrome DNGs...

The software is available here.

The regular and most used way (possibly the only current way) of turning M9 color photos into B&W is by clicking on the B&W button in programs like Lightroom. But the color interpolation that was performed by the RAW converter doesn't go away. The photo isn't 're-interpolated' specifically for monochrome. In fact, it's not monochrome at all: It's a color photo turned black & white, containing color noise and it is fully based on the heavy duty color interpolation that preceded it. It allows for color mixing within the black & white photo - that way you can create very cool effects, which is impossible to do with a true monochrome DNG - but it might not be the best way to get to the highest resolution monochrome.

That's where my assumption starts.


The Assumption

Creating a color photo out of a RAW file requires more processing than creating a monochrome photo out of the same RAW file.


The Idea

If you turn a photo B&W in Lightroom, it's still based on the processed color photo. What happens if you use a lighter method to turn the RAW into monochrome?

Because the colors in your photo are not thrown away when you click on B&W in Lightroom. So there's essentially the same possible loss of detail or color noise as in your color version, where that might not be necessary.

If you want monochrome, couldn't the interpolation be simpler, possibly leading to better results?


DNGMonochrome

It led to an experimental piece of software I call DNGMonochrome... which I will put online when I finish up the first version... and in coming posts I will write a little bit about my struggles with it and show you some of the results...

... continue with part II

Monday, June 11, 2012

Lightning over Jesselton Pier

This is a bit of a strange photo... at the bottom half there's the Jesselton Pier. It's a pier in Kota Kinabalu where you can book your boat rides to the islands and it extends (as most piers do) into the sea... it also has shops and restaurants, and in the evening - when the boat rides have finished - it's quite busy with people eating outside (as you can see on the photo)... Having dinner there (a really nice flying fish - the seafood in Kota Kinabalu is outstanding, fresh and tasty, they know how to cook...) lightning started, and people following this blog know my obsession with lightning, so I tried to capture a few... this one was one of the better results...

Kota Kinabalu, Sabah, Borneo, Malaysia, 1 May 2012

Click on photo for the full version...

Friday, June 8, 2012

Aspirations

Kota Kinabalu, Sabah, Borneo, Malaysia, 30 April 2012

Click on photo for the full version...

Wednesday, June 6, 2012

School kids

Class of school kids at St. Peter's Square...

Rome, Italy, 21 July 2011

Click on photo for the full version...

Saturday, June 2, 2012

View

View from the hotel at night, shot from behind glass, which doesn't do full justice to the Voigtlander 15mm used for this photo...

Kota Kinabalu, Sabah, Borneo, Malaysia, 29 April 2012

Click on photo for the full version...

Frigate birds II

On the Suriname river...

Suriname river, Suriname, 8 January 2012

Click on photo for the full version...