Thursday, June 9, 2022

Dear reader...

 ... or what's left of you all...

I hope you're all doing fine and have survived the past two years in good health!

Although this blog seems dead (and it sort of is), my activities in software, traveling and photography haven't subsided (apart from those incredibly annoying two years of pandemic) and I'm still very much alive.

However, most of my stuff was moved to www.mymymyohmy.com

But since I wasn't really 'blogging' anymore, that website was a bit static and rather boring.

So... I've taken it upon myself to make that one a bit more lively, starting with 'Snippets' (the name might change). Basically they're the blog posts with a photo I used to produce here. Some of them have longer stories.

Currently I'm in the process of transferring most of the ones I posted here, and already added a few new ones. In the end I will most likely also add a feed, so some kind of 'following' will become possible.

And for the technically interested, a similar 'blog' section might appear soon under 'Software'.

See also the 'Stories' section, where I hope to produce somewhat longer pieces.

Sadly there's currently no option to comment. Not sure if that will change soon, but it's in the back of my mind...

Here's an example... some recent two 'snippets': Pandemic and Post-Pandemic?


Monday, October 12, 2020

Ridiculous II

Even more ridiculous. 

 Two years behind. 

 But I did it! 

You can check it out here.

Monday, October 21, 2019

Ridiculous

Well okay, I'm not gonna give you any excuses.

I'm a year behind.

No but seriously, it's almost finished! I'm not kidding. But I realise no one is going to believe me anymore.

Let me just say: it will arrive, but I better stop with the promises about the 'when'.

I do have something new to present though.

It's called 'Falaphol' and you can check it out here.

Thursday, October 11, 2018

A genuine idea? Part II

In previous post I hinted at a new idea, but let me explain first what the new DNGMonochrome will offer. And yes, I know I'm going slow, promises promises, but this whole transformation was way more work than I had anticipated. I assure you it's not vaporware.


What's new

New is the user interface. Away with those small previews. You will now get the full image after conversion, able to zoom in to 800%, drag the photo around etc. Mostly based on Lightroom-like functionality.

Away with the clutter: no more noise reduction or deblurring (DNGDeblur will get a similar transformation, but you'll have to use the separate program).

Away also with the RGB filters. Nice experiment, but it came too close to true color interpolation and was dependent on white balancing, which I couldn't show, since there's no full color photo around. I'm not totally convinced though there wasn't an upside to it, so I might bring it back in a later version. Then hopefully a little bit more intuitive.

An improvement: you don't have to select RAW filters upfront anymore (you still can, but it's not necessary). If you run the conversion as three plane, you can filter in hindsight and save the photo once it looks okay to you.

Another improvement: added a histogram for the RAW result.

And a nasty one to get right, but I think I've finally got it: portrait photos are rotated properly.

What stays is the option to produce a monochrome photo without interpolating at all, by cutting away the red and blue and one of the greens. It's a very nice way to get to a small 'true' monochrome photo, without any of the interpolation artifacts (if you can live with 25% of the original size and a 50% reduction in width and height). It's also a handy option to experiment with the RAW filters, because it's all a lot faster. Then when you have the right settings, go for the full interpolated one.

New also: more algorithms. Apart from the one already in there, three new ones are added.

And of course more camera support. Most of the Leicas (M8 till M10, included the 240, 262, 262 M-D, the CL, SL, S, S2 and T), the Canons (EOS 350D, EOS 500D, EOS 550D, EOS 30D, EOS 40D, EOS 60D, EOS 5D Mark II / III), the Nikons (D200, D800, D800E) and the Sony A7s. For all the non Leicas the one condition remains: you'll have to convert the RAW (which should be a full RAW, not some smaller format = untested) to DNG first, with Adobe DNG Converter or Lightroom (export as DNG). I've also made some improvements handling the more quirky combinations of tags in a DNG, which should make it easier to add new cameras and better fulfill the promise of DNG as a universal format.


The algorithms

I have to remind you that we're pixel peeping. All the stuff discussed here needs at least 400% magnification to become visible. When it comes to algorithms, it's more nerdy and less photography. But well... when in pursuit of 'the best', it can't harm to focus on the extreme details.

VNG - Variable Number of Gradients - up til now it was the only algorithm used in DNGMonochrome and it will be fully implemented (the current one has a few tweaks that will disappear). VNG is strong on diagonals and arcs, doesn't produce excessive noise, isn't too bad when sharpening with Lightroom. Weak point: it can zipper on highlighted edges.

ACP - Adaptive Color Plane - I like ACP. It's the simplest of the four serious ones I'm implementing. It's fast, it's gritty, it's very strong on horizontal and vertical edges. Weak point: it can mess up diagonals (saw tooth like artifacts or 'jaggies'). When sharpened up it's comparable to VNG, but overall it's less soft than VNG (mind you, 400% to 800% magnification, else you won't see the difference).

AHD - Adaptive Homogeneity Directional - AHD is almost perfect. It's strong on every edge, it doesn't produce zippers, it's a little bit 'gritty', which I like. But really, there's no such thing as the perfect algorithm. Weak point: AHD can look quite nasty when you start sharpening it up in Lightroom. There are patterns everywhere. A bit maze like. And this isn't completely solved by balancing the greens (only made less apparent). The patterns gives the sharpened up photo a glazed-over look, like the image is behind broken glass. But if you do not intend to sharpen excessively or if you have a better (different) sharpener than Lightroom (or don't mind tweaking the sharpening with the masking and detail sliders), AHD is hard to beat.

LMMSE - Linear Median Mean Square Error - LMMSE is the most complex one (although AHD also has some tricks). It sharpens up very nicely and it's the least noisy one. When I read up on it I realized it was partly the implementation I had been searching for (under the theoretical assumption that the color channels should be able to 'help' reconstruct the green channel in a more profound way than the other algorithms did - I was convinced that could be a strategy, but I had no clue how). It's strong in every aspect. However, despite the fact you can't argue the results, it's my least favorite one. Regarding artifacts it's probably the best, out of the four presented in DNGMonochrome, but it looks very much like a Lightroom photo turned black and white. I think it's just a bit too smooth for my taste. No grittiness or a bit of bite. Maybe the noise gets eradicated too well. However, seeing all its strong points, don't let my opinion hold you back. Especially on high ISO photos, LMMSE might be the one best suited.

Since LMMSE is complex, I've currently only finished implementing the single plane version, so when you use LMMSE, you can't filter (yet).

For completeness and comparisons I also added bilinear, but I want to urge you not to use that one for anything serious. It's really second rate in all aspects.

On speed the order is (fastest first) measured in single plane: ACP, LMMSE, VNG. AHD is left out here, since that one can't be used in single plane mode.


Green imbalance

This has been an issue from the start. Most algorithms assume G1 and G2 in the Bayer layout are more or less the same value, or at least hold a correct value. In practice this is not the case. The divergence between G1 and G2 is a result of influence from the other channels (red or blue). This was very apparent on the Leica M8 and M9, where VNG produces highly visible maze patterns in areas where red is dominant. One of the greens on the CCD of these Leicas is clearly influenced by what's happening in the red channel. The M8 is more sensitive to this problem than the M9, but both are problematic (I recently discovered the Leica S2 suffers even more from this problem, where the S doesn't so much). By now I've improved the algorithm that tackles this problem, but that's not the whole story. This issue is quite an issue, because it's not only dependent on the camera used, but also on the algorithm used. VNG needs correction on the M8 and the M9, but in other M models - as far as I can tell - correction is hardly necessary. For AHD that's a different story. AHD causes stronger patterns - mostly visible when sharpening - on all the Leica models, when G1 and G2 are too far apart (probably also on the Canons, but I haven't tested the full set yet). The problem here is that it's hard to find the right amount of correction, since it's unclear per sensor under what conditions the greens diverge most or where in the photo the algorithm suffers most from the divergence (shadows, highlights, mid tones, certain colors etc). So the new DNGMonochrome will contain a special module, where this stuff can be set and changed per camera and per algorithm. It's set already by me to some defaults I think are okay, but since my testing is limited to only a few photos per camera, I can't fully judge every situation in which these problems might show. Of course, this undercuts the whole idea that 50% of the photo stays the green as recorded. That percentage drops once you start correcting one of the greens. On the other hand: the recorded value wasn't correct to start with. The recorded green wasn't what really hit the sensor at that spot, which makes the whole point slightly moot.


A genuine idea?

So, I was going back and forth between these algorithms, being frustrated about parts of some photos working better with algorithm A, when I thought the total photo looked better with algorithm B or C, when it suddenly dawned on me: why can't we interpolate photos with more than one algorithm? Why is it a choice upfront and then you're stuck with it for the total photo? Let alone programs like Lightroom, that don't want to bother you at all with this stuff and don't even give you a choice upfront (or 'at all').

Well... I can think up a few reasons why. Good reasons.

But not good enough reasons to hold back my nerdy brain waves.

So I decided to do it.

Yes.

In the new DNGMonochrome you can interpolate one DNG (the same DNG) with all the provided algorithms.

Different parts can be interpolated differently.

Now, don't tell me that's not a genuine idea!

I will elaborate in a next post.


When is it finally ready?

Well, I'm currently finishing up on testing all the algorithms with the different cameras. All the new stuff has to work with every DNG that's supported. Especially the rotating and the possibility to interpolate different parts of the photo differently can give unexpected results with different cameras. There's still quite a few bugs to kill, so I can't give an exact date. But I hope to be releasing the official 1.0.0 before the end of November (2018). I might release an unstable bèta before that. It's not a promise though, so don't hold me to it.

Tuesday, May 8, 2018

Hiroshima

Hiroshima Peace Memorial - or A-Bomb Dome (原爆ドーム Genbaku Dōmu) in the evening...

It's ground zero. The bomb exploded more or less above this building. What was left standing of it was preserved as a reminder. If you visit the museum and look through the monument there, you can see this building, across the canal. It's all designed on a straight line: the museum, the monument, the square, the eternal flame... on a line extending all the way to this building: its stark image captured within the monument on the square. It was impressive, to walk around there, to notice how much thought was put into remembering and to see how Hiroshima has reinvented itself after total destruction, incorporating that gruesome event into daily life and into a powerful 'never again'.

It's a lovely city, surrounded by mountains, with friendly people, beautiful parks, nice restaurants and a unique history.

2 November 2017

Hiroshima, Japan

Wednesday, April 25, 2018

A Genuine Idea?

Where DNGMonochrome is concerned, I think there are some solutions out there now, which can do the same. I'm not even sure if it wasn't already possible to interpolate on just the green channel, when I came up with the idea. I seldom have a genuine idea. I might think I have, but usually I'm proven wrong later on, because I don't like to research my brain waves. I just want to act on them (if they don't involve physical action). Who cares if it already exists!

You might know the feeling.

So, for the next idea, you tell me if it's genuine or not.

What bothered me about DNGMonochrome was the interpolation algorithm. If you followed my struggles from the beginning, you know I experimented a lot with different approaches. All basically under the assumption that it should be easier to just interpolate for monochrome, than it is for color. That assumption turned out to be quite untrue. So indeed: you might not have to bother with false colors, purple fringing or chromatic aberrations as much, but some of this stuff does show up in other shapes or forms to spoil your black & white photo.

There's the maze pattern if the greens are out of balance; there's zipper artifacts on certain algorithms; there's mazing on other algorithms; there's strange patterns that would show up as moire in the color version... but moire we recognize... some weird block pattern in a black and white photo, not really.

Note by the way that all the babble following, is based on 400% to 800% enlargements. The artifacts I'm talking about are not visible at 100% or when you're just flipping through your DNGMonochromed photo album. This is about extreme pixel peeping and has little to do with photography.

------------

In the current version of DNGMonochrome I finally settled on VNG for the interpolation. VNG (Variable Number of Gradients) produces overall very nice results, especially strong on diagonals and arcs, and it sharpens up quite nicely, but it has at least one flaw: it can produce zipper artifacts on horizontal and/or vertical edges.

And the problem is: you can't really tweak these things (the interpolation algorithms I mean). The more sophisticated algorithms - and even the simpler ones - are usually structured around tight mathematics. A lot of thought was put into them. Just simply changing a bit here or there, or adding a bit there and here, will only lead to a lot of wasted time and frustration (you thought you solved your zippers, only to discover a major mess somewhere else in the same photo - due to your handy work).

What also bothered me was the user interface of DNGMonochrome. Small previews, not a lot of room to navigate, no zooming. That badly needed an improvement.

And I think I overdid it a bit with the denoising and the deblurring and the RGB filters. Loaded it up with too much stuff no one is actually going to use. So that's gone in the coming update (DNGDeblur will also get an update, later on, so you can still deblur the monochrome results).

It's going to be a clean interface, built around a smooth viewer that can zoom up to 800%. And yes of course finally all the new Leica cameras that produce DNGs will be supported (the 262, the 262 M-D, the M10, and maybe some of the new non-M models).

On a side note: I traded in the Leica M-A. I loved the camera and the all mechanical approach, really, but staying abroad for prolonged periods of time and traveling in between, film photography turned out to be non maintainable (or at least a huge bother). It was hard to find film and even harder to have it developed and you have to count per role how often it goes through an airport scanner. For a short holiday fine. In countries where the broken Fuji development machines are staring at you, as a sad reminder of happier days, being pointed at by the store owner - no sorry, no more spare parts: not so much. I switched to the Leica M-D. Almost the same magical experience: click and then you have to wait... but without the additional hassle.

So, I went to work and tried to improve DNGMonochrome. And along the way I got an idea, when I was implementing a few new algorithms (the new DNGMonochrome will give you a choice out of at least four: VNG, AHD, LMMSE and ACP, perhaps more later on).

A bit silly and a bit nerdy (the idea). Probably quite useless. Not fully worked out yet (it's working but I still need to inspect the end result in comparisons). But that's exactly how I like my ideas, because that might mean the idea is genuine!

I will explain the idea in a next post, where I will also try to explain the differences between the algorithms in the new version.

Monday, April 9, 2018

It's been too long

Hey there, dear reader...

I would not be surprised if there is no one left. It's been too long yes, I know. Life, circumstances, obligations, etc. We all know how that works.

Just a quick update to let you all (or probably no one) know I'm still alive and kicking.

Working on a new program and on two upgrades (DNGMonochrome and DNGDeblur are getting a major overhaul).

So if no one is interested, keep an eye on this blog!

Sunday, August 30, 2015

Mountain view

Well, I still don't have much to show for.

On the shooting side, things have been fun though. Just one click, wondering how the photo will turn out, forced to put more thought into composition and exposure, and no worries about batteries, chargers, memory cards or a dusty sensor (of course, other worries about 'enough film, where to have the rolls developed, where to buy more').

So far it seems film is rather forgiving when it comes to the right exposure, although I do seem to underexpose quite often. The M-A doesn't have a light meter, so I'm metering with a Voightlander light meter on top of the camera, and I have a handhold around.

The first two rolls of Kodak Tri-X 400 I had not only developed but also printed. I considered them test rolls, so nothing much spectacular on them, but it did give an impression of what I was doing right and wrong. Also more of an indication - seeing the character of Tri-X - when to use it and when not to use it... it's quite a learning curve.

Otherwise judging exposure with just the negatives (two rolls of Fuji Superia 200 so far) is not easy, since I don't have a baseline. I don't have a negative scanner yet. I wanted to experiment first with my Canon 5D-II and 100mm macro lens, to see if I could get acceptable results shooting the negatives and then processing them in Photoshop and then over to Lightroom. But it's a tedious way of processing. To get the whole negative properly focused isn't easy. Then the flash behind it needs to be evenly distributed. Then questions about color balance, how much flash, how to process exactly and how to handle the negatives without damaging them. It simply takes too much time per negative. And since I can't compare yet with a negative scanner, I don't know if I'm getting the best out of the negatives this way.

Anyway, here's one of my first color results done this way. I do plan on buying a scanner, so you might see this photo again in future. It will be a nice comparison as to which method gives the better results.

Strawberry farm in the mountains...

Leica M-A with Leica Macro Elmar 90mm f/4.0 on Fujicolor Superia 200

Malaysia, Cameron Highlands, 6 August 2015

Click on the photo for the bigger version.

Friday, May 1, 2015

Goodbye, hello...

No don't worry, it's still the same blog. It just looks a bit different.

Well dear reader, here's one of the last photos I took with my Leica M9 after its second sensor had cracked (crack in the corner cropped out).

Beach under moonlight...

One of the last photos I took with my Leica M9.

Click on the photo for the bigger version.

Malaysia, 2 February 2015


I had a longwinded and rather boring story ready about how I traded in my M9 a few weeks ago (when it was in Germany for repair), tired of the sensor problems (ready for its third new sensor in barely 5 years), but who cares. Oh yeah, I now have a Leica M-A (I'm still in the Leica fold, since their lenses are awesome) - no more sensor or electronics, not even a lightmeter built in - and I'm trying film. No results yet, the first roll is still in the camera. It's an impressive machine though, this new M-A, with its smooth velvety black chrome and all mechanical innards... let's hope I know what I'm doing, since I never shot an analogue photo before.

Oh, and if you're attached to DNGMonochrome or DNGDeblur, not to worry. I will keep supporting the DNG software, also seeing the big photo archive I have myself. Next on the list for an upgrade is DNGMonochrome. I can't work on M9Tether anymore, but I don't think that's a big problem, seeing how that program was more or less finished and still does what it needs to do.

Sunday, April 26, 2015

DNGDeblur 1.1.0 released

Some small changes and some bugfixes in this new release.

Changes and additions
  • Speeds up the preview creation of DNGs
  • When deblurring JPEGs, the EXIF information is now preserved in the saved copy
  • Adds option to strip EXIF from JPEGs in the saved copy

Bug fixes
  • After clicking the Update button with a new version available and then clicking 'Yes' on the question 'Download now?' the browser would open the DNGMonochrome page in stead of the DNGDeblur page
  • When switching from a Leica T DNG or Sony A7s DNG to a JPEG in the list on the left, the notification about lens distortion would not disappear


Note the first bug fix: if you use the Update function in version 1.0.0, it might land you on the DNGMonochrome page.


Download

You can download the new version of DNGDeblur here.

Thursday, December 18, 2014

DNGDeblur 1.0.0 released

First release.

There are still some minor graphical details to attend to (only in the user interface), but for a first version I think it's good enough.

Don't forget to click on the Update button once in a while.

Posts about the specifics of DNGDeblur:

- Introduction
- User Interface I
- User Interface II
- About the deblurring circles


Download

You can download DNGDeblur here.

Sunday, December 14, 2014

DNGDeblur - The Circles

In this post I'll show you how the deblurring circles work.


Placing a circle

To place a circle on the photo, you first have to switch on the deblurring circles, by clicking the button outlined in red in the next screenshot.

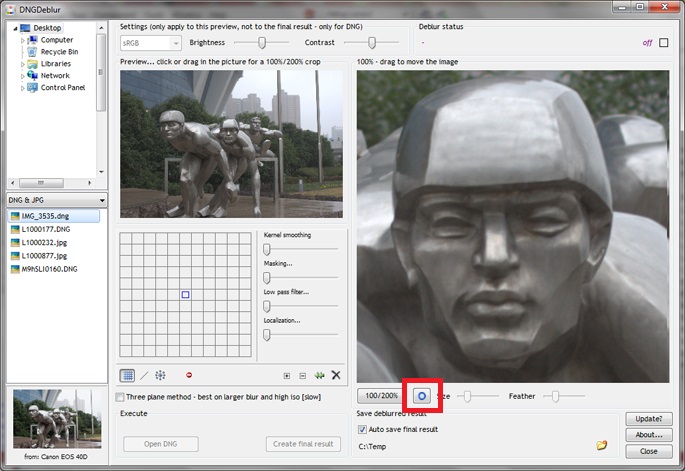
Button to turn on the deblur circle mode...

This circle button is an on / off button, and as long as it stays down, you are in 'deblur circle mode'. In that mode, the cursor is changed into a circle, as soon as you move your mouse over the bigger preview image. You then cannot drag the image with your mouse anymore (no more hand symbol).

To place a circle anywhere (after switching to deblur circle mode with the button), move the circle over the bigger preview and click with the left mouse button once, when you have the right position. At that point a circle will appear on the photo. You can place more than one circle: simply click again with the left mouse button.

The placed circle (and the cursor) will always be a fixed size. You can only change the size of the circle after it's placed on the photo.

Any deblurring you have done to the photo will at this point only be visible within the placed circle(s). See the next two screenshots, where I deliberately made the deblurring somewhat horrible, so you can see what happens after placing a circle.

No circles placed, the whole photo is deblurred (ugly deblurring shown deliberately)...

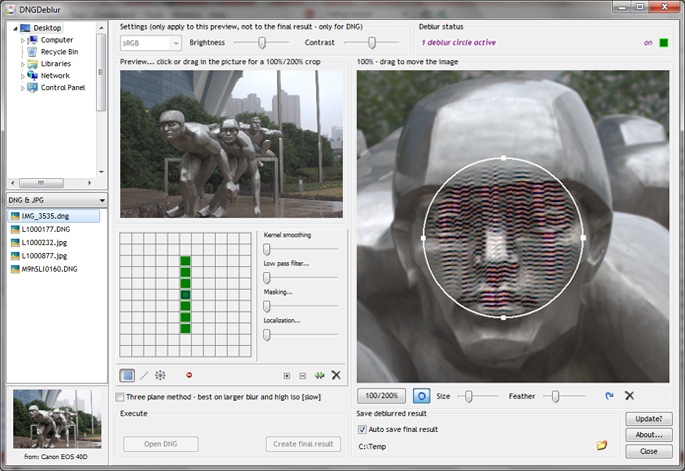
One circle placed, the deblurring is confined (ugly deblurring shown deliberately)...

Since you cannot drag the bigger preview image in deblur circle mode, if you need a circle on a part of the photo that's not visible, the easiest way is to navigate that part into view with the smaller preview image.


Selecting a circle

Before you can change the size of a circle or change its feathering, you have to select it. You can select the circle you want to change by clicking in it with the left mouse button. A selected circle has a thicker edge and shows four handles.


Moving a circle

You can move a circle by clicking in it with the left mouse button and holding the button. Then you can drag the circle to another position.


Resizing and feathering a circle

Next to the circle button (see first screenshot) you'll find two sliders. One is to increase or decrease the size of the selected circle, the other is to feather the selected circle. Note that the feathering works inwards and that every circle can have its own amount of feathering.

You can change the overall size of the circle with the slider, but you can also change the shape (and / or size) of the circle with the four handles on the edge of a selected circle.

If you do want to see the outline of the circles, but you don't want any of them selected, click the button next to the feather slider.

If you don't want to see the outline of the circles, click the 'deblur circle mode' button again so it switches off. You'll get back to the mouse hand (so you can drag the image) and you won't see the outline of the circle(s) anymore. However, the deblurring is still confined within the now invisible circles.


Deleting a circle

To delete a circle, make sure it's selected by clicking in it. Then click the delete button under the big preview picture. If you only had one circle, the deblurring will now be back to the total image.


Some remarks

The size and feathering are specific to each individual circle (meaning you can resize and feather every circle individually), however, all circles will use the same deblurring, set through the deblurring filter. Currently it's not possible to have a different type of deblurring per circle.

In the deblur status, on top of the bigger preview, you can see how many circles are placed on the photo.

The deselect and delete buttons, under the bigger preview, are only visible if there's a selected circle. The size and feather sliders are only enabled if there's a selected circle.


Download

You can download DNGDeblur here.


Previous posts about the specifics of DNGDeblur:

- User Interface II
- User Interface I
- Introduction

Sunday, November 30, 2014

DNGDeblur - User Interface - II

In this post I'll write a bit more about the deblur filter - mainly the free grid - and about the sliders and what they do.

But first let me show you an option in DNGDeblur that might easily be overseen. It's only applicable to DNGs.


The one or three plane method for DNGs

You can see the option if you have opened a DNG. See the next screenshot, where it is surrounded by the red square.

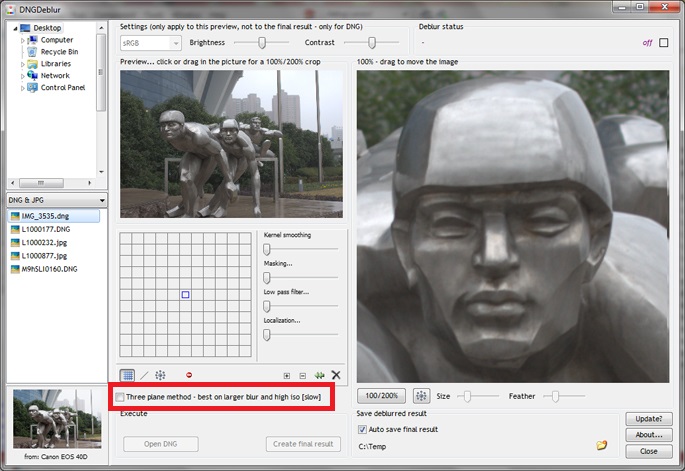
Option to select the slower three plane method for DNGs...

Default it's turned off, since it's slower than the one plane method.

The one plane method only deblurs the green plane of the DNG (after interpolating it in the background into a full monochrome photo). Then, through some comparing with the original DNG, the red and the blue pixels are interpolated back into the overall deblurred DNG. This method works very well for small blur (say within 2 or 3 pixels), but when the blur gets more extensive, it can lead to color loss, mainly in the reds, or to shifted colors overall. This is because the original DNG is used to base the new red and blue pixels on (in the deblurred DNG). But since the original is blurry, it will eventually lead to errors if the blur is too extensive. If that happens it's best to switch to the three plane method. In that method the green, red and blue are interpolated separately, into three monochrome photos. Then they're all deblurred, and the pixel values for the original green, red and blue are written back and thus form the deblurred DNG.

Both methods produce a non-interpolated DNG.

The single plane method is quite fast for the total DNG (although that will depend on your hardware and from which camera the DNG came), so the biggest downside of the three plane method is that it's three times as slow.

For monochrome DNGs the three plane option isn't available, because a monochrome DNG only contains one plane.

Also with JPEG, the option to select the three plane method is lacking, since JPEG already contains three interpolated planes if it's a color JPEG and 24-bits (not really, because it's a compressed format, but once it's decoded and shown on your screen). So with a JPEG, interpolating values back doesn't make sense. It's much easier to deblur the three complete planes and write them back in full. No interpolation necessary.


The one issue with deblurring DNGs and keeping them RAW

The biggest problem is out of my control, and that's the interpolation methods used. Every RAW converter will use a different interpolation algorithm. So the preview you see in DNGDeblur after deblurring, might not be accurate, compared to how your favorite RAW converter will show the deblurred DNG. To get a feel for the differences and how to get the best results out of DNGDeblur, you'll have to experiment a bit.

For the color preview I'm using a fairly simple interpolation, provided by Adobe. The interpolation in the background, to produce the monochrome planes for the actual deblurring - is done through the more sophisticated interpolation also used in DNGMonochrome.


More on the filter

In the free grid you can click with the left mouse button, to turn on a single square, which will then turn green. Click again to turn the square off. You can also 'draw' in the grid by dragging with your mouse. If you drag with the right mouse button held down, you can turn off squares.


Deblur filter, showing the free grid...

Note that after each action (either clicking in the grid or changing any of the sliders), the preview on the right is recalculated, and that causes a noticeable lag. If you have selected the three plane method for DNG (see above in this post) that lag will last longer. Advice is to turn off the three plane method when you're trying to deblur and only turn it on (if necessary) right before creating the final output.

Tip: most deblurring through the free grid works quite well if you start in the center with a small cross and try to improve from there. Working too much off center usually doesn't lead to much good.

The deblur filter also contains a row of buttons at the bottom.

With the first three buttons you can switch between the free grid, the line and shapes tool, and the circle tool.

The fourth button isn't a button. When you move over it with your mouse (no need to click), the preview image will switch to the original. It's meant as a quick compare. When you drag the bigger preview image, or click in the smaller preview image, or use any slider to change settings, the deblurring will also temporarily drop away, when everything is recalculated. This 'mouse over button' is a lot quicker to compare the result with the original, since it doesn't involve a recalculation.

Then you get a plus and minus button, only shown if you have selected the free grid. With those buttons you can zoom in or out on the free grid.

Next to it there's a button to reset the distortion sliders all to zero.

With the last button you clear the free grid, or set the radius and angle sliders (in the line and circle tool) to zero.

I'm currently not too happy with the zooming of the free grid. I think the free grid should also be able to scroll. So that's another one for the todo list.


Battling distortions

The first thing you'll notice when you start using the deblurring filter, either by clicking in the free grid or using the shapes, is how horrible and mangled up your photo will look if you click too freely or use a radius that's too big.

The problem with Wiener filtering (see also previous post) is that it reacts very badly to noise and that it has a tendency to start ringing on edges.

That's where the sliders on the right come in. Be aware though - something I figured out by applying automation (which isn't in the first version yet) - that if you get a lot of ugly side effects, the kernel you clicked together simply isn't the most suitable. For mildly blurry photos there are solutions that work pretty well, without having to use the sliders a lot. The trick is finding those solutions (or a solution that comes close). That's why all the sliders default to zero. However, for most kernels at some point you will have to use them a little bit, so let me explain what they do.

Kernel smoothing

This procedure lowers the values of the kernel, from the center outwards. The more you slide, the stronger the values are toned down. The effect is that a lot of the edge ringing and other side effects start to fade away, without interfering too much with the actual deblur. Though, if you push this slider too far on smaller kernels, you might lose a lot of the deblurring effect.

Low pass filter

This slider has a very strong effect on the higher frequencies and acts as a form of noise reduction. You will probably have to use it a little bit on most of your deblurring attempts, but if you push it too far, the resulting photo will end up more blurry than your original.

Masking

This is quite a complex procedure, involving Sobel masking and applying Gaussian blur to the mask, in an attempt to focus the deblurring on the edges of your subject, without making the deblurring too harsh. It works quite well if the deblurring side effects aren't too gross. If you push this slider too far, you will end up with the original and not see any deblurring effect anymore. Also, using this slider moderately might make you lose the deblurring effect in the darker parts of the photo.

Localization

Localization keeps the pixels within a local area limited in value, to the minimum or maximum of a similar area taken from the original. Downsides are that you have to push the slider quite far for the best effect and that if you go all the way with the slider, you will lose most of the deblurring effects and you might see a block effect on the highlighted edges. Since it involves looking at the blurry original, this procedure will not work very well on more extensive blur. Before I developed the masking procedure (see previous slider), I used this one a lot, but after developing masking, it was not as useful anymore. I might drop this slider in future versions, so my advice for now is not to get too attached to it and try to correct only with the first three sliders.

Next post I will show how the deblur circles work.


Download

You can download DNGDeblur here.


Previous posts about the specifics of DNGDeblur:

- User Interface I
- Introduction

Sunday, November 23, 2014

DNGDeblur - User Interface - I

In this post I will show the main elements of the user interface and talk a bit about the main part: the deblurring filter.

Next few screenshots might be unnecessary and self explanatory to most users, the program is not that complicated, but well, let's do this anyway. Just follow the red squares.

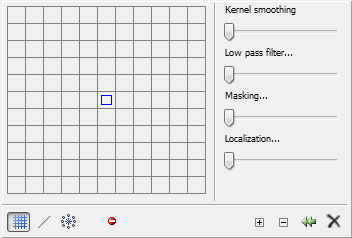
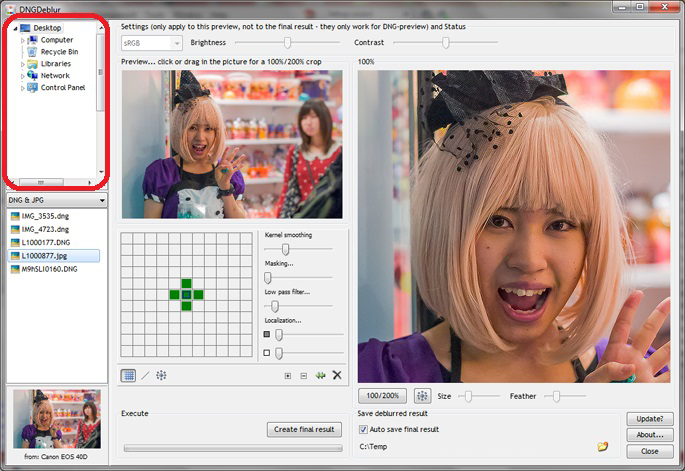
In this list you select the folder your DNGs or JPEGs are residing...


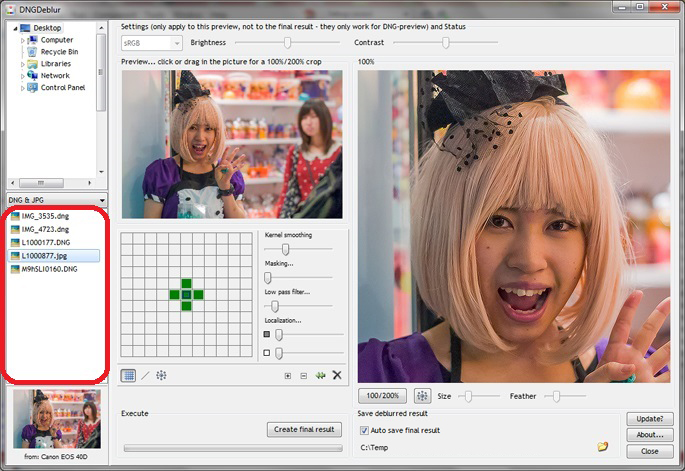
The DNGs and or JPEGs will then show up in this list...


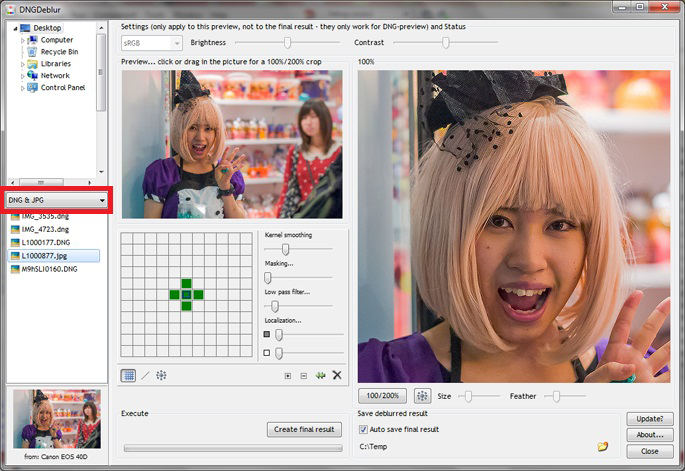
In the middle you can select if you want to see DNGs and JPEGs, or only DNGs or only JPEGs...


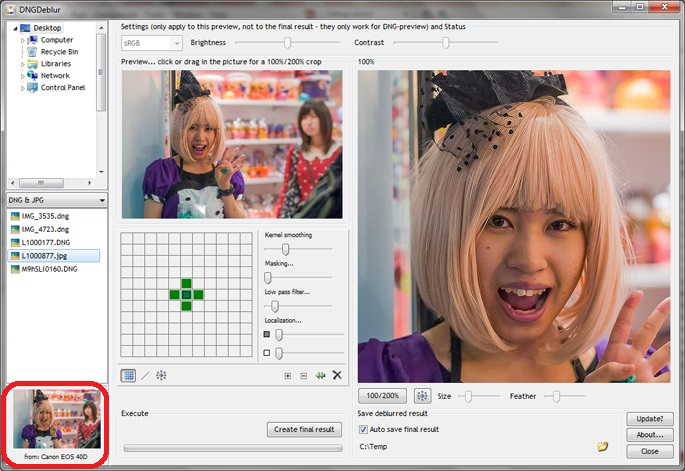
When you select a DNG or JPEG, you will see the preview image here... under it the camera model the photo was taken with. Note though that for JPEGs you will not see the camera model (yet), but an indication if the JPEG is 8-bits or 24-bits per pixel. This screenshot is from an earlier version and shows one of those many bugs I'm still solving, since it's a JPEG selected and this photo was not taken with the Canon 40D...


JPEG versus DNG selection

When you select a JPEG, it's loaded into the program almost instantly. So you will not only see the little preview - indicated in the previous screenshot - but also the bigger images. You can start to work on the photo almost immediately.

But when you select a DNG it first needs to be interpolated to get to a presentable result. That takes some time and it takes too long to do it automatically (then you would be stuck navigating the photo list every time you hit a DNG). So when you select a DNG, you first have to click the 'Open DNG' button, shown in the next screenshot, before you can start working on the photo.

When you select a DNG you have to click 'Open DNG' before you can start working on the photo. This button won't show if you select a JPEG.

Be aware that the program currently resets everything - without warning - when you select another photo in the list on the left. You will lose any deblurring you have done if you have not created the final result.


Navigating

After clicking the 'Open DNG' button (or selecting a JPEG), you can navigate the photo by clicking or dragging with your mouse in the smaller preview image on top. It will show you the 100% view of your selection on the right. You can also directly move the bigger image on the right, by dragging the image with your mouse (DNGMonochrome users: this will also be in the next version of DNGMonochrome).

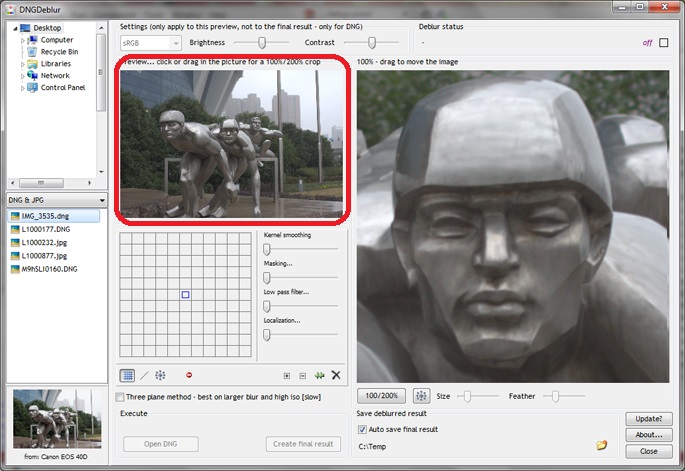
Drag or click in the smaller image to show a 100% view of your selection on the right... You can also drag the big image around with your mouse...

Under the bigger image you have several buttons. With the first one you can switch between a 100% and a 200% view. The other buttons and sliders have to do with the deblurring circles. I'll come back to those later.

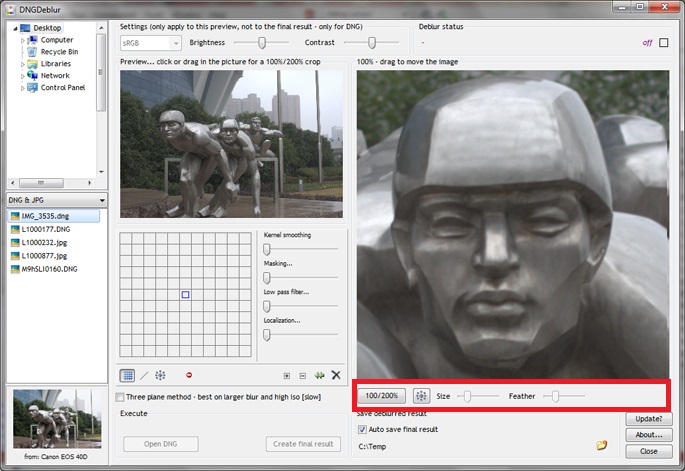
Buttons and sliders under the big image...


Saving or auto saving the final result

When you're happy enough with your deblurred result, you can click 'Create final result', after which DNGDeblur starts to work on the total image. Note that the button 'Create final result' is not available until there's actually some deblurring going on. If you have turned on 'Auto save result' and set a folder, the end result will be saved into that folder automatically. If you have not turned on auto save, DGNDeblur will open a Save dialog when the deblurring process is finished, and you can save the result manually.

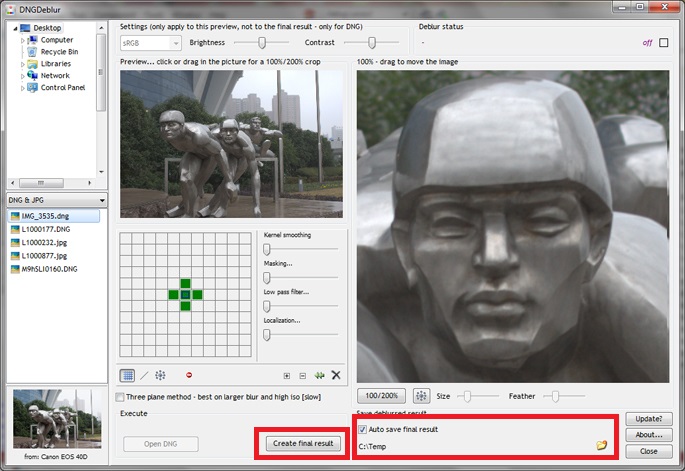
Click the 'Create final result' to produce the deblurred photo, which is then saved automatically if you have turned on 'Auto save', with a valid folder...


The deblurring filter

Obviously, this is the thing everything revolves around. It consists of three parts (for DNGMonochrome users who had a look at the deblurring filter in DNGMonochrome, also this will be in the next version).

The free grid


The line and other shapes tool


The circle - mainly for focus blur


You can switch between the three with the buttons under the filter. Note that currently the line and circle tool (if you switch from the free grid) will destroy anything you did in the free grid. I hope to address that in future versions.

In the free grid you can just click around to create the so called 'kernel'. In the line tool you select the shape and set the radius and angle. In the circle tool it's just the radius.


More technical

The deblurring is based on Wiener filtering. Now, I am not a mathematician and if I try to explain in detail, I will probably make gross mistakes, because I do not understand those rather complex mathematical formulas that go along with it, so for what it's worth - and as far as I understand it - in layman's terms: think of this type of filtering as a form of noise cancellation, like the one they implement nowadays in some head phones. Noise and unwanted sounds from your environment - that do not belong to the audio signal - are blocked, by generating 'anti sound' (since waves can cancel each other out - interference and all that).

So one could say that Wiener filtering for deblurring images, uses 'anti waves', to block out the residue in the image that's left behind by camera shake or focus errors. This is done by first transforming the image through Fast Fourier, and then combining its energy spectrum with the energy spectrum of the 'kernel' (where the kernel is the image you have created by clicking in the free grid or by selecting a shape in the line or circle tool, also transformed through Fourier).

So the kernel is the bit that's creating the anti waves.

Another shorter explanation - probably more correct, but also more vague - could be that Wiener filtering is a method of shaping the energy spectrum of your blurry image - towards a less blurry outcome - with the help of the energy spectrum of the kernel. Almost like a sculptor chiseling away at the photo, where the kernel is your chisel.

Or as the smart people of Wikipedia put it:

"The goal of the Wiener filter is to compute a statistical estimate of an unknown signal using a related signal as an input and filtering that known signal to produce the estimate as an output."

Which is even more vague, basically telling you nothing about what's actually happening. So I hope my own explanation isn't too far off.

But you can already guess the problem: finding the right kernel! If you have no record of how the shake went exactly (or when your subject was also moving), finding the right energy spectrum to correct your blur is not a simple task. That's why this method works quite well on small focus blur or mild camera shake (since the kernel can then be quite generic: a short line, a cross, or a circle and the whole thing then starts to act as some kind of super sharpener). But when the blur becomes more complicated, it's a different story. Then this method becomes more frustrating. And then I haven't even talked about 3D blur, where you didn't just shake the camera a bit, but where you were also moving back and fro at the same time.

This is one reason why I introduced the free grid (to give you and me a fighting chance), since some of the deblurring software out there stops at the line and the circle. But just the line or circle do not necessarily give you the best result for your particular bungled up photo.

I also think the free grid lends itself quite well for some automation I've been experimenting with: trying to estimate the best kernel based on an underlying comparison of the result. It's a very slow procedure, but some of the results have been quite encouraging. I hope to introduce that automation at some point in future versions.

Next post I will go a bit deeper into the workings of the free grid and the sliders.


Download

You can download DNGDeblur here.


Previous post about the specifics of DNGDeblur:

- Introduction

Sunday, November 16, 2014

DNGDeblur - Introduction

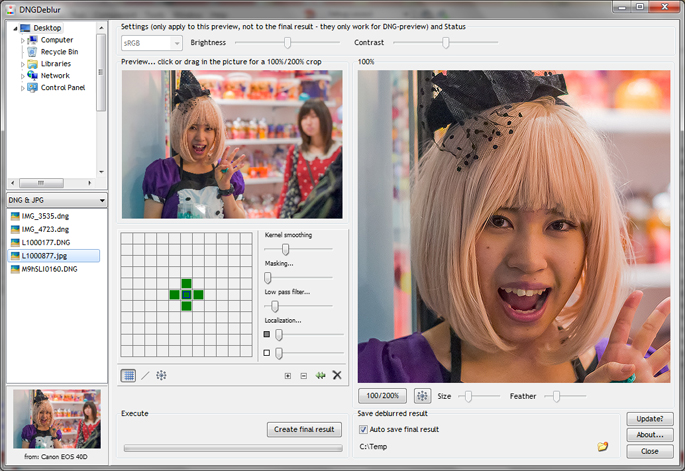
Screenshot of a first version - the official release will look slightly different...


Requirements

DNGDeblur runs on Windows only and was tested on Windows 7 and Windows Vista. It might run on Windows 8 without problems, but I haven't tested it on that platform. It needs quite a bit of memory, and a fast processor never hurts.

And to get an important issue out of the way: I do not intend to develop a MAC version.


Supported cameras

In general DNGDeblur can deblur color or monochrome RAW files from a limited number of cameras - when their RAWs are in the DNG format - and JPEGs from any source.

Note that the term 'deblurring' needs to be taken lightly. This program is not a one step solution to your blurry photographs. It will not work satisfactory on every blurry photo you throw at it (more on that in next posts) and you do have to spend some time and effort per photo to get to the best results. If you dislike post processing photos or if you are by nature an impatient person, DNGDeblur might not be for you.

DNGDeblur supports native DNG as produced by Leica cameras (supported are the S2, M8, M9, M, MM and T - the M-E should also work, if not, shoot me an email).

Additionally, if you have files from a Canon EOS 350D, 500D, 550D, 30D, 40D, 5D Mark II or 5D Mark III you can also use DNGDeblur if you convert your RAW CR2 file (the full CR2, not a downsized in-camera RAW) to DNG, using the free Adobe DNG converter (or Lightroom to export as DNG).

Same story for Nikon D200, D800, D800E and the Sony A7s (and to be clear: also these files need to be converted to DNG first).

I doubted the Nikon D800 and the Leica S2 a bit, because those files are so huge that deblurring the RAW might simply not show in the end result (if a smaller JPEG is produced). These RAWs also take quite a bit of time to process. But the files work in DNGDeblur and don't seem to pose any problems, so why not.

DNGDeblur also supports monochrome DNGs produced by DNGMonochrome, but that's hardly an advantage since the deblurring engine in DNGMonochrome is exactly the same as the one in DNGDeblur (although DNGMonochrome doesn't let you reload your monochrome DNG, in that sense DNGDeblur might be handy). The monochrome support in DNGDeblur is mainly meant for the Leica MM.

The deblurred DNG is currently written uncompressed, so don't be surprised if the endresult is bigger than what you started with. Adobe's DNG converter seems to JPEG compress all files it converts (that's lossless compression). The compression used by the Leica M8 and Leica M9 (on the latter it's optional) is different: that's a lossy compression. But also that compression gets lost in translation by DNGDeblur and you'll end up with an uncompressed DNG.


The Circles

Besides deblurring a DNG or JPEG, DNGDeblur can also deblur parts of a DNG or JPEG in so called 'deblur circles', which can be placed on the photo, much like the radial filters of Lightroom. This is especially handy for photos that have large out of focus areas, where only a face or eyes need to be deblurred. You can place more than one of these circles on a photo, resize them, turn them into ellipses, feather them and drag them around. The deblurring will stay confined within the circles and no part of the photo outside the circles is altered when you create the final output. See this post for an example.


So why can't DNGDeblur handle any old DNG?

I know that DNG is supposed to be a general standard, but as it turns out, it really requires implementing total support of the DNG standard in the software. Some cameras use options that other cameras do not use.

The Canon EOS 550D and the 5D Mark II for instance gave me major problems. When I ran their DNGs through DNGDeblur, the resulting deblurred DNGs contained huge color shifts and a wrong white balance compared to the original. None of the other supported cameras showed these problems. Of course: it was the ActiveArea tag again, not properly implemented by me, so pixels started shifting all over the place. I've been there before with the Canon 5D Mark II. And as it turns out: the Canon 550D has an equally awkward ActiveArea tag, hence the same problem with those files. But the problems are solved for both cameras. Just an example to show that I really need to test photos of every camera I intend to support, before I can open up the software for that specific camera.

However, if you have a camera that doesn't fall into the supported list, you can still use DNGDeblur for JPEGs.


JPEG support

Since I'm not totally opposed to the idea that deblurring RAW files is actually quite stupid (more on this stunning revelation later), DNGDeblur can also handle JPEGs. But only if the JPEG is 8-bit or 24-bit per pixel (that should not be a big problem, most JPEGs are). The deblurred JPEG result is always stored as 24-bit per pixel (also if your input JPEG was 8-bit per pixel) and is written with a 100% quality setting (which cannot be changed).

Since I added JPEG support last minute, the EXIF information in the original JPEG is not preserved in the deblurred copy (to get that right requires a bit more time and effort). I hope to address that issue in future versions, since I consider it quite a serious problem. In fact this was one of my main gripes with some of the deblurring software out there: producing low quality JPEGs with all the info stripped. At least I got the quality right, now I just need to keep the EXIF in tact.

[NOTE: EXIF preservation was added in version 1.1.0, so above paragraph is not valid anymore]

So why the doubt about deblurring RAW, calling it stupid even? Well, RAW files are usually quite big, and with the pixel race still going on (see the Nikon D800 or the Sony A7r) RAW files aren't getting any smaller (although the Sony A7s shows that some manufacturers might be reconsidering). It means the kernel to deblur needs to be bigger, which makes it harder to deblur without introducing a lot of artifacts. Deblurring RAW seems to work fine for files up to say give or take 20mp, but when the files get larger I really doubt the practicality of it. It might be smarter to then switch to a smaller JPEG end product, since a then much smaller kernel can have a much stronger effect. Hence the JPEG support (also a nice bonus for people who skip RAW completely).

However, stupid or not, DNGDeblur started out as an experiment, to see if it was actually possible to deblur a RAW file and keep it RAW. And that it is.


Download

You can download DNGDeblur here.


Next post about DNGDeblur I'll show you a bit of the user interface and try to explain how this deblurring actually works.

Tuesday, November 11, 2014

Two cats

Or one cat moving really fast? No seriously, there were really two...

Kuantan, Malaysia, 5 August 2013

Click on photo for the full version...

Sunday, November 9, 2014

DNGDeblur, almost done...

See the screenshot of the very first version. It's almost done.

Last week I also added JPG support and experimented a bit with some automation, trying to let the computer decide on the best kernel. That second part won't be in version one though, since I'm not convinced yet.

And although DNGDeblur is really aimed at RAW files, it seemed a bit of a waste not to include JPGs. In some cases deblurring the smaller JPG can have an overall better effect and not to forget: some people don't shoot RAW but go directly for JPG.

Saturday, November 8, 2014

Surprised?

Waitress in a crab restaurant taking a photo of me and my friends... maybe she zoomed in too much on my big nose...

Tokyo, Japan, 10 October 2014

Click on photo for the full version...

Wednesday, November 5, 2014

In the subway - II

Tokyo, Japan, 12 October 2014

Click on photo for the full version...

Tuesday, November 4, 2014

Intermezzo

Monkey at the beach...

Kuantan, Malaysia, 26 September 2012

Click on photo for the full version...