Got my hands today on a few DNG files from the new Leica M (see here - scroll down for the DNG files), in firmware called 'LEICA M (Typ 240)' and obviously I had to see if these DNGs could be converted to monochrome by DNGMonochrome.
[edit: much nicer examples can be found here]
Happy to report they could.
I'd show you an example, weren't it for the fact that would constitute a copyright violation.
Let's say that the examples of the second link were impressive (in itself, but also the conversion to monochrome, especially the 'snow' photos).
It was a very quick test, but it seems that the only issue I have to solve is the embedded preview image. For the Leica M8 and M9 (al beit stored differently between the two models) the preview image is an uncompressed bitmap. The Leica M DNG stores a JPG preview.
I'll have to run some more tests - filtering, noise reduction etc, - and obviously test again when the camera is officially launched (see if the non-beta firmware didn't change anything) - but I suspect the next release of DNGMonochrome will also be prepared for the Leica M, then you can give these examples a go yourself.
[edit: it seems the embedded preview image is 160 by 120 pixels - rather small (half the size of the M9 preview image) - a JPG, and there's a black bar on top of it, also visible when you open the DNG directly with e.g. Picasa Photo Viewer or when you import the DNG into Lightroom. I suspect this might be solved when the firmware reaches a production stage...]

Sunday, January 27, 2013
Tuesday, January 22, 2013
The Sight of Silence II
Making quite a bit of progress with the noise reduction.
For people just tuning in: I'm talking about the next release (not here yet).
DNGMonochrome doesn't show you a 'live' result you can work on and I decided that for noise reduction that had to change. I wanted to be able to push those sliders and see the effect instantly, without having to re-interpolate the whole photo.
But in order to do that I had to cut the area that's interpolated, since speeding up the whole procedure wasn't an option: apart from technical limits, it would never be fast enough.
So I implemented a dedicated 'noise preview', which will show the preview image (after interpolating the total photo once) with a 100% crop and a 200% crop, quite similar to the main screen.
You can then navigate the preview image and select the area you want to inspect. And the selected area will be noise-reduced very quickly by re-interpolating only the selected bit and not the whole photo.
This instant feedback is really the only way, because the noise reduction options I implemented so far are quite extensive.
Before interpolation
Before interpolation you can denoise the secondary channels of the RAW file separately (e.g. when producing a regular monochrome DNG you can denoise the red channel and the blue channel before interpolation). The effect is very subtle and you really have to look for it, but especially in the shadow areas it's quite noticeable.
When interpolating with the RAW red filter or the RAW blue filter, these 'before interpolation' sliders work on the green and blue channel and on the green and red channel respectively. Here the effect is a bit stronger, because the green channel is more dominant and occupies 50% of the sensor.
The main channel is untouched, because for that one it makes more sense to reduce noise after interpolation, since the before and after values are the same, e.g.: when interpolating the regular monochrome, the green pixel values don't change. Also, the effect of reducing noise in the main channel before interpolation leads to very strong and unsatisfactory results: too much detail gets lost.
After interpolation
And then there's three sliders for the 'after interpolation' results. They work on the final result, where noise reduction is applied on the DNG after it is reduced to one monochrome channel. These sliders also work on the RGB filters, where noise reduction is applied to the separate results before they are mixed.
Both the before and after interpolation have a detail slider, which works (in effect) quite similar to the Lightroom detail slider.
Here's a preliminary screenshot of the noise preview window.

Note that the final result in the next release might (and most likely will) look different. It's not finished yet. Also, I was a bit apprehensive about the 200% preview, since the upscaling algorithm is out of my hands. For quality you have to concentrate on the 100% view. The 200% will give you a good 'noise' indication, but it will also show jagged edges - due to the upscaling - and an overall fuzzy image.
Despite all these noise reduction options, my advice would still be to use the Lightroom noise reduction (or any other RAW converter you might be using) for the final result if possible (e.g. when converting to regular monochrome).
I think the 'before interpolation' sliders are very useful for all conversions, and when you're using the RGB filters you should use the noise reduction for the red and blue result, but otherwise I would leave it up to your regular RAW converter.
Not that there's anything wrong with the present implementation, but in a practical sense: DNGMonochrome doesn't remember the position of the sliders per photo. If you want to 'redo' the DNG conversion to monochrome, you have to start all over again. In that sense it's best to limit the use of these options within DNGMonochrome as much as possible.
For the RGB filters however, Lightroom isn't a good alternative. Once you start mixing the red and/or blue result for filtering, Lightroom can only partly help you out if the red or blue channel turns out too noisy. You have to tackle that noise in DNGMonochrome first, before you create the final monochrome DNG. And that was also the main reason for this extensive noise reduction implementation.
As mentioned before: I hope to have all this - and some other new stuff - finished somewhere in February...
Wednesday, January 2, 2013
Sci-Fi cat
 Dozing off after gouging on the krupuk we fed her... she loved it...
 Click on photo for the full version...
Sunday, December 9, 2012

Wednesday, November 21, 2012
The Sight of Silence
So what's next?
Well, that would be me finally giving some attention to photos I took in recent months. Since yeah, this did start out as a photo blog. Some readers and viewers might be contemplating suicide by now, after being confronted with all this nerd talk, so maybe time for some images...
Also, I have to go back on a promise - which I don't like doing in general - but a port of DNGMonochrome to OS X will have to wait until I settle down a bit with experimenting. I have too much stuff I want to try out in the current version, before I can set myself to the quite boring and time consuming task of translating code, ending up with basically nothing new...
I am however looking into ways of restructuring the code I have now, to make the core more portable. Then only the user interface would have to be redone.
Where DNGMonochrome is concerned, I will be concentrating next on the algorithms and noise.
Algorithms
The aim was to get what I have now into only one algorithm: retaining the sharpness of the sharpest, but with less to no artifacts.
Currently I'm testing a new algorithm that comes very close.
It's faster than what I have now, it's sharper than the 'smooth' algorithm, and it's without any of the artifacts the current sharp algorithms can produce. No speckles on high ISO, no ringing on highlighted edges, nicely stepped diagonals with no pixels misbehaving...
It's close to what I want... it was just not as sharp as the sharpest I have now.
But after some tuning, I managed to solve that with an extra setting, optionally changing the innards of the algorithm slightly.
Overall it means going to only one algorithm with one extra option for sharpness, ditching three separate algorithms, ditching the mixover and the quality slider, gaining speed and basically improving the conversion, since the new algorithm doesn't misbehave and is still sharper than the current smooth one.
And with the extra option you can still get to gritty, noisy and sharper.
In both cases (with or without the sharper option) the algorithm produces sharper results than Lightroom turned B&W.
I still need to run some tests on this new stuff, and see if it also works out for the RAW red and the RAW blue, but if it does, it will most likely be in the next release.
Noise
At present, the noise reduction offered in DNGMonochrome is kinda lame.
Now the assumption was that 'lame' was actually okay, because the monochrome DNG is not your finished result: Lightroom or any other RAW converter you use can take care of the noise. I threw in those crusty median filters because I had experimented with them and they actually worked, so why not... but they are not very sophisticated...
But in the latest version I introduced RGB filtering: the red and blue interpolated results are mixed in with the regular result, so noisy pixels (especially the red channel can be quite messy) are introduced into the regular result if you use those filters.
To be able to perform good solid noise reduction on the RAW red and RAW blue, before they are used in the filtering, would be a very welcome addition.
Now, when you google 'noise reduction' it's almost inescapable: it needs to be wavelets.
Wavelets?
Yes, wavelets.
Fourier transforms are also possible, but that seems to be yesterday's thing: wavelets are the way to go... (also not very recent mind you, but it's what all the kids rave about: wavelets!).
I had no clue... that's the fun of DNGMonochrome (for me that is). When I started it I had even less of a clue. It forces me to dive deeper and deeper, learning heaps of new stuff.
Pointless really, but it keeps me busy.
After reading up on wavelets, I finally had some vague idea of what they were, but it was still very abstract all.
Then I stumbled onto a piece of programming code, something practical, that represented 'wavelet denoising'... (dcraw, great program, not easy to read the source code, but at least that I'm capable of)...
So I grabbed that code - really not a lot of lines, strange: after reading many thick PDF on the theory of wavelets, one would expect some bulky programming code, but not so... and started to experiment with it.
Insight
I first adapted it to actually show me these mysterious 'wavelets' (or at least their consequences) and then I really started to understand (well, sort of...)
Then it took me a while to get it adapted to work with DNGMonochrome, and when it finally did: bingo.
The Sight of Silence
Impressive noise reduction.
No joke: seriously impressive noise reduction.
In comparison with Lightroom (3.6) one might even claim - on very very close inspection - that the wavelets rule: they seem to deal slightly better with fine detail (although I can't exclude Lightroom also using a wavelet technique: the results are remarkably similar - and when you throw in the detail slider in Lightroom, the difference becomes neglectable).
Getting philosophical
Of course 'good' and 'better' become very relative, because almost none of these differences are visible at 100%. This whole quality thing is really about extreme pixel peeping, under the assumption that if it's better at 800% magnification, it must also be better at 100%. Which in itself is true of course (is it?), but it excludes the notion: can we still see it?
Or on a more philosophical note: is better still better if we can't experience the difference?
Anyway...
Improvements?
After reworking this wavelet code a bit (adding an extra 'detail' setting and getting it more in line with my own programming), and reading some more on wavelets, I saw some concerns in the present code I'd like to address.
For instance: wavelets operate with thresholds. But the basic threshold in the present code is fixed per level and it's not documented where this threshold is coming from. There's suggested ways to determine the threshold dynamically and not set it upfront, so I want to have a look at that.
Also, the number of decomposition levels is fixed (how many wavelets are created in total), where it might be better to have a high number of levels for low ISO photos, and lower levels for high ISO photos. Need to examine that, see if I can detect a difference when changing the number of levels.
And I read about possible optimization steps after the denoising, for getting back lost detail, so I also need to examine that one.
So, enough to do for a next release...
Monday, November 19, 2012
DNGMonochrome 0.9.6 beta released
Ok, finally...
It's a release with quite a bit of new stuff, so I do expect bugs. Check back soon.
Here are all the changes...
Bug fixes
Changes
New stuff
Dropped stuff
Extra documentation
More on the new 'dead pixel mapper' and how to work it here.
More on the new white balance slider and what it does here.
Download
You can download the new version of DNGMonochrome here.
It's a release with quite a bit of new stuff, so I do expect bugs. Check back soon.
Here are all the changes...
Bug fixes
- Fixes bug that on rare occasions could lead to a checkerboard pattern on blown out highlights... it's very unlikely that any of your converted photos were affected by this bug
- Fixes bug which could lead to a crash when pressing the Cancel button on a running blue filtered process
Changes
- Changes the strength setting from steps of 25% to steps of 5%
- Changes the filter options to a drop down list
- Changes the file naming... filename will now indicate the type of filter (RAW or RGB), the filter used (color), and the strength setting of the filter
New stuff
- Adds a red, green and blue filter to the filter options
- Adds option to change the white balance of the photo before filtering (on RGB filters only)
- Adds option to use the RGB filters as a gradient in four directions, with options to end the gradient anywhere on the photo
- Adds option to boost the strength of the RGB filters when using the filters as gradient
- Adds dead pixel functionality, to register dead pixels per camera
- Adds quality option to fix registered dead pixels in the monochrome DNG
Dropped stuff
- Due to the fact the working of the new red RGB filter is slightly similar to the working of the RAW red filter on a non-full strength (same for the new RGB blue filter versus the RAW blue filter), the strength setting for the RAW filters was dropped
- Internal 8-bit support was dropped (mainly to make it easier to maintain the code)... effectively this means the M8 DNGs and compressed M9 DNGs are decompressed after loading and the resulting monochrome DNG will be written decompressed - 16 bit (making the monochrome DNG file larger for original 8-bit DNGs)
Extra documentation
More on the new 'dead pixel mapper' and how to work it here.
More on the new white balance slider and what it does here.
Download
You can download the new version of DNGMonochrome here.
Saturday, November 10, 2012
Filter fun...
That does sound a little bit geeky...
With all the filters almost finished, I thought it would be nice if you could actually apply them selectively... I call it 'gradient filters'. Not very original, the naming, granted, but it describes the working quite well.
They work a bit like the neutral density filter in Lightroom, albeit with a different user interface and quite a different effect.
Here's an example.
Red filtered gradient on only the top 1/3 of the photo.
Move over the photo with your mouse to see the effect...
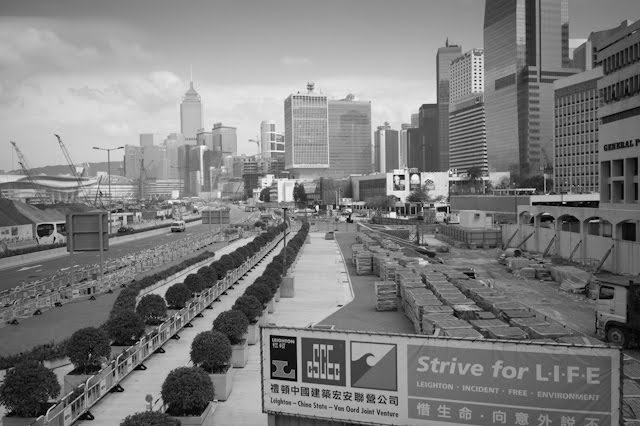
Regular monochrome from Leica M9...
Move over the image to see the gradient red filtered monochrome...
As you can see, it brings out the sky a bit, changes the top of the buildings on the right half, but the bottom half of the photo is completely untouched. It turns the rather flat top half of this image into a little bit more vibrant.
Using the neutral density filter in Lightroom to achieve a similar effect won't work. It will darken the blue of the sky, but also the top of the buildings and the white clouds: in stead of bringing out these details, the density filter would just darken them.
This photo was filtered according to this setting in DNGMonochrome:

You can filter from top to bottom, bottom to top, left to right and right to left (especially handy for images that need to be rotated, since DNGMonochrome doesn't do that for you... I follow the lazy Leica way...). You can then select where the gradient needs to end on the photo, by changing it with the slider. You can apply these gradients in combination with all the RGB color filters (red, green and blue), not just with red (and mind you: the 'gray' gradient you see in the image of the window above, represents one of the three color filters... it's to indicate where the effect will be strongest and where it ends... it's not a 'gray' filter).
I think Photoshop might offer similar functionality, but you can't do this in Lightroom (at least not in 3.6). It would require a neutral density filter type option which can selectively color mix.
This will also be in the next release of DNGMonochrome...
With all the filters almost finished, I thought it would be nice if you could actually apply them selectively... I call it 'gradient filters'. Not very original, the naming, granted, but it describes the working quite well.
They work a bit like the neutral density filter in Lightroom, albeit with a different user interface and quite a different effect.
Here's an example.
Red filtered gradient on only the top 1/3 of the photo.
Move over the photo with your mouse to see the effect...
Regular monochrome from Leica M9...
Move over the image to see the gradient red filtered monochrome...
As you can see, it brings out the sky a bit, changes the top of the buildings on the right half, but the bottom half of the photo is completely untouched. It turns the rather flat top half of this image into a little bit more vibrant.
Using the neutral density filter in Lightroom to achieve a similar effect won't work. It will darken the blue of the sky, but also the top of the buildings and the white clouds: in stead of bringing out these details, the density filter would just darken them.
This photo was filtered according to this setting in DNGMonochrome:

You can filter from top to bottom, bottom to top, left to right and right to left (especially handy for images that need to be rotated, since DNGMonochrome doesn't do that for you... I follow the lazy Leica way...). You can then select where the gradient needs to end on the photo, by changing it with the slider. You can apply these gradients in combination with all the RGB color filters (red, green and blue), not just with red (and mind you: the 'gray' gradient you see in the image of the window above, represents one of the three color filters... it's to indicate where the effect will be strongest and where it ends... it's not a 'gray' filter).
I think Photoshop might offer similar functionality, but you can't do this in Lightroom (at least not in 3.6). It would require a neutral density filter type option which can selectively color mix.
This will also be in the next release of DNGMonochrome...
Wednesday, November 7, 2012
Delay...
So, why the delay?
Well, not totally happy with the approach so far, I decided to dive a bit deeper into the process of getting to true sRGB. My YUV theory and the formulas do work (although I now think I'm not officially allowed to call it YUV... the approach works because of the relative relationship between green, red and blue on the sensor - a manufacturer specific YUV if you will...), but seeing how every sensor is different, it's hard to tell how 'green' the green result actually is.
And that was bothering me.
So I then diverted to a more official approach, by applying white balance and then using a color matrix.
Initially I used the sensor data DxO has published on their website.
But there seems to be a problem: the relationship between their documented white balance and the color matrix they present is unclear. It's not specified how they get to their numbers (it is according to an ISO standard, but I was unable to find the exact calculations)...
It seems the matrix might have to be different under different lighting conditions or with a different white balance. And you can't simply apply their documented white balance, because white balance is photo specific - either 'auto' by the camera, or set by the user (stored in the ShotAsNeutral tag of the DNG).
It's all kinda vague, and I wasn't thrilled with the results: a kind of weak green filtering and a humongous strong - really over the top - red and blue filtering.
And seeing how it's unclear how to balance it all out, I'm not sure about this one.
On to the third approach, the most complex one: convert the RAW colors through a matrix to a profile connection space (XYZ), and then use a generic sRGB color matrix to convert that one to sRGB. The conversion to XYZ is the most complex one. It takes into account two color matrices, two forward matrices, camera calibration, white balance and white point settings through different illuminant settings, all taken from the camera profile.
All that data is used to produce nine numbers, which are then used to convert the RAW sensor data to the XYZ color space.
Luckily Adobe provided most of the code to accomplish that conversion.
Then the XYZ data is converted to sRGB through another matrix.
This approach also works and gives better results than the DxO approach.
But also here there's a catch: These matrices and the conversion are rather complex and tight. It's very difficult to figure out where and how to apply the strength setting or where to incorporate that infamous black level. There's too many variables involved over too many layers and it's unclear where to tweak what.
I didn't get very far yet adapting this approach to fit what I want to accomplish.
In the end, after this rather exhausting detour of different approaches, I think the best results were with my first attempts, based on the YUV idea.
So I implemented that one, including white balancing, and I'm quite happy with the result.
But as to not throw away my other hard work on the third attempt, I'm contemplating to create another set: now the full sRGB or AdobeRGB. They won't have a strength setting, and you'll be looking at the pure red, green and blue result, fully based on camera profiles. Because here's the rub: the RAW red also contains a little bit of blue and green. And the RAW blue also contains a small amount of red and green. And the present filtering doesn't take that into account. That's why the sRGB filtering on e.g. red is so much stronger: It's the true non-diluted red. Noisy and over the top, because the little bit of blue and little bit of green - still left with the other filters - is now also gone.
This second set won't be in the next release though, let's first present what I have now, which will take a few more days to finish up.
Monday, October 22, 2012
Green finished...
Yes, I think I'm there... had some trouble finding the right formula to get the luminance back after the math to calculate green, but that's also solved, which opens up the way (I think) to a proper red and blue filter...
Let me show you two examples.
All settings on the photos are similar. The regular and the green result were edited exactly the same (same contrast, brightness, exposure settings etc...)
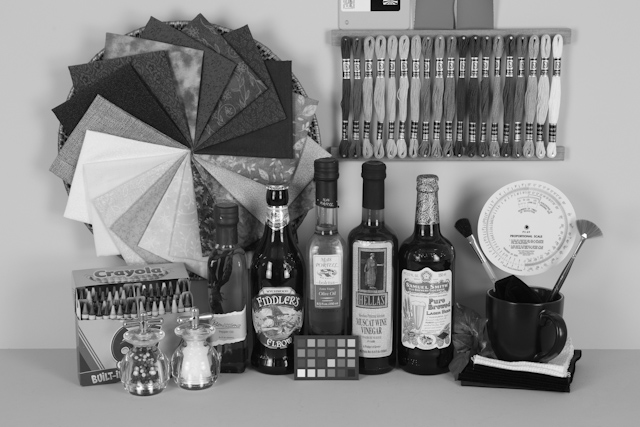
First my Leica test photo... regular monochrome and green filtered on the highest setting...
Move over the image with your mouse to see the difference... from regular to green filtered...
(possibly in some browsers this doesn't work - not fully sure... if you see no difference you either have a visual problem or your browser doesn't support the rollover... you then just have to believe me :-) )

Regular monochrome from Leica M9...
Move over the image to see the green filtered monochrome...
And here's an example from the Canon 5D Mark III
Regular monochrome from Canon 5D Mark III...
Move over the image to see the green filtered monochrome...
The effect is quite strong on the blue and red, but this is on the highest strength setting. The setting can be changed in steps of 5%, so there's quite a bit of room to pick a favorite strength...
Will still take a few days till the next release, with obviously this green stuff in it, since I'm also working on a dead pixel mapper I want to finish up first.
Let me show you two examples.
All settings on the photos are similar. The regular and the green result were edited exactly the same (same contrast, brightness, exposure settings etc...)
First my Leica test photo... regular monochrome and green filtered on the highest setting...
Move over the image with your mouse to see the difference... from regular to green filtered...
(possibly in some browsers this doesn't work - not fully sure... if you see no difference you either have a visual problem or your browser doesn't support the rollover... you then just have to believe me :-) )

Regular monochrome from Leica M9...
Move over the image to see the green filtered monochrome...
And here's an example from the Canon 5D Mark III
Regular monochrome from Canon 5D Mark III...
Move over the image to see the green filtered monochrome...
The effect is quite strong on the blue and red, but this is on the highest strength setting. The setting can be changed in steps of 5%, so there's quite a bit of room to pick a favorite strength...
Will still take a few days till the next release, with obviously this green stuff in it, since I'm also working on a dead pixel mapper I want to finish up first.
Wednesday, October 17, 2012
About Green and other stuff...
Getting there.
As written before, the complications were the Canon files.
At least, that's what I thought.
So I mainly looked for differences between the sensor readings of Leica and Canon.
But despite some differences (Canon seems to favor blue a little bit more than Leica does) it didn't make much sense.
The Leica values and the Canon values were too close to explain the big differences I was seeing.
Then I thought I had the model wrong. Not YUV but maybe YCbCr (in the second one the red and blue are gamma corrected), so I tried that. And that did lead to better results, but was also very photo specific. One photo would need a high setting, another photo a low setting... and in some situations the strength setting would cancel out the gamma setting and the filtering would hardly be noticeable.
Overall it wasn't very satisfying, since I still didn't understand what was going on.
Then, at some point, when I was just lazying around, thinking about this problem, I suddenly realized that in all my tests I had been ignoring the black level, and that the black level might not appreciate that very much.
In my Canon test photos the black level was much higher than in the Leica test photos. It explained the big differences I was seeing.
And indeed: incorporating the original black level in the calculations solved it all.
No more need to gamma correct, it just works on the linear data... for Canon and for Leica and for all kinds of black levels.
I've also been working on a red RGB and blue RGB filter. Quality wise they seem to perform better than the chrominance red and blue filters, but the results are also different (gray-toning wise), so the chrominance filters will stay.
And I still need to figure out if the new red and blue filters require some extra coding on the opposite end of the scale (the white level), since there similar issues might exist.
Anyway, I expect to have these three extra filters finished now pretty soon, in the meantime thinking about orange and yellow...
Sunday, October 14, 2012
DNGMonochrome 0.9.52 beta released
With one bug fix.
The RawImageUniqueID, stored in the DNG, was responsible for the somewhat strange behaviour of Lightroom, where after selecting a monochrome DNG, the wrong preview picture would be shown briefly (provided you had imported multiple monochrome DNGs, created from the same original photo).
The RawUniqueID is now filled for every monochrome DNG with indeed a unique value, and that solves the problem.
You can download the new version of DNGMonochrome here.
Friday, October 5, 2012
DNGMonochrome 0.9.5 beta released
[Edit: after releasing 0.9.5, I discovered the new quality slider was not fully operational on the blue filter... that's fixed in 0.9.51, which is currently the version on the download page]
This version improves the working of the quality slider by using a different method, leading to a tighter integration between the smooth and the sharp algorithms.
It leads to overall better results compared to the old method.
Be aware that I'm talking pixel peeping magnifications here (200% to 400%). You'll probably not notice the differences when viewing at 100% or when downscaling the photo.
The quality slider is mainly useful when you want to print large (over 100%), and the usage of it is strongly advised if you go for the red filtering or blue filtering.
The green filtering is not introduced yet in this version, since I'm still experimenting.
It works very nicely for the Leica files, but the numbers on the Canon files do not lead to the right results. I'm still figuring out what the difference is. It is to be expected obviously, since the two companies do not share the same Bayer filter or sensor, so the specs are different.
Also in this version the Canon EOS 5D mark III is now supported.
For Canon users: you first have to convert your CR2 file to DNG with the free Adobe DNG converter and the end product is a monochrome DNG that can not be read by DPP.
You can download the new version of DNGMonochrome here.
Lightroom and Canon files
I discovered the Lightroom preview / cache gets confused on the Canon files.
If you have imported multiple copies of one original DNG (say a regular monochrome DNG and a red filtered monochrome DNG of the same photo), switching to the red filtered monochrome in Lightroom will briefly show the regular monochrome one. It's harmless but looks weird. If you have only one monochrome copy loaded into Lightroom, this problem doesn't occur.
It also doesn't occur on Leica monochrome DNGs, which leads me to believe that it might have something to do with a specific DNG setting put in by the Adobe DNG converter.
Another possibility is that it's a local cache issue, to do with my Lightroom setup.
As said: it's harmless, the correct DNG is shown once Lightroom has it properly loaded after selection, but I will be investigating this issue anyway, see if I can figure out what's causing it.
Wednesday, October 3, 2012
So, how about a green filter?
Yeah.
That was a bit of a complication.
DNGMonochrome has the ability to produce a red filtered photo and a blue filtered photo.
Given that the Bayer filter has three colors (green, red and blue), you might expect producing a green filtered photo would be easy. In fact, you might even think the regular result - based on the green pixels - is already a green filtered photo.
But that's not the case.
The Bayer filter - as explained in one of the previous posts - is set up in the luminance / chrominance model. It means the green pixels register 'luma' and the the red and the blue pixels register 'chroma'.
So where is green?
Well, as far as I understand it now, the Bayer filter operates in the YUV model, which means there is no green.
Nah, obviously there is, but not the RGB green. You can't reach green in the YUV model without converting the values first to the RGB model.
Y stands for luma, U is chrominance blue, and V is chrominance red.
No green.
But how to convert to RGB without color interpolating?
Well, turns out it's fairly easy if you first interpolate the luma (the regular monochrome photo), then the red and the blue filtered photo. Then after applying some simple math, you can calculate the green.
But it's slightly unfair, since for a red and blue filtered photo, it's the chroma red and chroma blue that's being used, not the RGB red and blue, so I might introduce additional filters (a full RGB set, also for red and blue).
I'm not done with this issue...
Why?
Now you might think: why go through all that trouble of interpolating three photos to get to a green filtered (or blue or red filtered) one?
Well, maybe I'll show you next time, but if you think Lightroom can offer the same, you're probably mistaken.
I tried getting to a similar result in Lightroom with the HSL sliders and the color mixer. It's impossible to get to the same DNGMonochrome result without degrading the image.
The strength of DNGMonochrome sits in the fact that it interpolates the photo on one aspect of the color (either luma, chroma, or now also RGB green), whilst Lightroom starts messing with individual pixels, pulling or pushing certain gray tones, introducing artifacts if you go sliding too wild.
They could implement a similar thing - interpolate new after making an adaptation - but the slowdown would also slow down their sales I suspect... it's one of the advantages of giving software away for free: I don't have to bother about sales :-)
Tuesday, October 2, 2012
DNGMonochrome 0.9.41 beta released
This version solves the issue where converted CR2 files from the Canon EOS 5D Mark II would lead to monochrome DNGs that couldn't be read by Lightroom...
If you're not interested in processing CR2 files and you're already using version 0.9.4, there's no need to update to 0.9.41.
You can download this new version here.
If you're not interested in processing CR2 files and you're already using version 0.9.4, there's no need to update to 0.9.41.
You can download this new version here.
Monday, October 1, 2012
DNGMonochrome and the EOS 5D Mark II
Got informed by a user (thanks Olivér) that the 5D Mark II converted CR2 files do produce a monochrome DNG, but that Lightroom has trouble reading them.
I use several programs to test the results in, but apparently I forgot to see how Lightroom deals with the 5D DNGs. For the EOS 350D and 40D things go smooth and fine, no problems there, but the 5D Mark II is a bit problematic.
Turns out DNGMonochrome produces a DNG for these files with an uneven number of rows (the 'height' is off) and Lightroom doesn't like that.
This bug is fixed, but I want to run some additional tests to make sure there's no problem with the borders of these DNGs.
So if you want to use DNGMonochrome for Canon 5D Mark II CR2 files, please be patient. The next release (somewhere this week) will fix the problems.
Sunday, September 30, 2012
DNGMonochrome 0.9.4 beta released
That was quick...
Yesterday, after implementing the speckle solver (see previous post) I discovered two minor bugs that could prevent some DNGs from processing correctly. Those bugs are fixed, and because of those fixes I decided to release this version already.
So in this version: high ISO M8 DNGs and high ISO compressed M9 DNGs should now behave properly, without producing speckles on the two sharper algorithms, and if you did see conversion errors on some DNGs, that issue should now also be solved.
You can download this new version here.
Saturday, September 29, 2012
About those speckles...
Well, as you know - if you read some essential blog posts on DNGMonochrome - I discovered some problems with the two sharpest algorithms a while back, most noticeable on high ISO M8 files, leading to white or light gray speckles. So far I haven't seen them on high ISO M9 files, but I also didn't test a lot of high ISO M9 photos.
I discovered the speckles when I was experimenting with a downloaded 2500 ISO M8 DNG, and it took me a while to understand what was happening.
Essentially the two sharp algorithms stay very close to the pixel being interpolated, and the number of pixels looked at - to get to the right value for the pixel under consideration - is small. The advantage: the interpolation stays close to home and it leads to sharper results.
The smoother algorithm averages over a larger area, looks at more pixels, and loses sharpness that way. The advantage though is that noise (and dead pixels) gets eradicated. It leads to a smoother, less noisy, less sharp result and no speckles on high ISO images.
What happens with the sharp algorithms on high ISO is that the color noise starts to have a big impact on the outcome, in a rather negative way. This particular M8 file was riddled with color noise, especially the red channel was totally out of control, with big red blotches in the shadows. As a consequence, the information picked up from the red channel was incorrect. And when averaging based on only a few pixels, these out of control red pixels were too big an influence, causing wrong values for the pixel under consideration, leading to the speckles.
I managed to solve that today and the results are quite satisfying now. Still sharper results than with the smoother algorithm, without the speckles and without using a median filter.
Lower ISO images are untouched by this method. It only kicks in when necessary and on a per pixel basis.
I still need to transport this new approach to the red and blue filtering, and test if I also need to implement this for M9 high ISO files. Need to produce some very noisy photos first for some testing.
Obviously these improvements will be in the next release...
DNGMonochrome 0.9.3 beta released
No major changes in this version where the algorithms are concerned.
This version adds a strength setting to the red and blue filtering, it improves the speed of the red and blue filtering process, and it adds support for CR2 files converted to DNG (with Adobe's free DNG converter) for the Canon EOS 350D, EOS 40D and EOS 5D Mark II.
I didn't test the smaller RAW format of those Canon cameras, so at present I can't guarantee proper functioning of those smaller RAW formats.
You can download this new version here.
Monday, September 24, 2012
DNGMonochrome, next release almost there...
Well, more or less done with the new stuff, just need to run some additional tests.
Converted Canon files now all seem to work, but I've not tested the smaller RAW formats of the 5D Mark II.
If you are interested in this software for CR2 files, do note that you need to convert them first to DNG and that the end result is also DNG, which can't be read by the regular Canon software (DPP). Also, so far only the EOS 350D, EOS 40D and EOS 5D Mark II will be supported. I might extend that a bit with other models, if I can find some online camera specific RAW files.
The strength setting for red and blue works, and I managed to speed up the whole thing again. Not the regular conversion, but the red and blue conversion. Going from 90 seconds on my system to 30 seconds for the whole process, think that's a very welcome improvement.
I've not looked at the algorithms this time, but I do intend to start some more testing on high ISO images, since those were left out during the initial development and do pose some problems.
I figured out what's happening with the sharper algorithms (essentially color noise gets amplified), so I want to see what can be done about that (if anything) apart from diverting to the 'smooth' algorithm...
I've had several questions today, since the software seems to be 'discovered', sparking a sudden interest... bad timing because I'm off on a short break this week, starting tomorrow (Tuesday), so comments and emails might be left unanswered for a few days...
I suspect to have 0.9.3 beta online by the end of this week or in the coming weekend.
Sunday, September 9, 2012
DNGMonochrome - the next release...
It's not there yet, but currently after a short break, I'm back at it.
It's still Experiment I (for a potential Experiment II, I need to learn some new stuff first)...
I'm currently working on support for Canon files.
Adobe has a free DNG converter, in which you can convert the Canon RAW files (CR2) to DNG. And since I still have many Canon photos in my own collection, I wanted to see if DNGMonochrome could convert those converted CR2 files to monochrome.
It needed some small adaptations, but currently the EOS 350D, EOS 40D are fully supported, and I'm working on the DNGs converted from CR2 files from the 5D Mark II. That seems to be the only 'problem' camera so far and requires some additional coding, since the Bayer filter doesn't seem to be in the correct place for DNGMonochrome.
I've also introduced a new setting for red and blue filtering. It will be possible to filter according to a strength setting (ranging from 'full' to 25%). Especially a 50% red setting gives nice results, possibly comparable to an orange filter.
Not sure yet when the release will be, but I hope within two weeks from now...
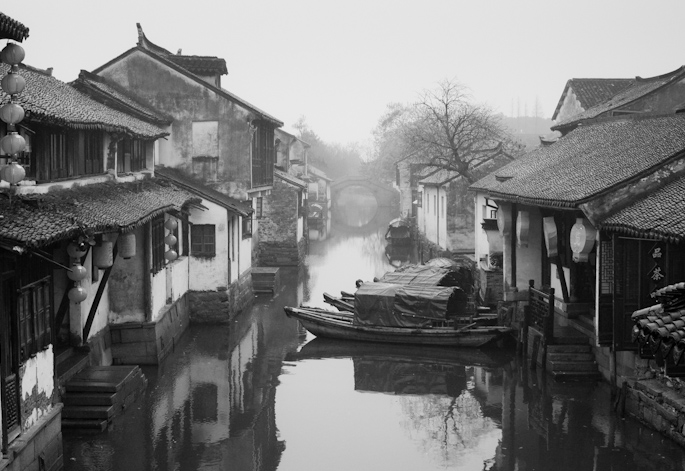
Zhouzhuang, China, December 2007...
Canon EOS 40D with Canon EF 35mm f/2.0 converted to DNG and then to red filtered monochrome with DNGMonochrome...
Subscribe to:
Posts (Atom)